Skip to content
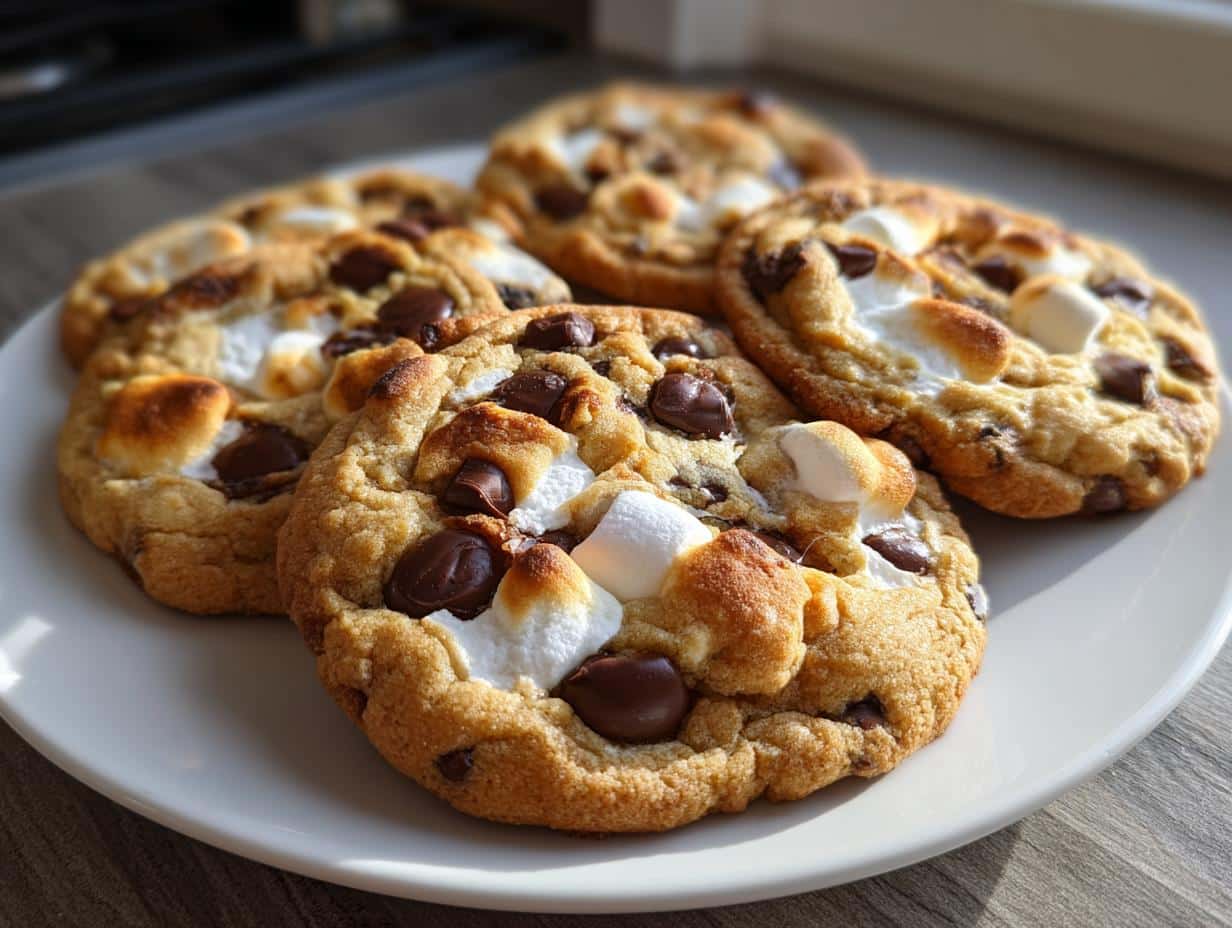
Remember those perfect summer nights by the campfire, when the marshmallows got just golden enough and the chocolate melted into gooey perfection between graham crackers? That’s exactly what I wanted to capture when I created these Soft S’mores Cookies – all the magic of your favorite campfire treat, but ready whenever the craving hits (no bonfire required!). My kids beg for these year-round, especially when we’re feeling nostalgic about our camping trips. The best part? No sticky fingers or smoke in your eyes – just chewy, chocolatey cookies packed with all those classic s’mores flavors we love.
Why You’ll Love These Soft S’mores Cookies
Oh my goodness, where do I even start? These cookies are my absolute go-to when I need a quick dose of happiness. Here’s why they’ll become your new favorite too:
- That chewy texture – just like biting into a perfect campfire s’more, but without the mess!
- So easy to make – seriously, my 8-year-old can practically make these by herself now
- The nostalgic flavor transports you straight back to summer nights under the stars
- Perfect for any occasion – bake sales, midnight snacks, or just because it’s Tuesday
- They make your whole house smell like a cozy campfire (minus the smoke!)
Trust me, once you try these, you’ll never look at regular chocolate chip cookies the same way again!
Ingredients for Soft S’mores Cookies
Okay, let’s gather our cookie magic! Here’s everything you’ll need to make these irresistible treats (and yes, I’ve learned the hard way – measure carefully!):
- 1 cup all-purpose flour – spooned and leveled, please! No packing it in
- 1/2 cup graham cracker crumbs – I crush mine fresh for maximum flavor
- 1/2 tsp baking soda – not powder! This makes them perfectly puffy
- 1/4 tsp salt – just enough to balance the sweetness
- 1/2 cup unsalted butter, softened – leave it out for 30 minutes first
- 1/4 cup granulated sugar – regular white sugar works great
- 1/4 cup brown sugar – packed firmly into the measuring cup
- 1 large egg – room temperature blends best
- 1 tsp vanilla extract – the good stuff makes a difference!
- 1/2 cup mini marshmallows – trust me, minis melt perfectly
- 1/2 cup chocolate chips – I use semi-sweet, but milk chocolate works too
See? Nothing fancy – just simple ingredients that create magic together. Now let’s get mixing!
Equipment You’ll Need
Don’t worry – you won’t need any fancy gadgets for these cookies! Just grab these basics from your kitchen (I bet you already have most of them):
- 2 mixing bowls (one for dry, one for wet ingredients)
- Whisk or fork for blending
- Baking sheet – I like the classic half-sheet size
- Parchment paper (lifesaver for easy cleanup!)
- Spatula for folding in those marshmallows gently
- Cookie scoop or tablespoon for perfect portions
That’s it! Now let’s make some cookie magic happen.
How to Make Soft S’mores Cookies
Alright, let’s dive into the fun part! Making these cookies is seriously easy, but I’ve learned a few tricks over the years that make all the difference. Follow these steps, and you’ll have perfect Soft S’mores Cookies every single time.
Step 1: Preheat and Prep
First things first – turn that oven to 350°F (175°C) and let it heat up while you work. This gives your cookies that perfect bake right from the start. Line your baking sheet with parchment paper – no greasing needed! Trust me, this saves so much cleanup time later.
Step 2: Mix Dry Ingredients
Grab a medium bowl and whisk together the flour, graham cracker crumbs, baking soda, and salt. Don’t skip the whisking! It makes sure everything’s evenly distributed so you don’t get any surprise bites of baking soda. I like to give it about 30 seconds of good whisking action.
Step 3: Cream Butter and Sugars
Now for the magic! In a large bowl, beat the softened butter with both sugars until it’s light and fluffy – about 2 minutes with a mixer. You’ll know it’s ready when the mixture looks almost like pale yellow frosting. This step creates those perfect air pockets that make your cookies wonderfully chewy.
Step 4: Combine Wet and Dry Ingredients
Beat in the egg and vanilla until just combined. Here’s my secret: add the dry ingredients in three batches, mixing gently after each addition. Don’t overmix! Stop as soon as you don’t see any flour streaks. The dough will be thick – that’s exactly what we want.
Step 5: Fold in Marshmallows and Chocolate
Time for the good stuff! Gently fold in the mini marshmallows and chocolate chips with a spatula. Be careful here – marshmallows can get crushed if you’re too rough. I like to save a few extras to press on top of the dough balls before baking for that picture-perfect look.
Step 6: Bake to Perfection
Scoop tablespoon-sized balls onto your prepared sheet (I use a cookie scoop for perfect rounds). Bake for 10-12 minutes until the edges are golden but the centers still look slightly underdone. They’ll continue cooking on the sheet for that perfect chewy texture. Let them cool for 5 minutes before transferring – those melty marshmallows are hot!
See? Told you it was easy! Now try not to eat them all straight off the baking sheet (I never manage to wait).
Tips for Perfect Soft S’mores Cookies
After burning one too many batches (oops!), I’ve learned these tricks make all the difference:
- Don’t overbake! Pull them out when edges are golden but centers look slightly underdone – they’ll firm up as they cool
- Press extra marshmallows on top before baking for that picture-perfect gooey pull
- Use cold dough if your kitchen’s warm – 10 minutes in the fridge prevents spreading
- Rotate your pan halfway through baking for even browning
- Freeze extras! These cookies thaw beautifully for midnight snack emergencies
My biggest tip? Make a double batch – they disappear faster than you’d think!
Ingredient Substitutions and Notes
Listen, I know we don’t always have exactly what a recipe calls for – here’s how to adapt without losing that perfect s’mores magic:
- Gluten-free? Swap the flour 1:1 with your favorite GF blend – just add 1/4 tsp xanthan gum
- Dairy-free? Vegan butter works great, and dark chocolate chips keep it plant-based
- No graham crackers? Crush digestive biscuits or vanilla wafers instead
- Mini marshmallows are key – regular ones create uneven melting pockets
- Brown sugar too packed? Fluff it first, then measure – accuracy matters!
Remember – some swaps change texture slightly, but the flavor will still transport you to campfire bliss!
Storing and Reheating Soft S’mores Cookies
Okay, confession time – these cookies rarely last long enough to store at my house! But when they do (miracle!), here’s how to keep them fresh: store in an airtight container at room temp for up to 3 days. Want that just-baked gooeyness? Pop one in the microwave for 10 seconds – the marshmallows get all melty again! For longer storage, freeze the baked cookies (or even the dough balls) for up to 2 months. Just thaw at room temp or give ’em a quick warm-up in the oven.
Nutritional Information
Just so you know – nutrition varies based on your exact ingredients, but here’s the general idea per cookie (and who stops at just one?): about 120 calories, 6g fat, 15g carbs, and pure happiness. These aren’t health food, folks – they’re little bites of campfire joy!
FAQs About Soft S’mores Cookies
I get asked about these cookies all the time – here are the answers to the questions that pop up most often in my kitchen (and my DMs!):
Can I freeze the dough?
Absolutely! Scoop the dough into balls first, then freeze on a tray before transferring to a bag. They’ll keep for 2 months – just add 1-2 minutes to the bake time straight from frozen. Perfect for spontaneous cookie cravings!
Why do my marshmallows disappear?
Ah, the great marshmallow mystery! If they’re melting completely, try pressing a few extras on top right after baking. Also, make sure you’re using mini marshmallows – the regular ones tend to vanish into the dough.
Can I make these gluten-free?
You bet! Swap the flour 1:1 with your favorite gluten-free blend (I like the ones with xanthan gum already added). The graham crumbs might need replacing too – gluten-free graham crackers or crushed gluten-free vanilla wafers work beautifully.
How do I get that perfect chewy texture?
Two secrets: 1) Don’t overbake! Pull them when the edges are golden but centers look slightly underdone. 2) That brown sugar is key – it adds moisture for that signature chew. Pack it firmly when measuring!
Why aren’t my cookies spreading?
If they’re staying in little balls, your butter might’ve been too cold or you overmixed the dough. Next time, make sure your butter is properly softened (finger-indent soft) and mix just until combined – no more!
Share Your Soft S’mores Cookies
I’d love to see your cookie creations! Snap a pic and tag me – nothing makes me happier than seeing your kitchen filled with that same campfire magic. Happy baking, friends!
Print
9 Secrets to Perfect Soft S’mores Cookies Every Time
- Total Time: 27 minutes
- Yield: 24 cookies
- Diet: Vegetarian
Description
Soft S’mores Cookies bring the campfire treat to your kitchen any time of year. These chewy cookies combine graham cracker crumbs, marshmallows, and chocolate chips for a nostalgic flavor.
Ingredients
- 1 cup all-purpose flour
- 1/2 cup graham cracker crumbs
- 1/2 tsp baking soda
- 1/4 tsp salt
- 1/2 cup unsalted butter, softened
- 1/4 cup granulated sugar
- 1/4 cup brown sugar
- 1 large egg
- 1 tsp vanilla extract
- 1/2 cup mini marshmallows
- 1/2 cup chocolate chips
Instructions
- Preheat your oven to 350°F (175°C). Line a baking sheet with parchment paper.
- In a bowl, whisk flour, graham cracker crumbs, baking soda, and salt.
- In another bowl, cream butter, granulated sugar, and brown sugar until fluffy.
- Beat in egg and vanilla extract.
- Gradually mix dry ingredients into wet ingredients.
- Fold in marshmallows and chocolate chips.
- Scoop dough into 1-inch balls and place on baking sheet.
- Bake for 10-12 minutes until edges are golden.
- Let cool on baking sheet for 5 minutes before transferring to a wire rack.
Notes
- Store cookies in an airtight container for up to 3 days.
- For extra gooeyness, press additional marshmallows on top before baking.
- Use mini chocolate chips for even distribution.
- Prep Time: 15 minutes
- Cook Time: 12 minutes
- Category: Dessert
- Method: Baking
- Cuisine: American