Skip to content
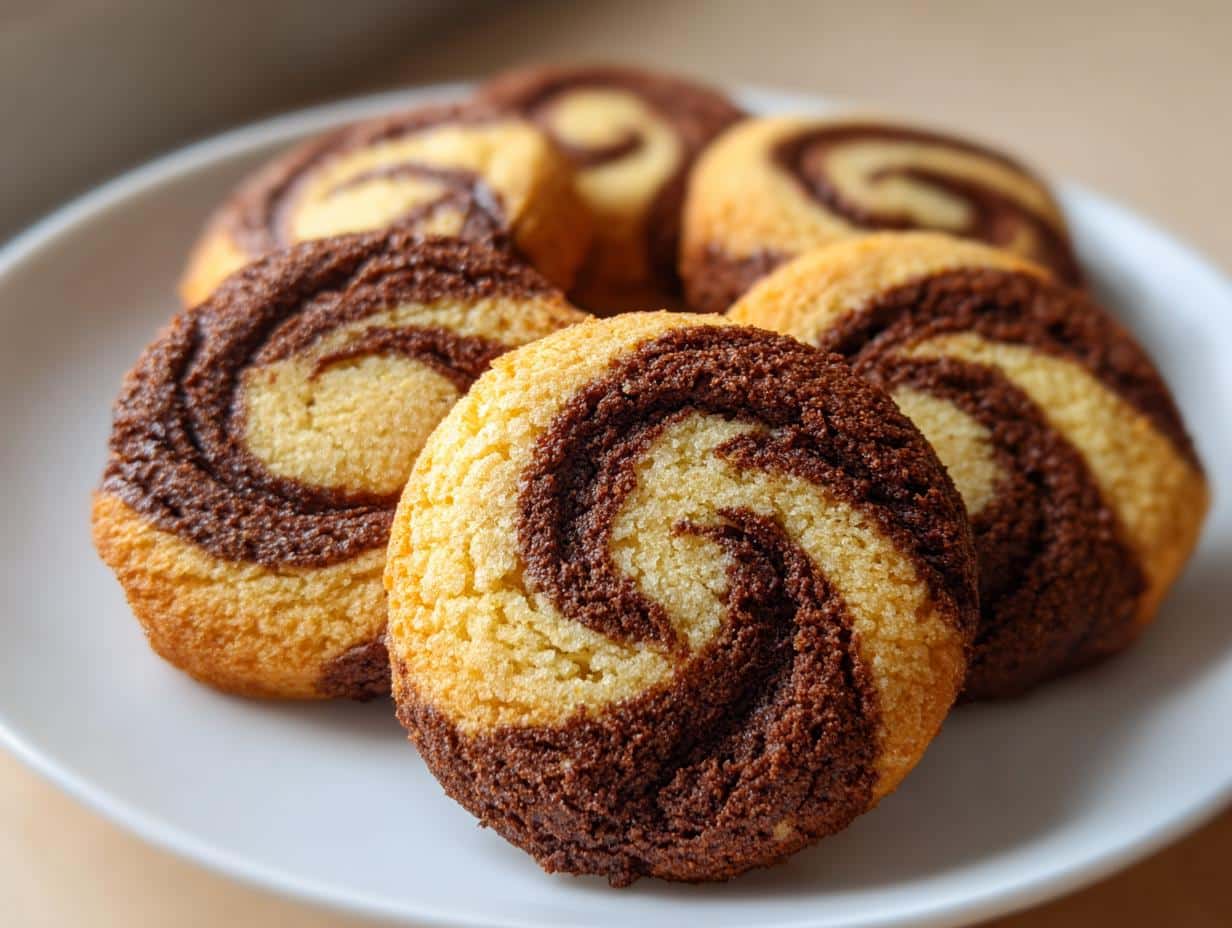
You know those treats that make everyone stop and say “Wow!”? That’s exactly what happens every time I pull out a batch of these Magical Spiral Cookies from The Boat Shed Kitchen. I still remember the first time I made them for my niece’s birthday party – kids and adults alike couldn’t stop marveling at the beautiful swirls!
What started as a simple cookie recipe in my grandmother’s notebook transformed into our family’s go-to special occasion treat. There’s something truly magical (see what I did there?) about slicing that chilled dough log and watching those perfect spirals appear. Whether it’s holiday gatherings, bake sales, or just because-Tuesdays, these cookies never fail to delight both the eyes and the taste buds.
Why You’ll Love These Magical Spiral Cookies
Let me tell you why these cookies became my signature bake – they’re absolute showstoppers! First off, that gorgeous swirl makes them look like you spent hours in the kitchen (our little secret – it’s way easier than it looks). But beyond their beauty, here’s what really makes them special:
- They’re like edible rainbows – swap cocoa for food coloring and create any color combo you dream up
- The texture? Perfectly crisp edges with a slightly chewy center that melts in your mouth
- Package them in cute boxes or tins and voilà – instant homemade gifts that wow everyone
- Kids adore helping roll the dough (and sneaking tastes of course)
Trust me, once you bake these, you’ll understand why I’m completely obsessed!
Ingredients for Magical Spiral Cookies
Okay, let’s talk ingredients – and I mean the good stuff! After years of testing, I’ve learned these exact measurements create the most magical swirls. You’ll need:
- 2 cups all-purpose flour (spooned and leveled – no packing!)
- 1/2 cup granulated sugar (the regular white kind works perfectly)
- 1/2 cup unsalted butter, softened (leave it out for 30 minutes – trust me, it makes all the difference)
- 1 large egg (room temperature helps it blend smoothly)
- 1 tsp pure vanilla extract (none of that imitation stuff!)
- 1/4 tsp fine sea salt (balances the sweetness just right)
- 1 tbsp cocoa powder (for that gorgeous chocolate swirl)
- 1 tbsp milk (whole milk gives the richest flavor)
See? Nothing fancy – just quality ingredients that do magical things when combined!
Equipment You’ll Need
Don’t worry – you won’t need any fancy gadgets for these magical cookies! Just grab these kitchen basics:
- A sturdy mixing bowl (I swear by my grandma’s old ceramic one)
- Wooden spoon or hand mixer (both work great)
- Rolling pin (any size will do)
- Baking sheet lined with parchment paper (no sticking!)
- Sharp knife for clean slices
That’s it! See? I told you this magic was simple.
How to Make Magical Spiral Cookies
Alright, let’s get to the fun part – making those gorgeous spirals come to life! I’ve made this recipe dozens of times, and these steps never fail me. Just follow along, and you’ll have picture-perfect cookies in no time.
Preparing the Dough
First things first – preheat that oven to 350°F (175°C). While it’s heating up, let’s make magic happen! Cream together the softened butter and sugar until it’s light and fluffy – this takes about 2 minutes with a mixer or 3-4 minutes by hand. You’ll know it’s ready when it looks like pale yellow clouds!
Beat in the egg and vanilla until fully combined. Now gradually add the flour and salt – I do this in three additions to prevent flying flour clouds! The dough should come together nicely but not be sticky. If it feels too soft, pop it in the fridge for 15 minutes.
Creating the Swirl
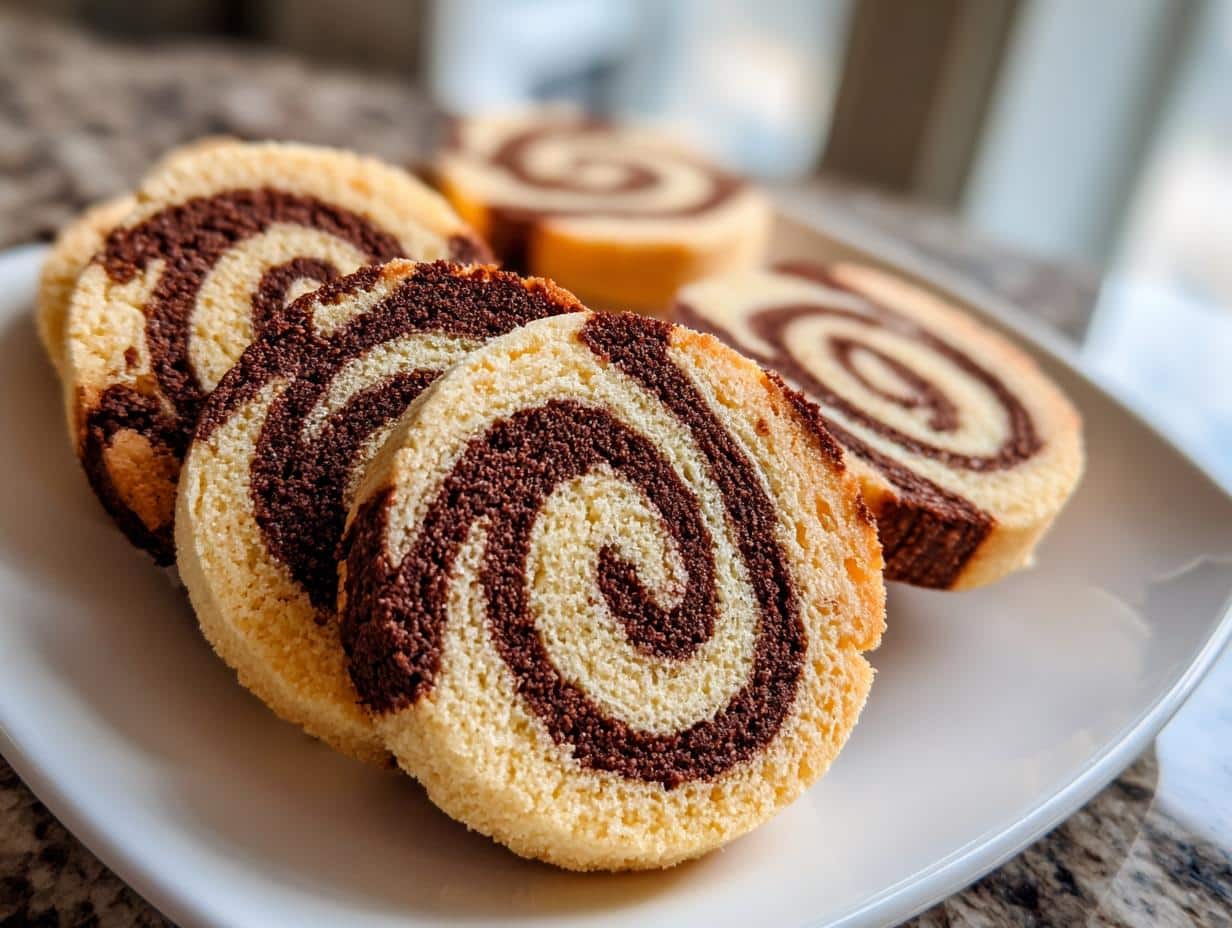
Here’s where the real fun begins! Divide your dough into two equal balls. Mix cocoa powder and milk into one portion until it’s evenly chocolatey. Now roll each dough between two sheets of parchment into rectangles about 1/4-inch thick.
Carefully place the chocolate sheet on top of the vanilla one. Starting from the long side, roll them up tightly like a jelly roll. If the dough gets too soft, wrap it in plastic and chill for 20 minutes – this makes slicing much easier!
Baking and Cooling
Slice your beautiful log into 1/2-inch rounds with a sharp knife. Place them on parchment-lined baking sheets about 2 inches apart – they’ll spread just a bit. Bake for 10-12 minutes until the edges are lightly golden.
Here’s my golden rule: let them cool on the baking sheet for 5 minutes before transferring to a wire rack. This keeps them from breaking and gives you those perfect crisp edges with soft centers. Try not to eat them all at once!
Tips for Perfect Magical Spiral Cookies
After burning through more dough than I’d like to admit, I’ve learned a few tricks that guarantee perfect spirals every time. First – chill that dough! Even 30 minutes in the fridge makes slicing so much cleaner. Use the sharpest knife you’ve got (I stole my husband’s chef’s knife for this) and wipe it between cuts for neat edges.
Oh! And don’t forget to rotate your baking sheet halfway through – that ensures even browning. If your kitchen’s warm, work quickly or pop the sliced cookies in the fridge while the first batch bakes. These little tricks make all the difference between good cookies and magical ones!
Variations for Magical Spiral Cookies
Oh, the possibilities! Once you’ve mastered the basic swirl, it’s time to play. My favorite twist? Swap cocoa for gel food coloring – a few drops create vibrant rainbow cookies that kids go crazy for. For grown-up flavors, try mixing orange zest into the vanilla dough or cinnamon into the chocolate. Last Christmas, I did peppermint extract with red food coloring – instant holiday magic!
Storing and Serving Magical Spiral Cookies
Here’s the best part – these beauties stay fresh for days! Store them in an airtight container at room temperature (I use my grandma’s old cookie tin) and they’ll keep their magic for up to 5 days. Want that just-baked crispness? Pop them in a 300°F oven for 2 minutes – instant revival!
For serving, I love arranging them on vintage cake stands or wrapping bundles in parchment paper tied with twine. They disappear fast either way!
Nutritional Information
Here’s the scoop on what’s in these magical bites – each cookie contains about 120 calories. Remember, these values are estimates and might change slightly depending on your exact ingredients. Enjoy responsibly (or not – I won’t judge)!
FAQs About Magical Spiral Cookies
Q1. Can I freeze the dough for later?
Absolutely! The dough freezes beautifully. Just wrap your spiral log tightly in plastic wrap, then foil, and pop it in the freezer for up to 3 months. When you’re ready to bake, let it thaw in the fridge overnight before slicing – no need to adjust baking time!
Q2. How do I prevent cracks when rolling?
The secret is keeping your dough happy! If it starts cracking while rolling, it’s probably too cold. Let it sit at room temperature for 5 minutes. Too sticky? A light dusting of flour on your rolling pin works wonders. And remember – gentle pressure creates the smoothest spirals.
Q3. Can I make these gluten-free?
I’ve had great success with a 1:1 gluten-free flour blend! The texture might be slightly more delicate, so handle the dough gently. My friend swears by adding 1/4 tsp xanthan gum for better structure too.
Q4. Why did my swirls come out blurry?
This usually means the dough was too warm when sliced. Chill that log for at least 30 minutes, and use a sharp knife wiped clean between cuts. Also, don’t press down too hard when slicing – let the knife do the work!

Magical Spiral Cookies: 5 Secrets to Perfect Swirls Every Time
- Total Time: 32 minutes
- Yield: 24 cookies
- Diet: Vegetarian
Description
Magical Spiral Cookies are visually stunning and delicious treats with a swirl of two-toned dough. Perfect for any occasion.
Ingredients
- 2 cups all-purpose flour
- 1/2 cup granulated sugar
- 1/2 cup unsalted butter, softened
- 1 egg
- 1 tsp vanilla extract
- 1/4 tsp salt
- 1 tbsp cocoa powder
- 1 tbsp milk
Instructions
- Preheat oven to 350°F (175°C).
- Cream butter and sugar until light and fluffy.
- Add egg and vanilla, mix well.
- Gradually add flour and salt, mix until dough forms.
- Divide dough into two equal parts.
- Mix cocoa powder and milk into one half.
- Roll each dough into a rectangle.
- Place one dough on top of the other and roll into a log.
- Slice into 1/2-inch pieces and bake for 10-12 minutes.
- Cool on a wire rack before serving.
Notes
- Chill dough for 30 minutes for easier handling.
- Use food coloring for different colors.
- Store in an airtight container for up to 5 days.
- Prep Time: 20 minutes
- Cook Time: 12 minutes
- Category: Dessert
- Method: Baking
- Cuisine: International