Skip to content
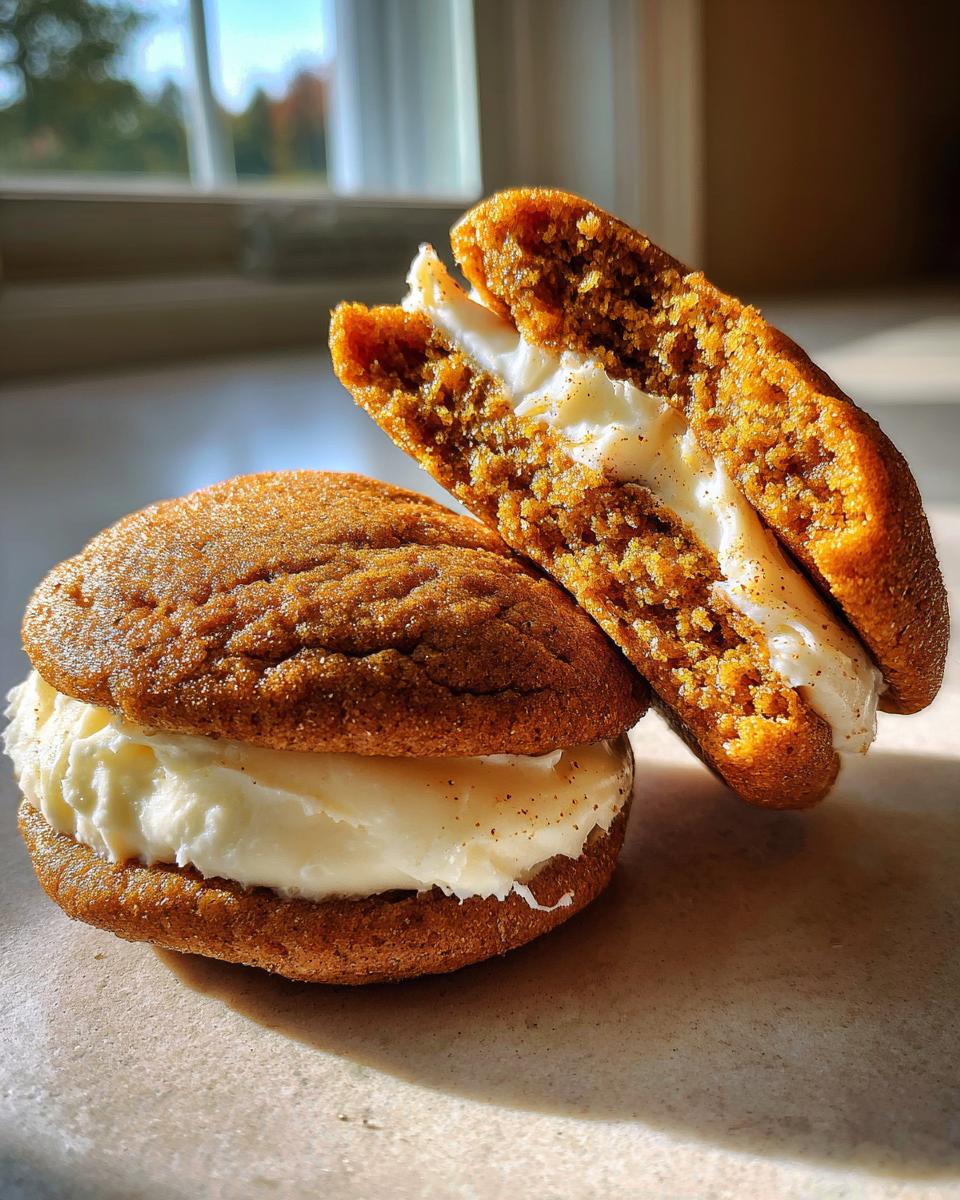
Oh, you’re in for a treat! These apple cider whoopie pies are my absolute favorite fall indulgence – soft, spiced cookies hugging a dreamy cream cheese filling that melts in your mouth. I first tried making them a few years ago when I had extra apple cider after a trip to the orchard, and wow, what a happy accident that turned out to be! The warm cinnamon and ginger make your kitchen smell amazing while they bake, and that creamy center? Pure magic. They’re like autumn in dessert form – cozy, comforting, and perfect for sharing (or not, no judgment here). Trust me, one bite and you’ll be hooked just like I was!
Why You’ll Love These Apple Cider Whoopie Pies
Let me tell you why these little guys are about to become your new obsession:
- That melt-in-your-mouth texture – soft as a cloud with just the right amount of chew
- Warm spices that hug your tastebuds – cinnamon, ginger, and nutmeg create the coziest flavor combo
- Easier than pie (literally!) – no fancy skills needed, just mix, scoop, and sandwich
- Instant crowd-pleaser – bring these to any fall gathering and watch them disappear
- That apple cider magic – gives the cookies the most incredible moistness and subtle tang
Seriously, one bite and you’ll understand why I make triple batches every autumn!
Ingredients for Apple Cider Whoopie Pies
Now let’s gather up everything we need to make these little pockets of autumnal joy! I like to separate everything into bowls before I start – it makes the whole process so much smoother. Pro tip: when I’m really organized, I even line up my spices in the order I’ll use them. My kitchen might look like a baking tornado hit it by the end, but at least I start off neat!
For the Cookies
First up, the dry ingredients – these are the backbone of our spiced cookies:
- 2 cups all-purpose flour (spoon and leveled, please – no packed flour!)
- 1 tsp baking soda
- 1 tsp cinnamon (the good stuff, not that dusty old bottle in the back of your pantry)
- 1/2 tsp ginger (freshly ground if you’re feeling fancy)
- 1/4 tsp nutmeg (just enough to whisper “hello” without shouting)
- 1/4 tsp salt (balances all that sweetness perfectly)
Now for the wet team – these are what make our cookies moist and flavorful:
- 1/2 cup unsalted butter, softened (I leave mine out overnight – no microwave cheating!)
- 1 cup brown sugar, packed (dark brown if you’ve got it for extra molasses goodness)
- 1 large egg (room temp is best – just set it out with the butter)
- 1/2 cup apple cider (the real fresh-pressed stuff makes all the difference)
- 1/2 cup buttermilk (no substitutions here – the tang is essential)
- 1 tsp vanilla extract (the good stuff, not imitation)
For the Cream Cheese Filling
This filling is so good you’ll want to eat it with a spoon (I won’t tell if you do):
- 1/2 cup unsalted butter, softened (yes, more butter – we’re making magic here)
- 1 1/2 cups powdered sugar (sifted if you’re fancy, but I often skip this step)
- 4 oz cream cheese, softened (full-fat only, please – this is dessert, not diet food)
- 1 tsp vanilla extract (just like in the cookies)
See that “softened” note on the butter and cream cheese? Don’t ignore it! Cold ingredients will give you lumpy filling, and we want this smooth as silk. I’ve learned that one the hard way!
How to Make Apple Cider Whoopie Pies
Alright, let’s get baking! I promise this process is way easier than it looks. The first time I made these, I was convinced I’d mess them up, but they’re surprisingly forgiving. Just follow these steps, and you’ll have perfect little whoopie pies before you know it!
Mixing the Cookie Dough
First things first – let’s make that spiced cookie dough that smells like autumn in a bowl:
- Grab your biggest mixing bowl (trust me, you’ll need the space) and cream together the softened butter and brown sugar. This is where the magic starts! Beat them until they’re light and fluffy – about 2-3 minutes with a hand mixer. You’ll know it’s ready when the mixture looks almost like wet sand and has lightened in color.
- Add the egg and beat until fully incorporated. Then pour in the apple cider, buttermilk, and vanilla. Don’t panic if it looks a bit curdled at this point – that’s totally normal! The dry ingredients will bring it all together.
- Now, gradually add your flour mixture. I do this in about three additions, mixing just until combined each time. Overmixing is the enemy here – we want tender cookies, not tough ones! The dough should be thick but scoopable, like a slightly wetter brownie batter.
- Optional but recommended: If you’ve got time, chill the dough for 30 minutes. This helps prevent spreading and gives you thicker, more bakery-style cookies. But if you’re impatient like me sometimes, you can skip this step – they’ll still taste amazing!
Baking the Cookies
Now for the fun part – turning that dough into perfect little cookie rounds:
- Preheat your oven to 350°F (175°C) and line your baking sheets with parchment paper. This is non-negotiable in my kitchen – it prevents sticking and makes cleanup a breeze!
- Use a tablespoon cookie scoop or two spoons to drop dough onto your prepared sheets. Space them about 2 inches apart – they’ll spread just a bit as they bake. I like to make them slightly smaller than golf balls for the perfect whoopie pie size.
- Bake for 10-12 minutes. You’re looking for the edges to be set but the centers still soft – they’ll firm up as they cool. Don’t overbake them, or you’ll lose that wonderful soft texture! The cookies should spring back lightly when touched.
- Let them cool on the baking sheet for 5 minutes, then transfer to a wire rack to cool completely. This is the hardest part – resisting the urge to eat them warm! But trust me, they’re worth the wait when properly filled.
Preparing the Filling
While those beauties are cooling, let’s whip up that dreamy cream cheese filling:
- In a clean bowl, beat the softened butter and cream cheese together until completely smooth. No lumps allowed! This takes about 1-2 minutes with a hand mixer on medium speed.
- Gradually add the powdered sugar, about 1/2 cup at a time, beating well after each addition. Scrape down the sides of the bowl often – those sneaky powdered sugar pockets love to hide!
- Add the vanilla and beat for another minute until the filling is light, fluffy, and holds its shape. It should be thick enough to hold a peak when you lift the beaters. If it’s too soft, you can chill it for 15 minutes before using.
Assembling the Whoopie Pies
Now for the best part – creating those perfect little sandwiches:
- Match up your cooled cookies in pairs of similar sizes. Flip one cookie from each pair upside down – this will be your bottom.
- Using a spoon or piping bag, dollop about 1-2 tablespoons of filling onto the flat side of the bottom cookie. I like to spread it slightly toward the edges but not all the way – you want that filling to peek out when you sandwich them.
- Gently press the matching cookie on top, flat side down. Give it a little twist as you press to help the filling spread evenly. Don’t squish too hard – we want some height to our whoopie pies!
- Repeat with all your cookies, then take a step back and admire your handiwork. See? I told you it was easy! Now try to resist eating them all at once – they’re best if you let them sit for about 30 minutes so the flavors can mingle.
Tips for Perfect Apple Cider Whoopie Pies
After making dozens (okay, maybe hundreds) of batches, here are my foolproof tips for whoopie pie perfection:
- Chill that dough! Just 30 minutes in the fridge prevents flat cookies and gives you that perfect domed shape.
- Fresh cider is key – the bottled stuff just doesn’t give the same bright, tangy flavor.
- Room temp ingredients matter – cold butter and cream cheese won’t cream properly.
- Don’t overbake – pull them when the edges are set but centers still look slightly underdone.
- Airtight is right – store them in a sealed container with parchment between layers to prevent sticking.
Follow these, and you’ll get bakery-quality whoopies every single time!
Variations & Substitutions
Listen, I’m all for the classic recipe, but sometimes you gotta mix things up! Here are my favorite twists that still deliver that amazing whoopie pie experience:
- Sweetener swap: Replace half the brown sugar with pure maple syrup for deeper flavor (reduce apple cider by 2 tbsp to balance moisture).
- Dairy-free magic: Use plant-based butter and coconut yogurt instead of buttermilk. For the filling, try vegan cream cheese – it works surprisingly well!
- Spice it up: Add a pinch of cardamom or allspice to the dry ingredients for extra warmth.
- Nutty variation: Fold in 1/2 cup chopped toasted pecans or walnuts to the dough for crunch.
- Boozy twist: Soak raisins in bourbon for 30 minutes, then pat dry and mix into the dough (adds such a grown-up kick!).
The beauty of these whoopie pies? They’re like a blank canvas for your creativity. Just promise me one thing – don’t skip that apple cider! It’s what makes them truly special.
Storing and Serving Apple Cider Whoopie Pies
Now that you’ve made these little beauties, let’s talk about keeping them fresh and serving them up right! Nothing breaks my heart more than seeing perfect whoopie pies go stale – unless it’s watching someone eat them straight from the fridge (cold filling? No thank you!). Here’s how I handle my precious stash:
Keeping Them Fresh
These whoopie pies are best enjoyed within 3 days – not that they ever last that long in my house! Store them in an airtight container at room temperature with parchment paper between layers. That cream cheese filling stays perfectly creamy this way.
Got a humid kitchen? Toss in a couple of those silica gel packs (you know, the ones that come in shoe boxes) to absorb excess moisture. They’ll prevent the cookies from getting soggy. And whatever you do, don’t refrigerate them unless it’s absolutely necessary – that just dries everything out!
Freezing for Later
Want to make them ahead? You’re brilliant! Here’s my trick: freeze the unfilled cookies in a single layer, then transfer to a freezer bag once solid. The filling freezes great too – just portion it into a container. When the craving hits, thaw everything at room temp for an hour, then assemble. They taste just-baked fresh this way!
Serving Suggestions
These whoopie pies shine brightest with a hot drink. My personal favorites:
- Spiced coffee – the cinnamon notes in both make magic together
- Warm apple cider – double down on that apple goodness!
- Chai tea latte – the spices play so nicely together
For parties, I arrange them on a cake stand with cinnamon sticks and apple slices – instant autumn vibes! And if you really want to impress, dust them with a little cinnamon sugar right before serving. The sparkle makes them extra special.
One last tip? Let them sit at room temperature for about 15 minutes before serving if they’ve been stored. That cream cheese filling gets extra dreamy when it’s not ice cold. Now go enjoy your perfect little autumn treats – you’ve earned it!
Apple Cider Whoopie Pies Nutritional Information
Okay, let’s be real – we’re not eating whoopie pies for their health benefits! But just in case you’re curious (or need to justify eating three at once), here’s the nutritional breakdown per serving. Remember, these numbers are estimates – your actual counts might vary slightly depending on exact ingredients and sizes. I always say life’s too short to stress over dessert calories, but knowledge is power, right?
- Serving Size: 1 whoopie pie (about the size of your palm)
- Calories: 280 (worth every single one!)
- Total Fat: 12g (7g saturated – that’s the good butter and cream cheese doing their thing)
- Cholesterol: 45mg
- Sodium: 120mg
- Total Carbohydrates: 38g (including 1g fiber and 22g sugars – hello, brown sugar and apple cider!)
- Protein: 3g (not bad for a dessert!)
A little nutritionist tip from my sister (who rolls her eyes at my baking habits): If you want to balance things out, pair your whoopie pie with some protein like Greek yogurt or nuts. But between you and me? Sometimes you just need to enjoy the sweet moment without overthinking it. Life’s about balance – and sometimes that means balancing a whoopie pie in each hand!
FAQs About Apple Cider Whoopie Pies
After making these whoopie pies more times than I can count, I’ve fielded every question imaginable! Here are the answers to the ones I get asked most often:
Can I freeze apple cider whoopie pies?
Absolutely! These freeze like a dream. Here’s my method: freeze unfilled cookies in a single layer first, then stack them with parchment paper in between. The filling freezes great too – just store it separately in an airtight container. When the craving hits, thaw at room temperature for about an hour before assembling. They taste freshly made!
How can I reduce the sweetness?
I get it – sometimes you want less sugar but all the flavor! Try these tweaks:
- Cut the powdered sugar in the filling to 1 cup instead of 1½
- Use half brown sugar, half granulated in the cookies
- Add a pinch of salt to the filling to balance sweetness
The apple cider’s natural tartness helps too!
Why did my cookies spread too much?
Oh honey, I’ve been there! Usually it’s one of three things:
- Butter was too soft (should leave a slight indent when pressed)
- Dough wasn’t chilled (that 30-minute fridge time really helps)
- Old baking soda (check the expiration date!)
Next time, try chilling the dough and baking one test cookie first – you can always adjust!
Can I use store-bought apple cider?
You can, but fresh-pressed makes all the difference! The bottled stuff often lacks that bright, tangy flavor we love. If you must use store-bought, reduce it by simmering ½ cup down to ¼ cup to concentrate the flavor. Your whoopie pies will thank you!
How do I prevent lumpy filling?
This one’s easy – just make sure your butter and cream cheese are truly softened (not melted!) before mixing. I leave mine out overnight. And always beat the butter and cream cheese together first until completely smooth before adding sugar. Lumpy filling trauma = avoided!

Apple Cider Whoopie Pies: 7 Ways to Bake Perfect Fall Cookies
- Total Time: 32 mins
- Yield: 12 whoopie pies
- Diet: Vegetarian
Description
Soft spiced cookies sandwiched with a creamy filling, perfect for fall or any occasion.
Ingredients
- 2 cups all-purpose flour
- 1 tsp baking soda
- 1 tsp cinnamon
- 1/2 tsp ginger
- 1/4 tsp nutmeg
- 1/4 tsp salt
- 1/2 cup unsalted butter, softened
- 1 cup brown sugar
- 1 large egg
- 1/2 cup apple cider
- 1/2 cup buttermilk
- 1 tsp vanilla extract
- For the filling: 1/2 cup unsalted butter, softened
- 1 1/2 cups powdered sugar
- 4 oz cream cheese, softened
- 1 tsp vanilla extract
Instructions
- Preheat oven to 350°F. Line baking sheets with parchment paper.
- Whisk flour, baking soda, cinnamon, ginger, nutmeg, and salt in a bowl.
- Cream butter and brown sugar until light. Add egg, apple cider, buttermilk, and vanilla.
- Gradually mix in dry ingredients until combined.
- Drop tablespoon-sized dough onto baking sheets, spacing 2 inches apart.
- Bake for 10-12 minutes. Cool on a wire rack.
- For the filling, beat butter, powdered sugar, cream cheese, and vanilla until smooth.
- Spread filling on flat side of one cookie and sandwich with another.
Notes
- Chill dough for 30 minutes for thicker cookies.
- Store in an airtight container for up to 3 days.
- Use fresh apple cider for best flavor.
- Prep Time: 20 mins
- Cook Time: 12 mins
- Category: Dessert
- Method: Baking
- Cuisine: American