Skip to content
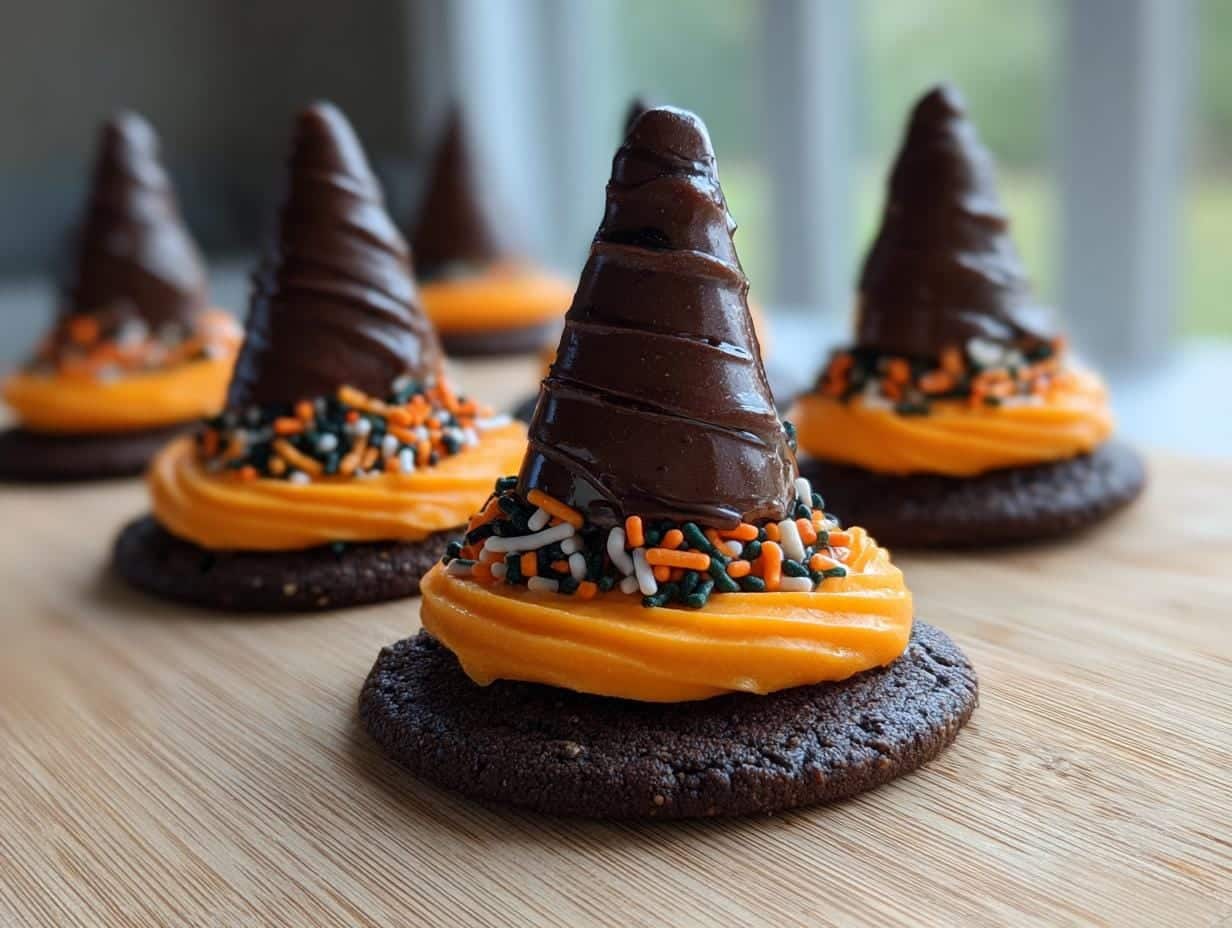
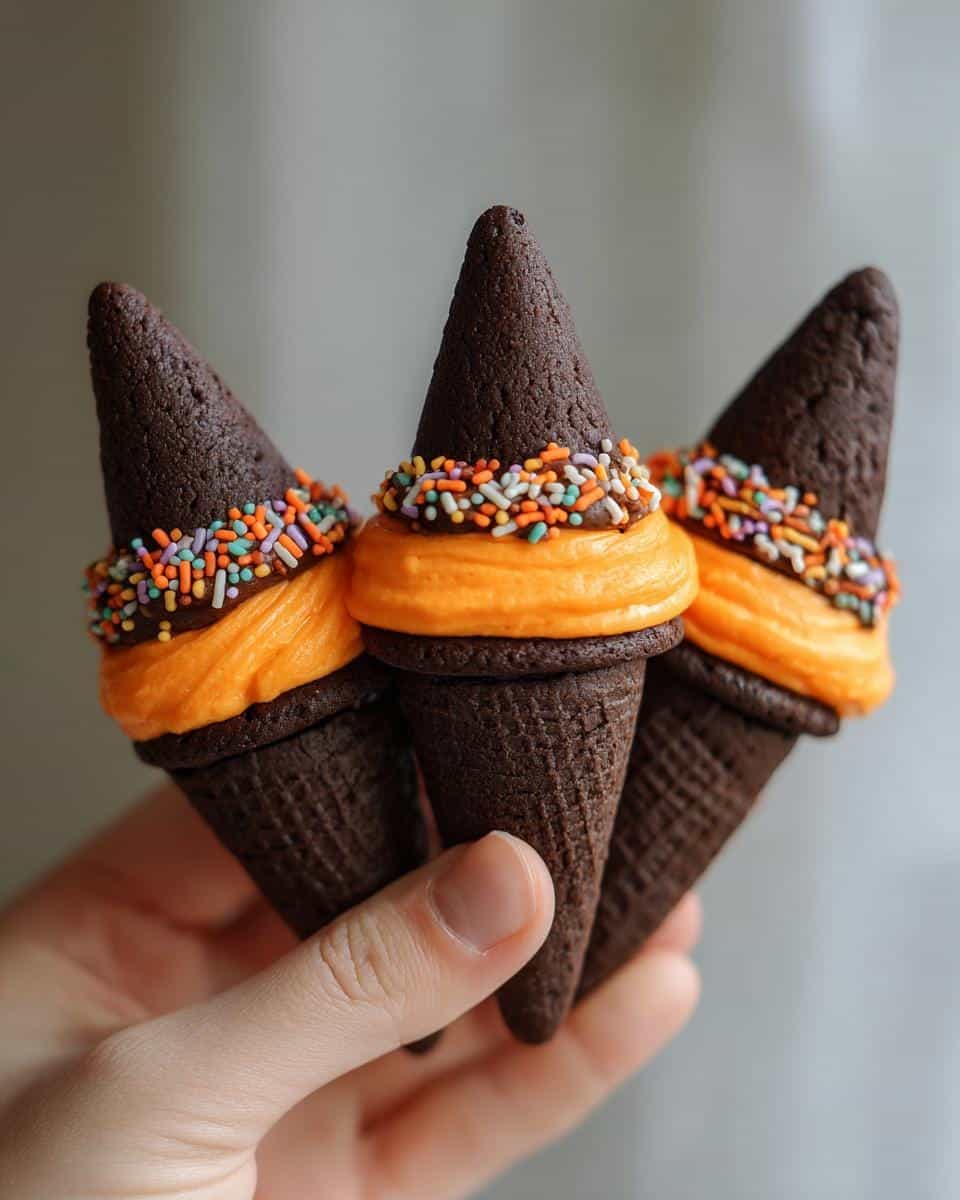
Oh my gosh, you HAVE to try these Witch Hat Cookies this Halloween! They’re the cutest, easiest spooky treat—perfect for parties or just a fun afternoon with kids. I’ve been making them for years, and trust me, even if you’re usually all thumbs in the kitchen, you can’t mess these up. No baking required, just some frosting, sugar cones, and a little creativity. My nieces go wild decorating them—last year we did neon purple bands and edible glitter, and they looked like something out of a witch’s candy shop. Whether you’re a seasoned dessert pro or a total newbie, these no-bake Witch Hat Cookies will steal the show.

Table of contents:
Why You’ll Love These Witch Hat Cookies
Seriously, what’s not to love about these adorable treats? Here’s why they’re my Halloween go-to:
- No-bake magic: Zero oven time means you’re just 15 minutes away from spooky-ready cookies—perfect for last-minute party prep!
- Kid-approved fun: Little hands can help assemble (and sneak sprinkles). Watching their faces light up when the cones become hats? Priceless.
- Totally customizable: Swap frosting colors, add edible glitter, or even use striped cones—each batch becomes your own wicked creation.
- Store-bought shortcuts welcome: Grabbing pre-made cookies and frosting? No judgment here. They’ll still look and taste fantastic.
Ingredients for Witch Hat Cookies
Here’s what you’ll need to whip up a batch of these adorable spooky treats:
- 24 store-bought chocolate cookies (about 2-inch diameter works best)
- 24 sugar cones (those pointy ice cream cones—trust me, they make perfect witch hats!)
- 1 cup prepared chocolate frosting (homemade or store-bought—I won’t tell)
- ½ cup orange frosting (or any color you like for decoration)
- Sprinkles or edible glitter (optional, but oh-so-fun!)
Ingredient Substitutions & Notes
No chocolate cookies? Vanilla works too—just pretend they’re ghost hats! If you’re out of frosting, melted chocolate chips make great “glue.” Want different colors? A drop of gel food coloring transforms white frosting into any witchy hue. Pro tip: Sugar cones can be fragile—handle gently when flipping them upside down, or you’ll end up with broken witch crowns!
How to Make Witch Hat Cookies
Okay, let’s turn these simple ingredients into the cutest witch hats ever—it’s seriously foolproof! Here’s how I do it:
- Set up your cookies: Lay out all your chocolate cookies on a flat surface (I use a big cutting board or baking sheet so I can move them later).
- Flip those cones: Turn each sugar cone upside down—this is your hat’s pointy top! Dab a teaspoon of chocolate frosting on the wide end like you’re gluing it, then press gently onto the center of a cookie. Hold for 3 seconds—boom, instant hat shape!
- Add the magic band: Spoon your colored frosting into a piping bag (or ziplock with the corner snipped) and pipe a thick ring around the base where the cone meets the cookie. This hides the “seam” and makes it look like a proper witch’s hat band.
- Bedazzle them: While the frosting’s still wet, go wild with sprinkles or edible glitter. Pro move: Tilt the cookie slightly and roll the sprinkles against the band for full coverage.
- Let them set: Leave the witch hat cookies alone for at least 30 minutes so the frosting hardens—otherwise, you’ll have leaning towers of Halloween!
Pro Tips for Perfect Witch Hat Cookies
Avoid runny frosting disaster: If your “glue” is too soft, chill the frosting for 10 minutes first. Gentle hands win: Press cones lightly—they crack if you bear down. Piping bag hack: No fancy tools? Snip the tiniest hole in a plastic bag for precise bands. And if hats wobble? Prop them against a mug while drying!
Storing & Serving Witch Hat Cookies
These little witch hats hold up surprisingly well—just pop them in an airtight container at room temperature for up to 3 days. No stacking! (You don’t want crushed pointy hats.) For a killer Halloween party display, arrange them on a cake stand with fake spiderwebs and twinkle lights—they’ll vanish faster than a witch on a broomstick!
Witch Hat Cookies Variations
Once you’ve mastered the basic witch hats, the spooky fun really begins! Try lime-green frosting bands for an extra-witchy look, or crush some chocolate cookies to press onto the frosting “glue” before adding cones—like creepy dirt bases. For next-level details, add thin licorice straps as buckles or frayed ribbon. Want edible “stars”? Dot the hats with silver dragees! My neighbor’s kids once made a whole coven with different colored bands—purple, black, and electric blue—lined up like a proper witch hat collection.
Witch Hat Cookies Nutritional Information
Nutrition varies by ingredients, but here’s the general estimate per cookie: about 120 calories, 18g carbs (10g sugar), and 5g fat. Not too wicked for such a fun treat! Store-bought ingredients may slightly alter these numbers, but hey—it’s Halloween, live a little.
FAQs About Witch Hat Cookies
Can I make these ahead? Absolutely! Assemble them the day before your party—just store in an airtight container so the cookies stay fresh and the frosting doesn’t dry out.
Gluten-free option? Easy-peasy! Simply use gluten-free chocolate cookies and check that your sugar cones are GF (most are, but always double-check labels).
How to transport safely? Use a shallow container with a single layer—I prop mine between sheets of parchment so the hat points don’t bump into each other during travel.
Share Your Spooky Creations
I’d love to see your witchy masterpieces! Tag me on Pinterest or Instagram—show me how you decorated your hat cookies this year!
Print
7 Irresistibly Cute Witch Hat Cookies You Can Make Now
- Total Time: 15 minutes
- Yield: 24 cookies
- Diet: Vegetarian
Description
Witch Hat Cookies are a fun and easy Halloween treat. These cookies feature a sugar cone placed on a cookie base with frosting to create a spooky witch hat look.
Ingredients
- 24 chocolate cookies (store-bought or homemade)
- 24 sugar cones
- 1 cup chocolate frosting
- 1/2 cup orange frosting (or any color for decoration)
- Sprinkles or edible glitter (optional)
Instructions
- Place chocolate cookies on a flat surface.
- Flip a sugar cone upside down and attach it to the center of each cookie using chocolate frosting.
- Pipe a ring of orange frosting around the base of the sugar cone to resemble the hat’s band.
- Add sprinkles or edible glitter for extra decoration.
- Let the frosting set before serving.
Notes
- Use store-bought cookies and frosting for a quicker option.
- Adjust the frosting color to match your Halloween theme.
- Store in an airtight container to keep fresh.
- Prep Time: 15 minutes
- Cook Time: 0 minutes
- Category: Dessert
- Method: No-Bake
- Cuisine: American