Skip to content
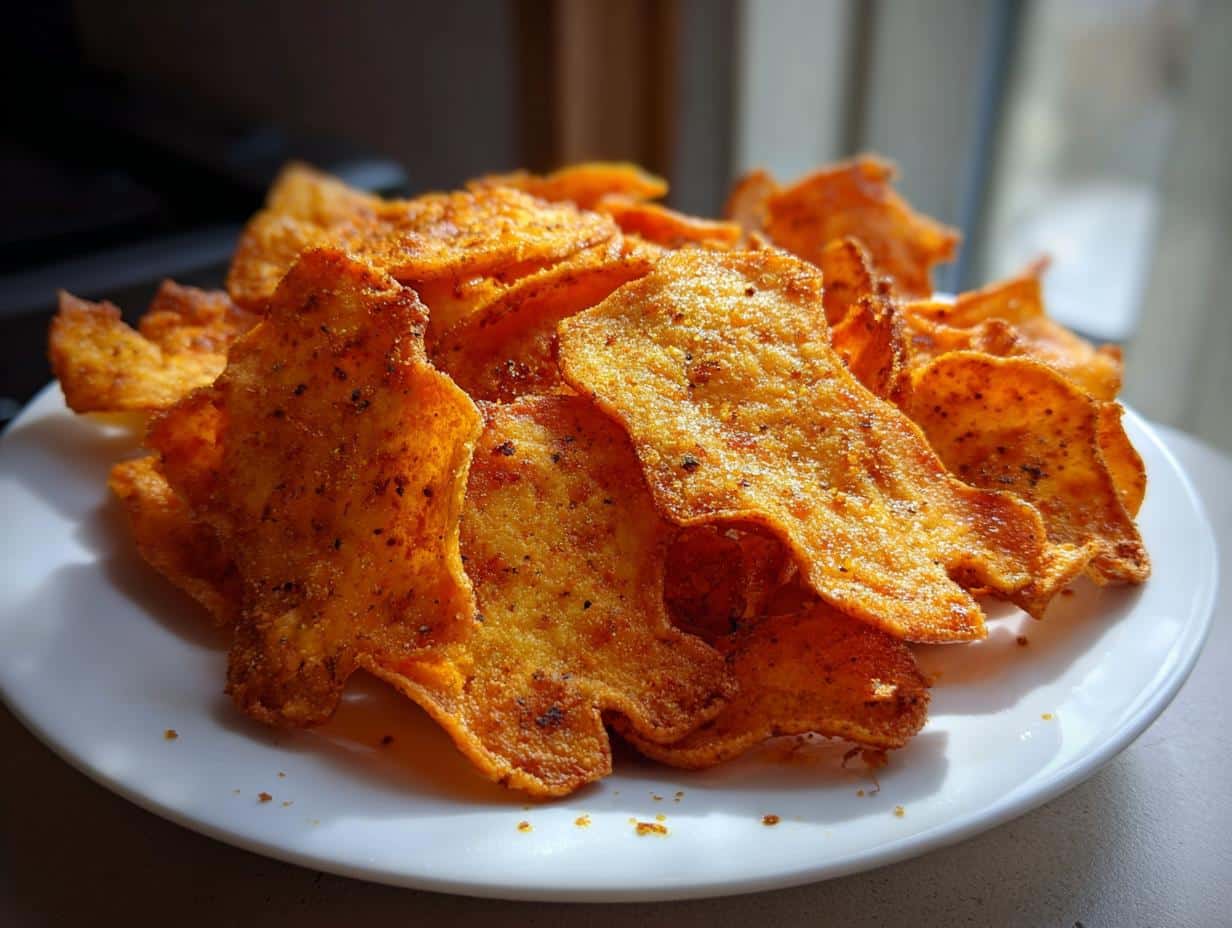
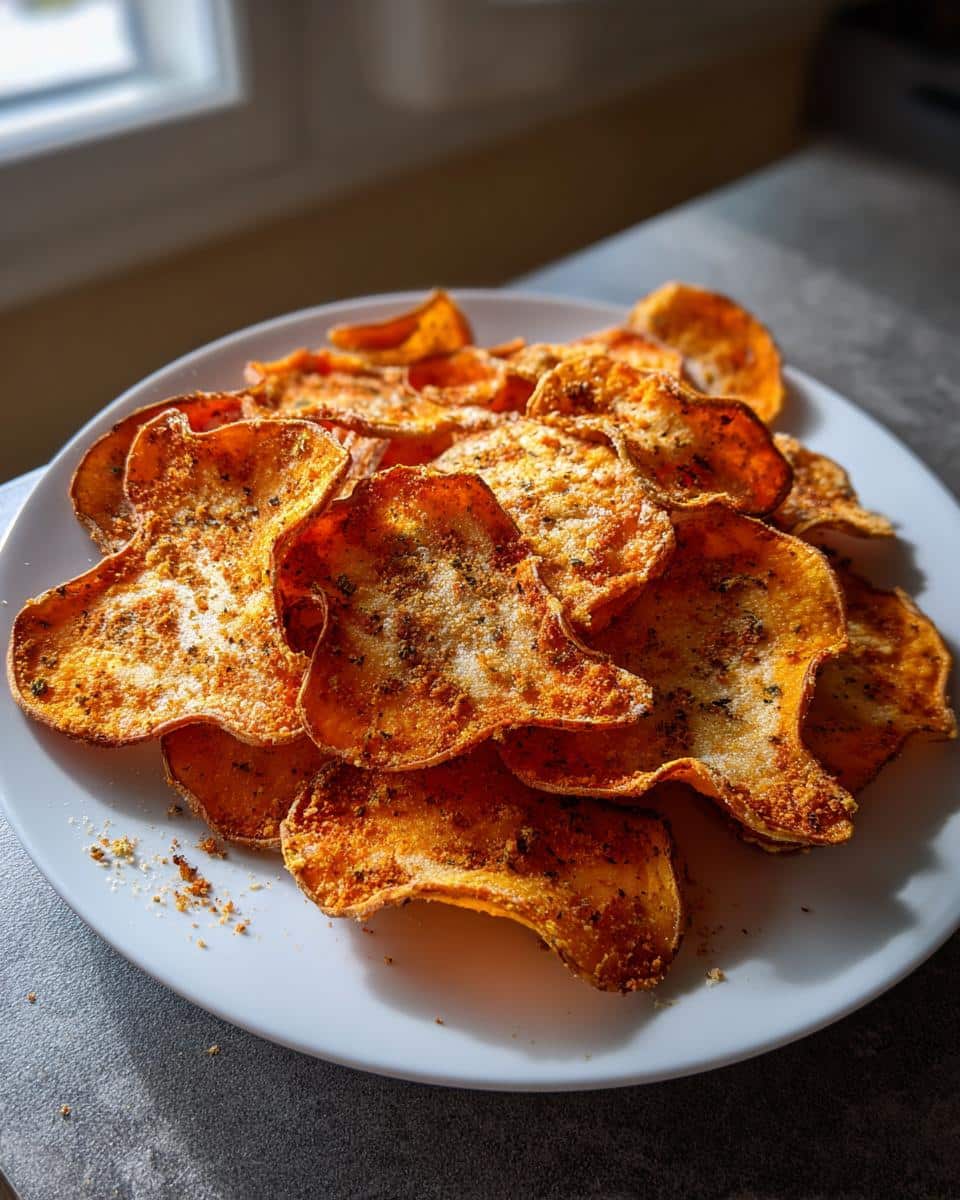
You know that moment when your kids are bouncing off the walls with Halloween excitement, and you need a snack that’s both fun and not loaded with junk? That’s exactly how these Spooky Baked Halloween Ghost Chips were born in my kitchen. Last October, my little monsters (I mean, darlings) begged for something “creepy but yummy,” so we whipped up these crispy sweet potato ghosts together.
The best part? They’re totally gluten-free and paleo-friendly, so even the grown-ups can sneak a handful without guilt. Trust me, nothing beats the sound of kids giggling as they bite the heads off ghost-shaped chips—it’s the perfect mix of silly and delicious!
Table of contents:
Why You’ll Love These Spooky Baked Halloween Ghost Chips
Oh my gosh, where do I even start? These little ghosties are seriously the Halloween snack of my dreams—and here’s why:
- Kid-approved fun: Watching tiny hands grab these crispy ghosts never gets old. They’re edible crafts!
- Wholesome ingredients: Just sweet potatoes, olive oil, and spices—no mystery additives here.
- Foolproof baking: Even if you burn cookies regularly (no judgment!), these chips are forgiving.
- Party superstar: Toss ‘em on a tray with dip, and suddenly you’re the coolest Halloween host.
Honestly? The way these disappear at gatherings, you’d think real ghosts were snacking too!
Ingredients for Spooky Baked Halloween Ghost Chips
Okay, let’s raid the pantry—you probably have most of this stuff already! Here’s what you’ll need to summon these crispy little spirits:
- 2 large sweet potatoes (look for ones with smooth skins—they’re easier to slice into ghostly perfection)
- 2 tablespoons olive oil (the good stuff—it makes all the difference in crispiness!)
- 1 teaspoon sea salt (I like flaky Maldon salt, but any fine salt works)
- 1/2 teaspoon garlic powder (trust me, this adds that “what IS that delicious flavor?” factor)
- 1/2 teaspoon paprika (smoked paprika gives extra spooky vibes if you’ve got it)
That’s it—five simple ingredients for ghostly greatness! Pro tip: If your sweet potatoes are looking sad and shriveled, grab fresh ones. Older ones can be trickier to slice thinly enough for perfect crispiness.
Equipment You’ll Need for Spooky Baked Halloween Ghost Chips
Don’t worry—you don’t need a witch’s cauldron full of fancy gadgets for these ghost chips! Here’s the shortlist of tools you’ll want to grab:
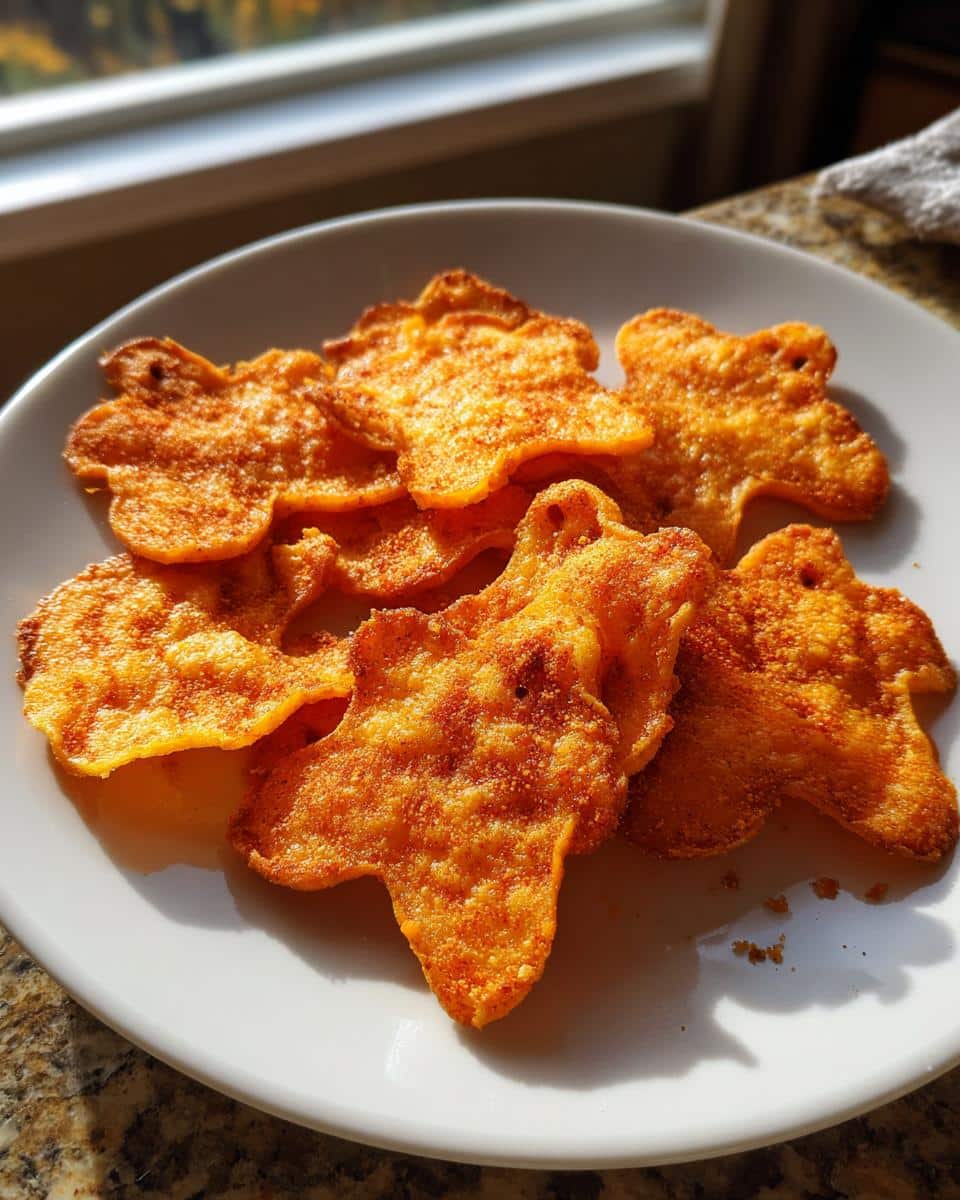
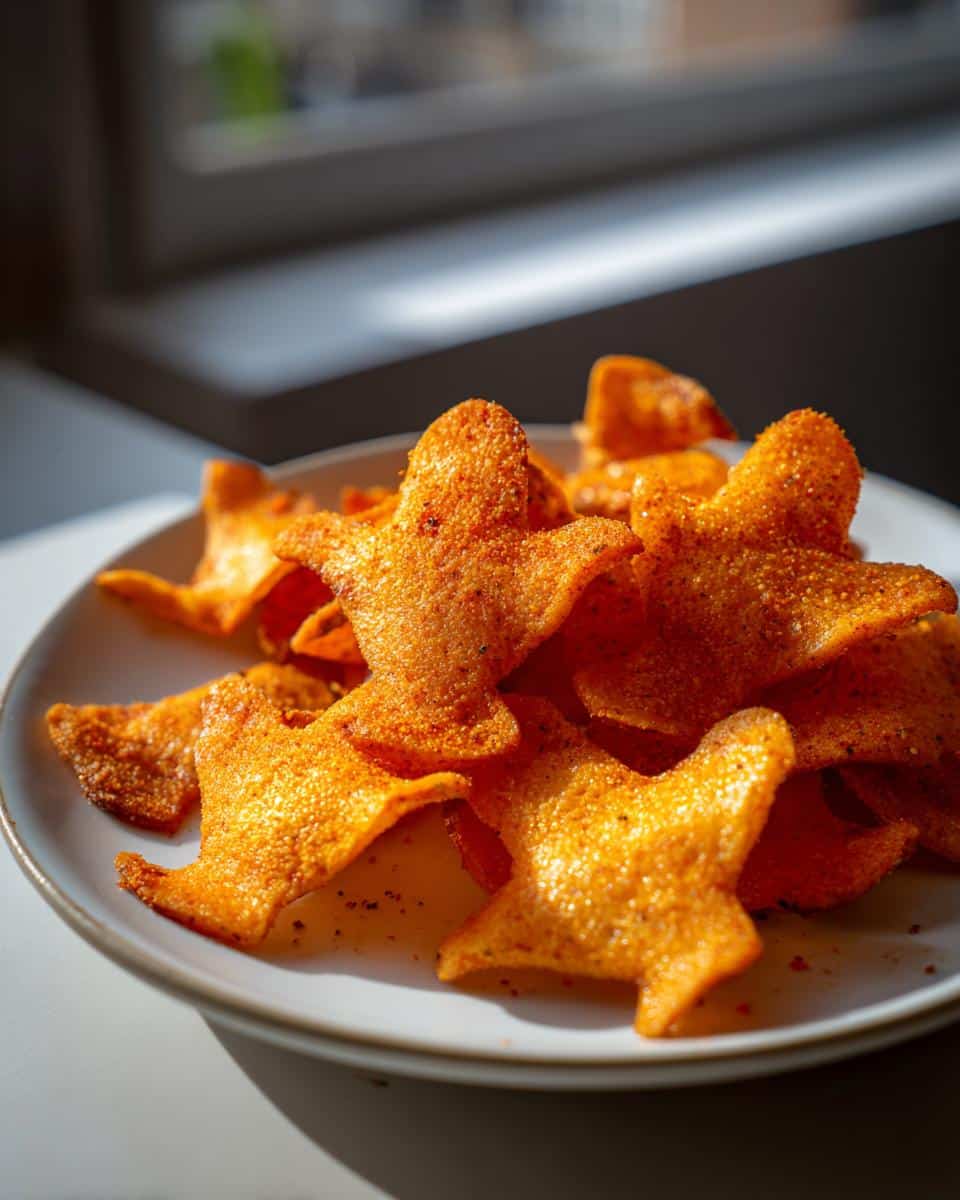
- Ghost-shaped cookie cutter (mine’s about 2 inches tall—big enough for satisfying bites but small enough to get lots of ghosts from one sweet potato)
- Baking sheet (no need for anything special—your trusty old sheet pan works perfectly)
- Parchment paper (this is my crispy-chip secret weapon—no sticking, easy cleanup)
- Mixing bowl (any medium-sized bowl will do—I’ve even used a big measuring cup in a pinch!)
Bonus items that help but aren’t mandatory: a mandoline slicer for paper-thin slices (careful with those fingers!), tongs for flipping halfway through baking, and—most importantly—a cute little helper to press out ghost shapes if you’ve got tiny hands available!
How to Make Spooky Baked Halloween Ghost Chips
Alright, let’s get these ghoulish goodies in the oven! I promise it’s easier than convincing a toddler to wear their costume for the fifth time. Here’s how we bring these crispy little spirits to life—step by step.
Step 1: Prepare the Sweet Potatoes
First things first—preheat your oven to 375°F (190°C). While it’s warming up, let’s tackle those sweet potatoes. Wash and dry them really well (nobody wants ghost chips with dirt freckles!). Now, here’s the key: slice them about 1/8-inch thick. Too thick, and they won’t get crispy; too thin, and they’ll turn into sweet potato lace (which, okay, is still tasty but not very ghostly).
Lay the slices flat and press your ghost cookie cutter straight down—firm but gentle, like you’re giving each one a little hug. Save the scraps! Toss them with oil and spices later for “ghost dust” snacks. Pro tip: If the cutter sticks, dip it in water between cuts. You’ll have a spooky little army ready in no time!
Step 2: Season and Bake
Grab your mixing bowl and toss those ghostly shapes with olive oil—you want them lightly coated but not drowning. Sprinkle in the salt, garlic powder, and paprika, then give everything a good mix with your hands (the best tools you’ve got!). Spread them out on your parchment-lined baking sheet—no overlapping, or they’ll steam instead of crisp up.
Pop them in the oven and set your timer for 10 minutes. When it dings, peek in—you’re looking for the edges to just start curling up like shy little sheets. Flip each ghost (tongs work great here!) and bake another 5-10 minutes until they’re golden with slightly darker “toasted” edges. Your kitchen will smell like Halloween heaven!
Step 3: Cool and Serve
This part takes willpower: let them cool completely on the baking sheet. I know, I know—you want to eat them immediately! But trust me, 10 minutes of patience turns them from “good” to “CRUNCHY PERFECTION.” The cooler they get, the crispier they become. It’s like magic—but with way less risk of accidentally turning someone into a newt.
Arrange them on a platter with a bowl of creamy avocado dip (or just serve as-is) and watch them vanish faster than a ghost in a haunted house. BOO-yah!
Tips for Perfect Spooky Baked Halloween Ghost Chips
Okay, let me spill my ghostly secrets—the little tricks that took this recipe from “pretty good” to “OH MY GOSH give me the whole batch!” Here’s how to make sure your chips come out perfectly spooky every single time:
- Slice with confidence: Use a mandoline if you’ve got one (watch those fingers!), but a sharp knife works too. Just pretend you’re a sweet potato surgeon—uniform thickness means even baking.
- The parchment paper rule: Don’t even THINK about skipping it. I learned this the hard way when I lost half my ghosts to stubborn sticking. Parchment = crispy perfection.
- Watch the clock: Ovens lie sometimes! Start checking at 15 minutes—edges should curl like little ghost smiles. If some chips bake faster than others, just pull those early.
- Season generously: These chips can handle bold flavors! I often do a second light sprinkle of salt right when they come out of the oven—it sticks better when they’re still warm.
- Storage smarts: If they last longer than 5 minutes (ha!), store in an airtight container with a paper towel to absorb moisture. Recrisp in a 300°F oven for 3 minutes if needed.
- Ghost whisperer trick: If your cookie cutter struggles, microwave sweet potato slices for 15 seconds first—they’ll soften just enough to cut clean shapes without tearing.
There you go—my hard-earned wisdom after many “oops” batches. Now go forth and make the crispiest, most adorable ghost chips your neighborhood has ever seen!
Variations for Spooky Baked Halloween Ghost Chips
Listen, I love the original version of these ghost chips more than I love Halloween candy (and that’s saying something!), but sometimes you gotta mix things up! Here are my favorite ways to play with this recipe when I’m feeling extra creative:
- Pumpkin Spice Ghosts: Swap the garlic and paprika for 1 teaspoon pumpkin pie spice—it makes the kitchen smell like autumn magic! Bonus points if you serve these with a little bowl of coconut yogurt “ectoplasm” for dipping.
- Zombie Zucchini Chips: Use zucchini instead of sweet potatoes for lighter ghosts—slice them extra thin and pat dry before cutting shapes. They bake faster, so keep a close eye after 10 minutes!
- Cheesy Ghosts: Okay, not paleo, but sometimes I sprinkle nutritional yeast or parmesan on half the batch for my dairy-loving friends. It gives them a deliciously “haunted” golden glow.
- Sweet Ghost Boos: Toss the shapes with cinnamon and a tiny bit of maple syrup instead of savory spices—perfect for a Halloween breakfast treat or after-school snack!
Honestly? The ghost shape makes everything more fun, so don’t be afraid to experiment. Last year we even made “mummy chips” by using a gingerbread man cutter and then scratching little bandage lines with a toothpick before baking—total hit at the class party!
Serving and Storing Spooky Baked Halloween Ghost Chips
Okay, let’s talk about the BEST part—showing off your adorable ghost chips! Presentation is everything with these little guys. My favorite trick? Pile them on a black platter (a baking sheet works in a pinch) with a bowl of bright orange pumpkin hummus in the center—it looks like your ghosts are floating around a spooky moon! For extra drama, add some fake spiderwebs or plastic eyeballs around the edges. The kids go wild for it!
Now, let’s be real—these rarely last long enough to store. But if you somehow end up with leftovers (wow, teach me your self-control!), here’s how to keep them fresh:
- Airtight is right: Toss them in a container with a tight lid—I like glass jars because you can still admire your handiwork. Slide in a paper towel to catch any sneaky moisture.
- Room temp magic: They’ll stay crispy at room temperature for about 2 days—just don’t refrigerate unless you want sad, soggy ghosts!
- Crisp revival: If they lose their crunch, a quick 3-minute trip through a 300°F oven brings them back to life—like zombie ghosts! Watch closely so they don’t burn.
Pro tip: Make extra batches and freeze the uncooked ghost shapes between parchment layers—then just bake straight from frozen (add 2-3 extra minutes) when surprise guests arrive. You’ll look like the Halloween hostess who’s always prepared (even if you totally forgot until the doorbell rang)!
Nutritional Information for Spooky Baked Halloween Ghost Chips
Alright, let’s talk numbers—but don’t worry, these ghosts won’t haunt your healthy eating goals! Here’s the scoop on what’s in these crispy little spirits (based on a serving of about 15 ghost chips):
- Calories: 120 (perfect for sneaky snacking!)
- Fat: 7g (the good kind from olive oil)
- Carbs: 15g (hello, naturally sweet potatoes!)
- Fiber: 2g (ghosts with benefits, who knew?)
- Sugar: 3g (all natural from the sweet potatoes)
- Protein: 1g (okay, they’re not bodybuilder food—but they’re delicious!)
Now, full disclosure—nutritional values are estimates and vary based on ingredients used. Your ghosts might be slightly bigger or smaller than mine (ghosts are sneaky like that!), and different olive oils or sweet potato sizes can tweak the numbers. But here’s what really matters: these are treats you can feel good about sharing, with simple ingredients that won’t leave you or your little monsters crashing from a sugar high. That’s what I call a Halloween win!
FAQs About Spooky Baked Halloween Ghost Chips
I’ve made these ghost chips more times than I can count, and along the way, I’ve gotten some great questions—here are the ones that pop up most often (along with my tried-and-true answers)!
Can I use regular potatoes instead of sweet potatoes?
Absolutely! Russet or Yukon gold potatoes work beautifully—just know they’ll be more savory than sweet. For extra Halloween flair, try purple potatoes! They make gorgeously spooky ghosts when baked. The cooking time might vary slightly, so keep an eye on them after 15 minutes.
Help! My cookie cutter won’t go through the sweet potato slices—what now?
Oh, I’ve battled this ghostly problem too! Two tricks: microwave the slices for 10-15 seconds first to soften them just enough, or dip your cutter in water between cuts (like you’re giving it little sips). If all else fails, slightly thicker slices (about 1/4 inch) will still taste amazing—they just won’t get quite as crispy.
Can I make these ahead for a party?
You sure can! Here’s my make-ahead magic: bake them completely, let them cool, then store in an airtight container with parchment between layers. They’ll stay crispy for up to 2 days. Or—my secret weapon—freeze the raw ghost shapes on a baking sheet, then transfer to a bag. Bake straight from frozen (add 3-5 extra minutes) when party time comes!
Are these spicy? My kids don’t like heat.
Not at all! The paprika adds color and smokiness without actual spice—it’s totally kid-friendly. If you’re worried, just use half the amount or swap it for onion powder. My nephew calls these “friendly ghost chips” and gobbles them up by the handful!
What dip pairs best with these spooky chips?
Oh, the possibilities! My family loves them with:
- Avocado “ectoplasm” (mashed avocado + lime + salt)
- Pumpkin hummus (orange for extra Halloween vibes!)
- Plain Greek yogurt with chives (looks like floating ghost eyes!)
But honestly? They disappear so fast, half the time we don’t even bother with dip!
Print
Spooky Baked Halloween Ghost Chips: 3-Ingredient Crispy Magic
- Total Time: 30 mins
- Yield: 4 servings
- Diet: Gluten Free
Description
A fun and spooky Halloween snack that’s gluten-free and paleo-friendly. These ghost-shaped chips are crispy, flavorful, and perfect for parties.
Ingredients
- 2 large sweet potatoes
- 2 tbsp olive oil
- 1 tsp sea salt
- 1/2 tsp garlic powder
- 1/2 tsp paprika
Instructions
- Preheat oven to 375°F (190°C).
- Slice sweet potatoes into thin rounds.
- Use a ghost-shaped cookie cutter to cut shapes.
- Toss with olive oil, salt, garlic powder, and paprika.
- Arrange on a baking sheet lined with parchment paper.
- Bake for 15-20 minutes until crispy.
- Let cool before serving.
Notes
- Store leftovers in an airtight container for up to 3 days.
- For crispier chips, bake longer but watch to avoid burning.
- Prep Time: 10 mins
- Cook Time: 20 mins
- Category: Snack
- Method: Baking
- Cuisine: American