Skip to content
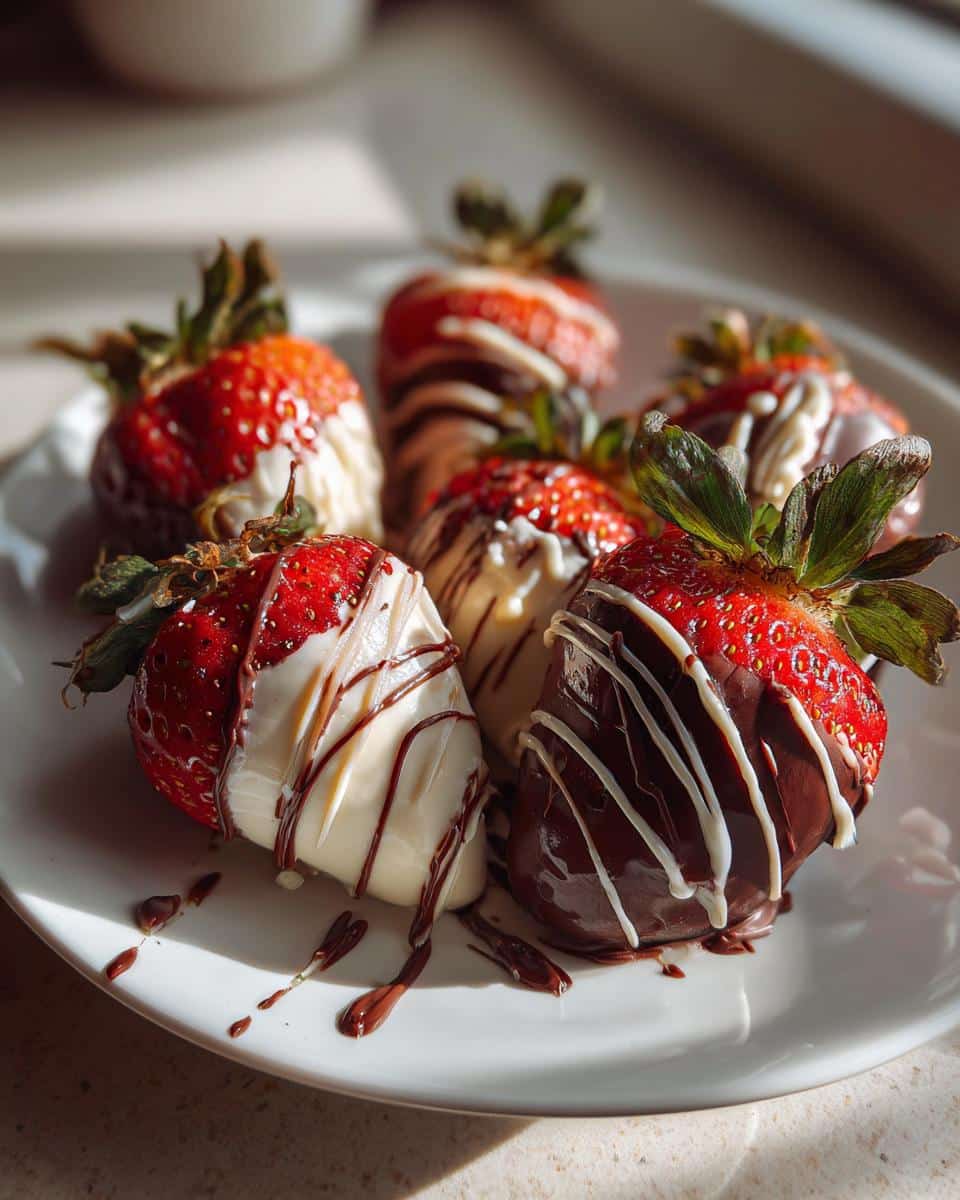
Okay, I have to confess – these rotten teeth chocolate strawberries are my absolute favorite Halloween party trick! Picture this: plump, juicy strawberries dipped in rich dark chocolate, then drizzled with “decaying” white chocolate that looks just like creepy, rotting teeth. The first time I made them for a Halloween bash, my friends screamed (in the best way possible) before devouring every last one. The best part? They’re ridiculously easy to whip up – no fancy skills needed, just some melted chocolate and a little playful drizzling. Trust me, these spooky treats will steal the show at any gathering!

Table of contents:
Why You’ll Love These Rotten Teeth Chocolate Strawberries
These creepy-cute treats are a total win for so many reasons – let me count the ways!
Fun and Spooky Halloween Treat
The moment you set these out at a party, they become the star of the show! That perfect combo of delicious chocolate-dipped strawberries with their intentionally messy “rotting” effect gets reactions every time. Kids adore the gross-out factor (while secretly loving how tasty they are), and adults appreciate the clever presentation. Last year, mine disappeared so fast I had to make a second batch!
Easy No-Bake Dessert
No oven? No problem! All you need is a microwave and about 20 minutes. I love recipes like this that look impressive but are secretly simple. The chocolate does all the work – just melt, dip, drizzle, and voila! Even if you’re not usually a baker, you can nail these. They’re perfect for last-minute Halloween parties when you need something quick but memorable.
Ingredients for Rotten Teeth Chocolate Strawberries
Here’s everything you’ll need to create these delightfully creepy treats – trust me, sticking to these simple ingredients makes all the difference!
Chocolate and Strawberries
The magic starts with 12 large strawberries – and I mean BIG ones! Look for berries with their stems intact (they make perfect “handles” for dipping). For the chocolate, you’ll need 1 cup packed dark chocolate chips (I always use Ghirardelli – their melt is just right) and 1 cup white chocolate chips. Don’t skip the 1 tsp coconut oil – it keeps the chocolate silky smooth.
Optional Add-Ins
For that extra-gross rotten effect, grab some black food coloring – but here’s my pro tip: use gel-based coloring, not liquid! The gel blends beautifully into white chocolate without making it watery. Just a tiny drop gives you that perfect moldy-gray tooth color that’ll make everyone do a double-take!
Equipment You’ll Need
Gathering your tools is half the battle – and luckily, you probably already have everything! Here’s what I always grab from my kitchen:
- Microwave-safe bowls (one for dark chocolate, one for white – trust me, you don’t want to mix them too soon!)
- Parchment paper or a silicone mat for easy cleanup
- A small spoon or fork for drizzling that perfect “rotten” effect
- Paper towels (because chocolate drips happen to the best of us)
That’s it! No fancy gadgets needed – just simple tools that make the process smooth (and the chocolate smoother).
How to Make Rotten Teeth Chocolate Strawberries
Ready to turn sweet strawberries into delightfully creepy treats? Follow these simple steps – I’ve made this recipe dozens of times, and these are all my tried-and-true methods for perfect “rotten teeth” every time!
Prepping the Strawberries
First things first – wash those berries! I rinse 12 large strawberries under cool water, then pat them bone dry with paper towels. This step is crucial – any water left on the berries will make your chocolate seize up into a grainy mess. I learned this the hard way during my first Halloween party disaster!
Leave the green stems on – they make perfect little handles for dipping. Arrange your completely dry berries on a plate lined with paper towels while you melt the chocolate. This is also when I like to set up my parchment paper-lined baking sheet so everything’s ready to go.
Melting the Chocolate
Time for the magic! In a microwave-safe bowl, combine 1 cup dark chocolate chips with ½ tsp coconut oil. Microwave in 30-second bursts, stirring well after each one. It usually takes about 90 seconds total – you want it smooth but not scorched. I always do the spoon test: if it coats the back of a spoon evenly, it’s ready!
Repeat with the white chocolate chips and remaining coconut oil in a separate bowl. Here’s where the fun begins – stir in just one tiny drop of black food coloring until you get that perfect grayish “rotten” hue. Too dark? Add a bit more white chocolate to lighten it up.

Creating the Rotten Effect
Now for the transformation! Holding each strawberry by its stem, dip it about halfway into the dark chocolate, letting excess drip off. Place on your prepared baking sheet. Once all are dipped, take a spoon (or fork for finer lines) and drizzle the grayish white chocolate over the dark coating in messy, uneven streaks – the more haphazard, the better the “rotten” look!
Pro tip: Tilt your spoon at different angles as you drizzle to create realistic tooth decay textures. Some of mine look like cracks, others like cavities – it’s all good! If you mess up? Just wipe it off and start again. Chocolate is very forgiving.
Setting and Serving
To speed up setting time, pop the tray in the fridge for 15 minutes. No fridge space? A cool countertop works too, but it’ll take about 30 minutes. You’ll know they’re ready when you gently touch the chocolate and it doesn’t leave a fingerprint.
Serve these bad boys on a creepy platter – I love using a vintage dental tray for extra giggles! They keep well in the fridge for up to 2 days, but trust me, they never last that long at parties. Watch as your guests do that hilarious “eww… wait, yum!” double-take!
Tips for Perfect Rotten Teeth Chocolate Strawberries
After making batches and batches of these (and learning from all my mistakes!), here are my can’t-live-without tips for spooky strawberry success:
For the best chocolate texture, never skip the coconut oil – it keeps everything silky smooth. If your chocolate starts thickening as you work, just pop it back in the microwave for 5-second bursts. No black food coloring? Mix a tiny bit of cocoa powder into your white chocolate for an earthy decayed look.
Storing them? Single layer only! Stacking ruins all your hard work on those drips and cracks. I keep mine in the fridge on a parchment-lined tray with a loose foil tent – no condensation that way. Want to prep ahead? Make them the morning of your party for peak freshness!
Ingredient Substitutions
Don’t stress if you’re missing an ingredient – I’ve swapped things out plenty of times with great results! For a milder flavor, milk chocolate works beautifully instead of dark (kids especially love this version). Need it vegan? Simply use dairy-free chocolate chips – I’ve had success with Enjoy Life brand. Out of coconut oil? A tiny bit of vegetable oil works in a pinch, though the chocolate might not set quite as firm. The beauty of this recipe? It’s wonderfully adaptable!
Storing and Serving Suggestions
These creepy creations taste best the day you make them, but they’ll keep in the fridge for up to 2 days if stored properly. I always arrange them in a single layer on a parchment-lined tray with a loose cover – stacking ruins those gorgeous “rotten” details! For parties, I love displaying them on a vintage dental tray or nestled among dry ice “fog” for extra spooky flair. Pro tip: Let them sit at room temperature for 5 minutes before serving so the chocolate loses its chill and the flavors really shine!
Nutritional Information
Let’s be real – these rotten teeth chocolate strawberries are a treat, not health food! But if you’re curious about what you’re biting into (besides deliciousness), here’s the scoop per strawberry. Keep in mind these are estimates – your exact numbers will vary depending on your chocolate brands and strawberry sizes.
Each creepy creation clocks in at about 120 calories, with 6g fat (mostly from that heavenly chocolate) and 15g carbs (10g of which are the good stuff – sugar!). You’re also getting 2g fiber from the strawberries and 1g protein – not bad for something that looks like it belongs in a haunted dentist’s office!
My philosophy? When it comes to Halloween treats, nutrition takes a backseat to fun – just enjoy these in moderation while admiring your handiwork. After all, how often do you get to serve something that’s equal parts delicious and delightfully disgusting?
Frequently Asked Questions
Over the years, I’ve gotten some great questions about these rotten teeth chocolate strawberries – here are the ones that pop up most often with my tried-and-true answers!
Can I use frozen strawberries? Oh honey, no! I made this mistake once and ended up with a soupy chocolate mess. Frozen berries release too much water as they thaw, which makes the chocolate seize up. Always use fresh, dry strawberries for the best results.
How far ahead can I make these? They’re best enjoyed the day you make them, but you can prep them up to 1 day in advance. Store them in a single layer in the fridge – any longer and the strawberries start to sweat under the chocolate.
What if my chocolate is too thick? No worries! Just add a tiny bit more coconut oil (start with ¼ tsp) and microwave for 5 more seconds. This is my go-to fix when my chocolate starts turning into paste halfway through dipping!
Final Thoughts
Well, there you have it – my foolproof recipe for turning innocent strawberries into gloriously gross rotten teeth that’ll be the talk of any Halloween party! I still get giddy watching people’s reactions when they see these for the first time – that perfect mix of horror and hunger. The best part? You can totally make these your own. Try adding edible glitter for a “zombie sparkle” effect, or use different drizzling patterns to create unique tooth decay designs.
I’d love to see your creepy creations! Tag me on social media with your photos – nothing makes me happier than seeing how you’ve put your own spin on these spooky treats. Whether you’re making them for a kids’ party, an adult Halloween bash, or just because (no judgment here!), these rotten teeth chocolate strawberries are guaranteed to bring laughs and deliciousness wherever they go. Happy haunting… I mean, happy baking! You can find more fun recipes on Pinterest.
Print
12 Spooky Rotten Teeth Chocolate Strawberries That Shock & Delight
- Total Time: 25 mins
- Yield: 12 servings
- Diet: Vegetarian
Description
A sweet treat combining chocolate and strawberries, designed to look like rotten teeth for a fun and spooky effect.
Ingredients
- 12 large strawberries
- 1 cup dark chocolate chips
- 1 cup white chocolate chips
- 1 tsp coconut oil
- Black food coloring (optional)
Instructions
- Wash and dry strawberries thoroughly.
- Melt dark chocolate chips with 1/2 tsp coconut oil in a microwave-safe bowl.
- Dip each strawberry halfway into the dark chocolate, then place on parchment paper to set.
- Melt white chocolate chips with 1/2 tsp coconut oil in a separate bowl.
- Add a drop of black food coloring to the white chocolate for a grayish tint (optional).
- Drizzle the white chocolate over the dark chocolate to create a rotten tooth effect.
- Let harden completely before serving.
Notes
- Use fresh strawberries for best results.
- Chill the chocolate-dipped strawberries for faster setting.
- Adjust food coloring for a more dramatic rotten effect.
- Prep Time: 15 mins
- Cook Time: 10 mins
- Category: Dessert
- Method: No-Bake
- Cuisine: American