Skip to content
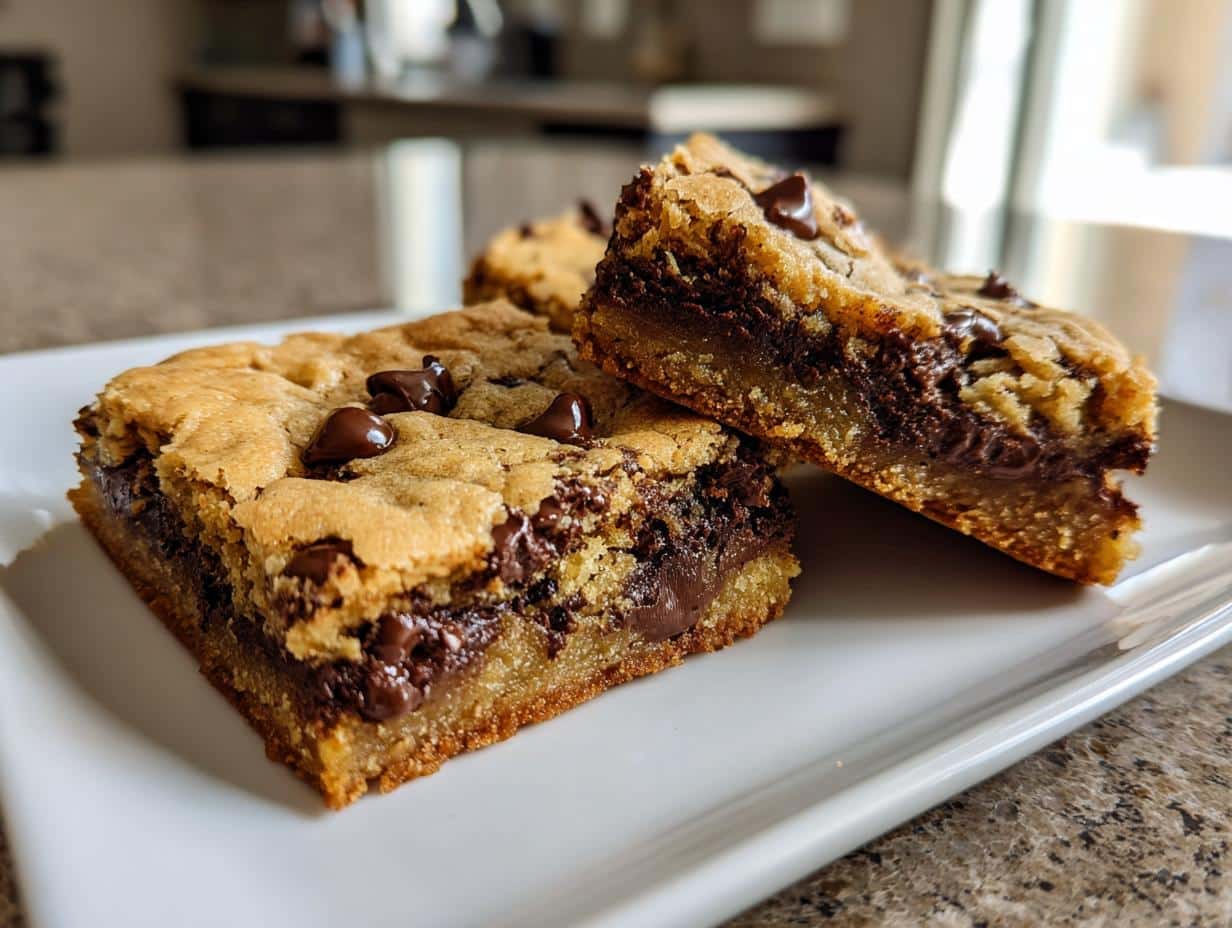
Oh my goodness, let me tell you about my absolute obsession with chocolate chip cookie bars! These golden, gooey squares of joy have saved me more times than I can count – from last-minute bake sales to those “I need chocolate NOW” emergencies. What I love most is how they combine everything wonderful about classic chocolate chip cookies with none of the fuss of scooping individual portions.
My love affair with this recipe started in college when my roommate’s mom mailed us a care package with a pan of these bars. We devoured the whole thing in one sitting (no regrets!). Now I make them weekly – they’re that easy. Just one bowl, simple ingredients you probably have right now, and 30 minutes later you’ve got a pan of warm, melty chocolate perfection.
The magic of chocolate chip cookie bars is how they please everyone. Kids go wild for them at birthday parties, adults sneak seconds at potlucks, and they’re sturdy enough to mail to faraway friends (my brother gets them every finals week). Plus, they stay soft for days – if they last that long!
Ingredients for Chocolate Chip Cookie Bars
Okay, let’s talk ingredients! The beauty of these bars is they use simple pantry staples – nothing fancy required. But trust me, every single one plays a crucial role in creating that perfect chewy-gooey texture we all crave. Here’s what you’ll need:
Key Ingredients
Butter is where the magic starts – and I mean real butter, not margarine. That rich, creamy base gives the bars their signature tenderness and helps create those irresistible crispy edges. You’ll cream it with both brown and white sugar (yes, both!) because the molasses in brown sugar equals chewiness while white sugar gives that perfect crisp.
Now the chocolate chips – don’t skimp here! I always use semisweet because they balance the sweetness just right, but this is where you can really make the recipe your own. That two-cup measurement isn’t a suggestion – it’s the golden ratio for maximum chocolate in every bite. Pro tip: toss them in a bit of flour first so they don’t all sink to the bottom!
Ingredient Substitutions
Allergic to nuts? No problem – just leave ’em out. Want to make these gluten-free? Swap the all-purpose flour 1:1 with your favorite GF blend (I like the ones with xanthan gum already added). For dairy-free folks, coconut oil can replace butter, but expect a slightly different texture – more cakey than chewy.
Out of brown sugar? You can make your own by mixing 1 cup white sugar with 1 tablespoon molasses. And if you’re like me and constantly running out of vanilla, almond extract makes a fun twist – just use half the amount since it’s stronger. The bars will still be delicious, I promise!
How to Make Chocolate Chip Cookie Bars
Alright, let’s get baking! I promise this is easier than you think – even if you’ve never baked before. Just follow these simple steps, and you’ll have a pan of chocolate chip cookie bars that’ll make your whole house smell like a bakery.
Preparing the Dough
First things first – that butter needs to be soft but not melted. I leave mine on the counter for about an hour before baking. When you press it with your finger, it should leave an indent but still hold its shape. Now grab your biggest mixing bowl (trust me, you’ll need the space) and let’s cream the butter and sugars together.
Here’s my secret weapon: mix the butter with the sugars for a full 2-3 minutes until it’s light and fluffy. This step builds the foundation for perfect texture. Then add those eggs one at a time, mixing well after each. Splash in the vanilla – yes, that whole 2 teaspoons! It makes all the difference.
Now for the dry ingredients. I whisk them together in a separate bowl first – this prevents those dreaded flour lumps. Gradually mix them into the wet ingredients just until combined. Overmixing is the enemy here! When you see the last streaks of flour disappear, stop immediately. Fold in those chocolate chips gently – I like to save a handful to sprinkle on top before baking for extra chocolatey goodness.
Baking and Cooling
Preheat that oven to 350°F (175°C) – no cheating on this step! While it heats, grease your 9×13 pan really well. I use butter and a light dusting of flour, but parchment paper works wonders too if you’re worried about sticking.
Spread the dough evenly in the pan – wet fingers help smooth it out without sticking. Bake for 25-30 minutes, but here’s the tricky part: they’ll look underdone when they’re actually perfect. The edges should be golden brown, and the center will still look slightly soft. Do the toothpick test – a few moist crumbs are good, wet batter means more time.
Now the hardest part – let them cool completely before cutting! I know, I know, the smell is torture. But cutting warm bars leads to crumbly messes. I usually wait at least an hour, then slice with a sharp knife wiped clean between cuts. The wait is worth it – promise!
Tips for Perfect Chocolate Chip Cookie Bars
Want to take your chocolate chip cookie bars from good to absolutely *chef’s kiss*? Here are my tried-and-true tips that I’ve learned from making way too many batches (not that I’m complaining!). Follow these, and you’ll be the hero of every bake sale, potluck, or late-night snack session.
Room-temperature butter is non-negotiable
I know it’s tempting to microwave that cold butter, but resist! Room-temperature butter creams beautifully with the sugars, creating that light, fluffy texture we love. If you forget to take it out ahead of time, cut it into cubes and let it sit for 15-20 minutes. When you press it, it should give slightly but still hold its shape. Trust me, this little step makes a huge difference.
Spread the dough evenly – no shortcuts!
Uneven dough means uneven bars, and we don’t want that. Use a spatula to spread the dough into every corner of the pan. If it’s sticking to the spatula, wet your fingers slightly and press it down gently. This ensures every bite has the perfect balance of chewy center and crispy edge. Pro tip: Sprinkle a few extra chocolate chips on top before baking for that bakery-worthy look!
Cooling time is your friend
I know, I know – waiting is the worst part. But cutting into warm bars is a recipe for crumbles. Let them cool in the pan for at least an hour before slicing. If you’re in a hurry, you can pop the pan in the fridge for 20 minutes. Use a sharp knife, and wipe it clean between cuts for neat, perfect squares. Patience pays off, I promise!
Don’t overbake – they’ll firm up as they cool
Here’s the golden rule: if they look done in the oven, they’re overdone. The edges should be golden brown, but the center will still look slightly soft. A toothpick test should come out with a few moist crumbs, not clean. Remember, they’ll continue cooking a bit as they cool. This is the secret to that perfect chewy texture we all crave.
Store them right for maximum freshness
If by some miracle you have leftovers (unlikely, I know!), store them in an airtight container at room temperature. Layer them with parchment paper to prevent sticking. They’ll stay soft and delicious for up to 5 days – though they’ve never lasted that long in my house! For longer storage, wrap them tightly and freeze. Just thaw at room temperature when the craving strikes.
Variations of Chocolate Chip Cookie Bars
Okay, let’s get creative! While I adore the classic version, sometimes I love shaking things up with these easy twists. The best part? The basic recipe stays the same – just toss in your favorite extras and bake as usual. Here are my go-to variations that always impress:
Nutty for Nuts
My dad’s favorite is adding chopped walnuts – about a cup does the trick. Pecans work beautifully too, giving that buttery crunch. Toast them first for extra flavor! Just spread on a baking sheet at 350°F for 5-7 minutes until fragrant, then let cool before mixing in. The toasty nuttiness takes these bars to another level.
Caramel Swirl Magic
This one’s dangerous – in the best way. After spreading the dough in the pan, dollop spoonfuls of caramel sauce (about 1/2 cup) on top. Use a knife to swirl it gently through the batter. The caramel bakes into gooey ribbons that make every bite irresistible. Pro tip: Use thick caramel sauce, not syrup, to prevent soggy bars.
Chocolate Overload
For true chocoholics, mix up your chips! I’ll do half semisweet, half milk chocolate for balanced sweetness. Want to go wild? Throw in some white chocolate chips too – the three-way combo is heavenly. Sometimes I’ll even chop up a chocolate bar for those melty, irregular chunks you just can’t get from chips alone.
Seasonal Twists
These bars are perfect year-round with simple tweaks. In fall, add a teaspoon of cinnamon and swap in butterscotch chips. For Christmas, use red and green M&Ms (kids go nuts for this!). Springtime? Fold in pastel-colored chocolate eggs after baking – they look so festive peeking through the golden top.
The possibilities are endless! I’ve even done a “s’mores” version with crushed graham crackers in the dough and mini marshmallows on top (broil for 30 seconds at the end to toast them). What creative combos will you try? Just remember – keep add-ins to about 1-2 cups total so the bars hold together. Now go forth and customize!
Storing and Reheating Chocolate Chip Cookie Bars
So, you’ve baked the most amazing chocolate chip cookie bars (if I do say so myself!), and now you’re wondering how to keep them fresh and delicious. Don’t worry, I’ve got you covered with all my best storage and reheating tips. Because let’s be real – these bars are too good to let go stale!
Storing for Maximum Freshness
First things first – let those bars cool completely before you even think about storing them. I know it’s tempting to dive in, but warm bars in a container create condensation, and nobody likes soggy cookie bars. Once they’re cool, transfer them to an airtight container – a cookie tin or a plastic storage box works great.
Here’s a little trick I swear by: layer them with parchment paper between each row. This keeps them from sticking together and makes it easy to grab just one (or three) whenever the craving hits. At room temperature, they’ll stay soft and chewy for up to 5 days. If you’re in a humid climate, throw in a slice of bread – it absorbs excess moisture and keeps the bars fresh longer.
Freezing for Future Cravings
Yes, you can freeze these beauties! Wrap individual bars tightly in plastic wrap, then pop them into a freezer-safe bag or container. They’ll keep for up to 3 months this way. When you’re ready to enjoy, just take out as many as you need and let them thaw at room temperature for about an hour. They’ll taste just as good as the day you baked them!
Reheating for That Fresh-Baked Feel
Want to recreate that just-out-of-the-oven magic? Here’s how I do it: place a bar on a microwave-safe plate and zap it for 10-15 seconds. Watch it closely – you just want it warm enough to make the chocolate gooey again. For a more even heat, pop it in a 350°F oven for 5 minutes. Either way, you’ll get that warm, melty chocolate and soft, chewy texture that makes these bars irresistible.
Pro tip: If you’re reheating frozen bars, let them thaw first for the best results. And if you’re feeling fancy, add a scoop of vanilla ice cream on top while they’re still warm. Trust me, it’s life-changing!
Nutritional Information
Okay, let’s talk numbers – but don’t let this scare you away from enjoying every delicious bite! Since I know some folks like to keep track (or are just curious), here’s the estimated nutrition for one chocolate chip cookie bar. Just remember – exact amounts can vary depending on your specific ingredients and how you slice them. I mean, who can resist cutting those corner pieces a little bigger, right?
Each approximately 2″x2″ bar contains:
- Calories: 250 (worth every one!)
- Sugar: 20g (mostly from that perfect chocolate balance)
- Fat: 12g (thank you, real butter!)
- Carbohydrates: 35g
- Protein: 3g (hey, eggs count!)
Now for my standard baker’s disclaimer: These numbers are estimates based on standard ingredients. If you use different chocolate chips, alternative flours, or any of those fun variations we talked about earlier, your numbers will change slightly. And let’s be honest – when something tastes this good, sometimes the exact calorie count doesn’t matter quite as much as that first melty bite!
Pro tip: If you’re watching portions (which I rarely do with these), cut them smaller before serving. They’re rich enough that a little goes a long way – though good luck stopping at just one!
Common Questions About Chocolate Chip Cookie Bars
I’ve made these chocolate chip cookie bars more times than I can count, and along the way, I’ve gotten every question imaginable from friends and family (and myself when things went wrong!). Here are the answers to all those burning questions – consider this your troubleshooting guide to cookie bar perfection!
“Can I freeze chocolate chip cookie bars?”
Absolutely! These freeze like a dream. Just let them cool completely first, then wrap individual bars tightly in plastic wrap. Pop them into a freezer bag, and they’ll keep beautifully for up to 3 months. When the craving hits, thaw at room temperature for about an hour or zap in the microwave for 15-20 seconds. Pro tip: freeze them already sliced – it makes grabbing a quick treat so much easier!
“Why did my bars turn out cakey instead of chewy?”
Oh, I’ve been there! Usually, it’s one of three things: too much flour (always spoon and level, don’t scoop!), overmixing the batter (stop as soon as the flour disappears), or baking too long (remember, they firm up as they cool). Next time, try reducing the flour by 2 tablespoons and pulling them out when the center still looks slightly underdone. That should give you that perfect chewy texture.
“Can I make these without eggs?”
You can, but the texture changes a bit. For each egg, try using 1/4 cup applesauce or 1 tablespoon ground flaxseed mixed with 3 tablespoons water. The bars will be more cake-like but still delicious. My vegan friend swears by using mashed banana – just know they’ll have a slight banana flavor (which actually pairs amazingly with chocolate!).
“Why do my bars fall apart when I cut them?”
Two words: cooling time. I know it’s torture to wait, but cutting into warm bars is asking for crumbles. Let them cool completely in the pan – at least an hour. If you’re impatient like me, you can speed things up by popping the pan in the fridge for 20 minutes. Also, use a sharp knife and wipe it clean between cuts for perfect edges.
“Can I double this recipe?”
Yes! But don’t just dump everything in a bigger bowl – mix two separate batches if you’re doubling. The creaming step especially needs attention – you want that butter and sugar properly fluffy. Bake in two separate pans rather than one giant one, or the center won’t cook evenly. And watch the baking time – it might need 5-10 extra minutes.
Got more questions? Drop them in the comments – I’m happy to help troubleshoot your chocolate chip cookie bar adventures! After all, we’re all in this delicious journey together.
Go Ahead – Bake Up Some Happiness!
There you have it – all my secrets for perfect chocolate chip cookie bars spilled in one place! I’ve made every mistake so you don’t have to, and now you’re armed with everything you need for bar-baking success. Whether it’s a Tuesday afternoon pick-me-up or your new go-to party dessert, this recipe won’t let you down.
I’d love to hear how your bars turn out! Did you stick with the classic version or try one of the fun variations? Maybe you’ve invented your own twist (caramel-sea salt, anyone?). Drop a comment below to share your results, questions, or even your favorite chocolate chip cookie bar memories. Happy baking, friends – may your bars be chewy, your chocolate melty, and your kitchen filled with that incredible freshly-baked smell!