Skip to content
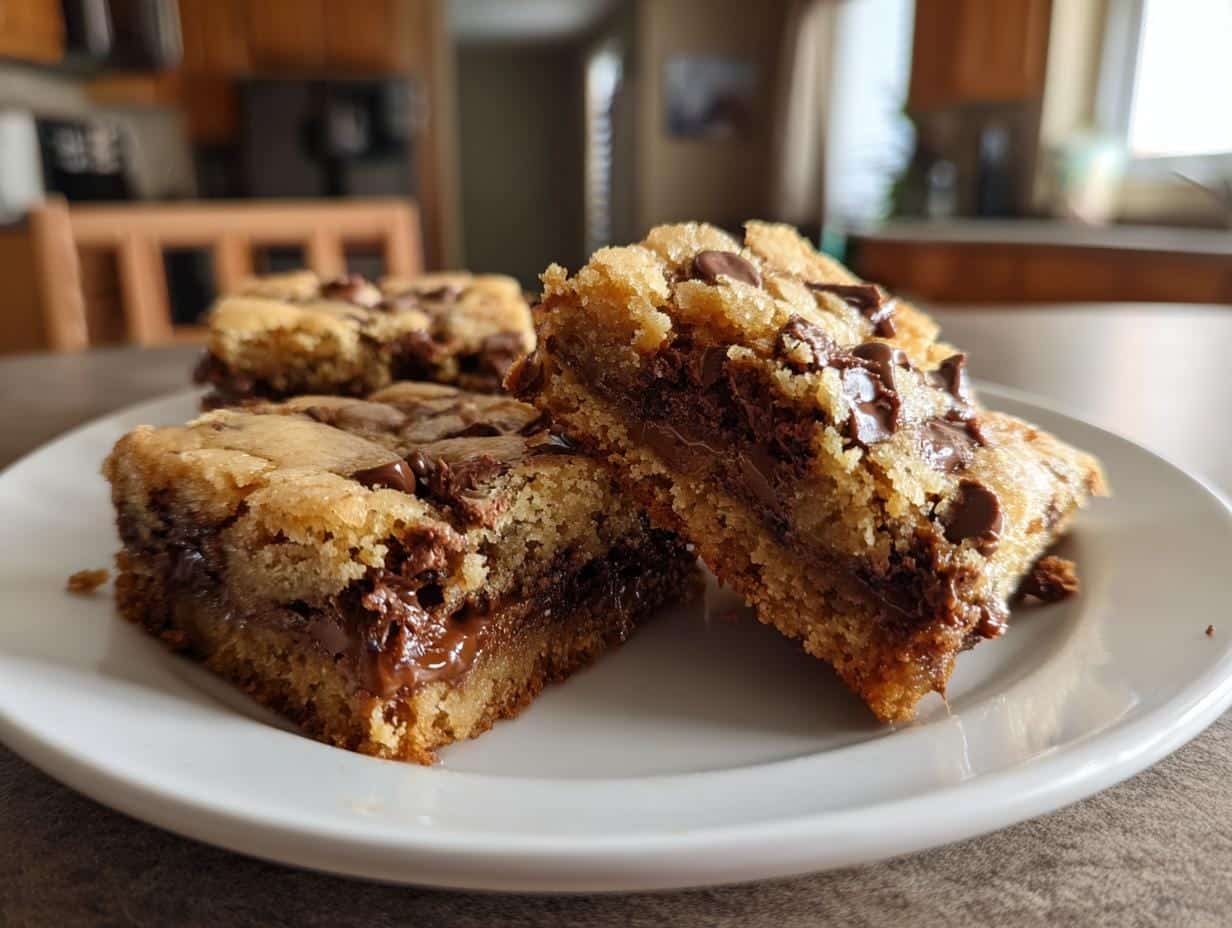
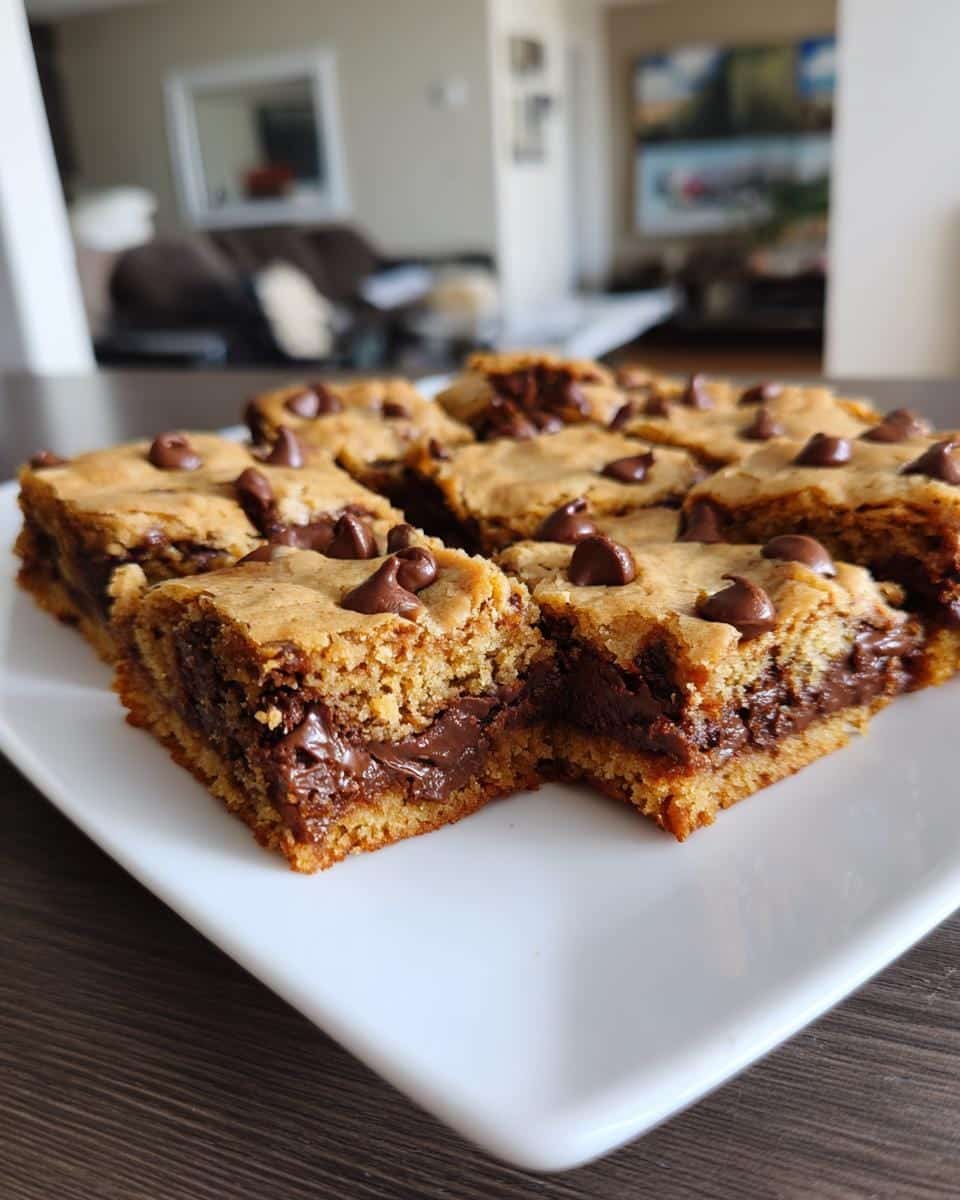
I’ll never forget the first time I made these chocolate chip cookie bars—it was one of those “oops, I need dessert in 30 minutes” moments, and they saved the day. Now, they’re my go-to when I want something quick, foolproof, and guaranteed to disappear fast. No rolling dough, no chilling, just one bowl and a pan—these bars are soft, chewy, and packed with melty chocolate chips in every bite. My kids call them “emergency cookies,” and honestly? They’re not wrong. Whether it’s a bake sale, potluck, or just a Tuesday, this recipe never lets me down. Plus, that buttery, caramelized edge? Chef’s kiss.

Table of contents:
Why You’ll Love These Chocolate Chip Cookie Bars
Listen, I’m not exaggerating when I say these bars are pure magic. Here’s why they’ve become my secret weapon (and why you’ll be making them on repeat):
- Effortless to make: No fancy techniques here—just melt, mix, and bake. You don’t even need a mixer! I’ve made these half-asleep at 6 AM for school bake sales (don’t ask).
- That perfect texture: Crispy golden edges with a center so soft and chewy, it’s like biting into a giant chocolate chip cookie. Pro tip: underbake by a minute for extra gooeyness.
- Ready in a flash: From bowl to pan to oven in under 10 minutes. When unexpected guests show up or the kids demand cookies now, this recipe’s got your back.
- Crowd-pleaser guarantee: The disappearing act these bars pull at parties is almost comical. Last Thanksgiving, my uncle hid the last piece in his napkin—true story.
Seriously, if you want a dessert that feels like a warm hug without the fuss, these bars are it. They’re the little black dress of baked goods—always appropriate, always delicious.
Ingredients for Chocolate Chip Cookie Bars
Okay, let’s gather our cookie bar dream team! Here’s what you’ll need—and yes, I’m including all my little measurement quirks because precision matters when we’re chasing that perfect chewy texture:
- 1 cup (2 sticks) unsalted butter, melted – Not softened, not cold—melted! This gives those crispy edges we love.
- 1 cup light brown sugar, packed – Pack it tight in your measuring cup like you’re stuffing a suitcase for vacation. That extra density = caramel magic.
- 1/2 cup granulated sugar – Plain white sugar does the job here, no fancy substitutes needed.
- 2 large eggs – I mean LARGE—not medium, not jumbo. Crack them into a separate bowl first to avoid shell surprises.
- 2 teaspoons vanilla extract – Splurge on the real stuff if you can. Imitation vanilla makes me sad.
- 2 1/4 cups all-purpose flour – Spoon it into your measuring cup, don’t scoop! We want fluffy flour, not packed.
- 1 teaspoon baking soda – Check the expiration date—old baking soda equals flat bars.
- 1/2 teaspoon salt – Trust me, this balances all the sweetness beautifully.
- 2 cups semisweet chocolate chips – The classic choice, but see my notes below for fun twists!
Ingredient Substitutions & Notes
Baking should be fun, not stressful—so here’s my no-fail guide to swapping things around when needed:
- Butter alternatives: Coconut oil works in a pinch (use refined for no coconut taste), but the texture changes slightly. Margarine? Grandma would frown, but it’ll do.
- Sugar swaps: Dark brown sugar adds deeper molasses notes. For less sweetness, try 3/4 cup brown + 1/4 cup white sugar.
- Egg issues? For each egg, mix 1 tbsp ground flaxseed + 3 tbsp water and let thicken for 5 minutes.
- Flour options: Gluten-free 1-to-1 blends work shockingly well here—I’ve tested them!
- Chip varieties: Go wild! Dark chocolate, chopped chocolate bars, peanut butter chips, or even half chocolate/half toasted pecans.
See? Plenty of wiggle room to make these bars yours. Just promise me one thing—don’t skip the salt. It’s the unsung hero that makes all the flavors pop!
How to Make Chocolate Chip Cookie Bars
Alright, let’s get to the fun part—turning that bowl of ingredients into golden, chocolate-studded perfection! Follow these steps (and my running commentary) for foolproof results every time:
- Preheat your oven to 350°F (175°C) and grease that 9×13-inch pan like you mean it. I use butter or nonstick spray, getting into every corner. Cold pans = uneven baking, and we can’t have that!
- In a large bowl, mix the melted butter, brown sugar, and granulated sugar until it looks like caramel sauce. No lumps allowed! This takes about a minute with a wooden spoon—no mixer needed, but feel free if you’re feeling fancy.
- Beat in the eggs one at a time, stirring well after each. This is where patience pays off—fully incorporating each egg makes the texture just right. Then, splash in that vanilla like you’re making perfume. Ahhh, that smell!
- In another bowl, whisk together flour, baking soda, and salt. Here’s my trick: sift them through your fingers to banish any baking soda clumps. Nobody wants a bitter bite!
- Gradually add the dry ingredients to the wet, mixing just until the flour disappears. Overmixing = tough bars, and we want tender, so stop when you still see a few streaks. It’ll come together, promise!
- Fold in those glorious chocolate chips with enthusiasm—I like to reserve a handful to sprinkle on top for bakery-worthy looks. The dough will be thick and sticky, like cookie dough should be.
- Spread the dough evenly into your prepared pan. Wet your fingers or press with a spatula—this stuff is stubborn! Get it into every corner for uniform thickness.
- Bake for 25-30 minutes until the edges are golden brown and the center looks just set. It’ll keep cooking as it cools, so pull it when the middle still seems slightly soft. Your kitchen should smell like a bakery at this point—enjoy it!
- Let cool completely before cutting. I know, waiting is torture, but hot bars fall apart. Distract yourself with coffee or dishwashing… or just hover and inhale that vanilla-chocolate aroma.
Tips for Perfect Chocolate Chip Cookie Bars
After making approximately a zillion batches (my neighbors are suspiciously well-fed), here are my hard-earned secrets:
- Underbake slightly for ultimate gooeyness – Pull them at 25 minutes if you love fudgy centers. They’ll firm up as they cool but stay gloriously soft.
- Resist overmixing! Stir just until ingredients combine—those last few flour streaks will disappear as you fold in chocolate chips.
- Pan size matters – A 9×13” metal pan is ideal. Glass pans bake slower, so add 5 minutes. Want thicker bars? Use a 9×9” pan and bake 30-35 minutes.
- Line your pan with parchment for easy lifting and clean cuts. Leave an overhang on two sides as “handles.” Lifesaver for pretty bars!
- Press extra chips on top before baking for that photogenic, melty look. Works every time for Instagram glory.
See all our recipes for more baking inspiration!
There you go—everything I’ve learned through (delicious) trial and error. Now go forth and bake with confidence!
Storing & Reheating Chocolate Chip Cookie Bars
Here’s the beautiful thing about these bars—they stay ridiculously soft for days if you store them right. (Not that they usually last that long in my house!) Here’s how to keep them tasting fresh-baked:
Storing Tips for Maximum Freshness
At room temperature: Stack cooled bars in an airtight container with parchment between layers to prevent sticking. They’ll stay perfect for 3-4 days—if your family doesn’t devour them first. Pro tip: toss in a slice of bread to maintain moisture (sounds weird, works magic!).
In the fridge: Not my favorite method (cold cookies make me sad), but they’ll keep for up to a week chilled. Let them come to room temp before eating—or better yet, warm them up!
Freezing for later: These bars freeze like champs! Wrap individual bars tightly in plastic wrap, then stash in a freezer bag for up to 3 months. Perfect for unexpected cookie emergencies or lunchbox treats.
Reheating Like a Pro
Want that just-baked warmth? Here’s how:
- Microwave method: 10-15 seconds on high—any longer and the chocolate turns lava-hot. I like covering with a damp paper towel to prevent drying.
- Oven refresh: Wrap bars in foil and warm at 300°F for 5-8 minutes. Crisps the edges while keeping centers soft.
- Straight from frozen: No thawing needed! Microwave frozen bars for 20 seconds or pop in a toaster oven until warm.
Bonus tip: For frozen bars, I sometimes drizzle extra melted chocolate over the top before reheating—because why not? It’s like giving your leftovers a fancy makeover!
Nutritional Information for Chocolate Chip Cookie Bars
Okay, let’s talk numbers—but before we do, let me say this: I firmly believe dessert should be enjoyed first, analyzed later. That said, I know some folks (like my carb-counting sister) appreciate the details, so here’s the breakdown per bar, based on cutting the pan into 24 squares:
- Calories: 210 – Think of it as two delicious bites of happiness!
- Sugar: 18g – Mostly from the brown sugar and chocolate chips—nature’s candy, right?
- Sodium: 120mg – That little pinch of salt does more than you’d think.
- Fat: 10g (6g saturated) – Thank the butter for that rich, melt-in-your-mouth quality.
- Carbohydrates: 28g – With 1g fiber from those sneaky-good chocolate chips.
- Protein: 2g – Not why we’re here, but hey, every bit counts!
- Cholesterol: 30mg – Mostly from the eggs and butter—the building blocks of deliciousness.
Important note: These values are estimates based on specific ingredients—your results may vary slightly depending on brands, exact measurements, or if you (like me) “accidentally” add extra chocolate chips. Always consult a nutritionist for precise dietary needs.
Now, if you’ll excuse me, I need to go “quality test” another bar… purely for research purposes, of course!
Common Questions About Chocolate Chip Cookie Bars
After years of baking (and eating!) these bars, I’ve heard every question imaginable—so let me save you some kitchen stress with my tried-and-true answers:
Absolutely! These bars freeze like champs. Just cool completely, then wrap tightly in plastic wrap and foil before freezing for up to 3 months. When the craving hits, thaw at room temp for an hour or microwave straight from frozen—they’ll taste freshly baked!
Oh, you like that caramelized crunch too? Here’s my trick: use a metal pan (not glass) and press the dough thinner at the edges before baking. The thinner parts crisp up beautifully while the center stays soft. Bonus: sprinkle a pinch of coarse sugar along the edges before baking for extra crunch!
This breaks my heart—but we can fix it! Cakey bars usually mean either too much flour (always spoon-and-level!), overmixing (stop when just combined!), or overbaking (pull them when the center looks slightly underdone). Next batch, promise!
Yes—but don’t just dump twice the dough in one pan! Double all ingredients, then divide between two 9×13” pans or bake in batches. Trying to bake one giant batch leads to raw centers and burnt edges (ask me how I know…).
Share Your Chocolate Chip Cookie Bars
Nothing makes me happier than seeing your versions of these bars come to life! Did you add nuts? Try brown butter? Maybe even sneak in some sea salt on top? I want to hear all about it—the triumphs, the flops (we’ve all been there!), and especially those “oh my gosh, these disappeared in five minutes” moments.
Snap a photo of your pan—edges perfectly golden, chocolate chips still glistening—and tag me on Instagram. Or leave a comment below telling me how your family reacted (my favorite story so far: a reader’s toddler tried to hide an entire bar in his diaper! Now that’s a review).
Your feedback helps more than you know. When you rate the recipe, it’s like giving me a virtual high-five—and it helps other bakers find this little slice of cookie bar heaven. So go ahead, take that last bite, then come back and tell me: what made your batch special?

P.S. If disaster strikes (burnt edges, underbaked centers—we don’t judge!), message me. I’ve got a troubleshooting toolkit ready to save your next batch!
Print
Irresistible Chocolate Chip Cookie Bars – 30-Minute Bliss!
- Total Time: 35 minutes
- Yield: 24 bars
- Diet: Vegetarian
Description
Easy-to-make chocolate chip cookie bars that are soft, chewy, and loaded with chocolate chips. Perfect for any occasion.
Ingredients
- 1 cup (2 sticks) unsalted butter, melted
- 1 cup light brown sugar, packed
- 1/2 cup granulated sugar
- 2 large eggs
- 2 teaspoons vanilla extract
- 2 1/4 cups all-purpose flour
- 1 teaspoon baking soda
- 1/2 teaspoon salt
- 2 cups semisweet chocolate chips
Instructions
- Preheat your oven to 350°F (175°C). Grease a 9×13-inch baking pan.
- In a large bowl, mix melted butter, brown sugar, and granulated sugar until smooth.
- Beat in eggs one at a time, then stir in vanilla.
- In another bowl, whisk flour, baking soda, and salt. Gradually add to the wet ingredients.
- Fold in chocolate chips.
- Spread the dough evenly into the prepared pan.
- Bake for 25-30 minutes or until edges are golden brown.
- Let cool before cutting into bars.
Notes
- For gooey bars, slightly underbake.
- Store in an airtight container for up to 5 days.
- You can add nuts for extra crunch.
- Prep Time: 10 minutes
- Cook Time: 25 minutes
- Category: Dessert
- Method: Baking
- Cuisine: American