Skip to content
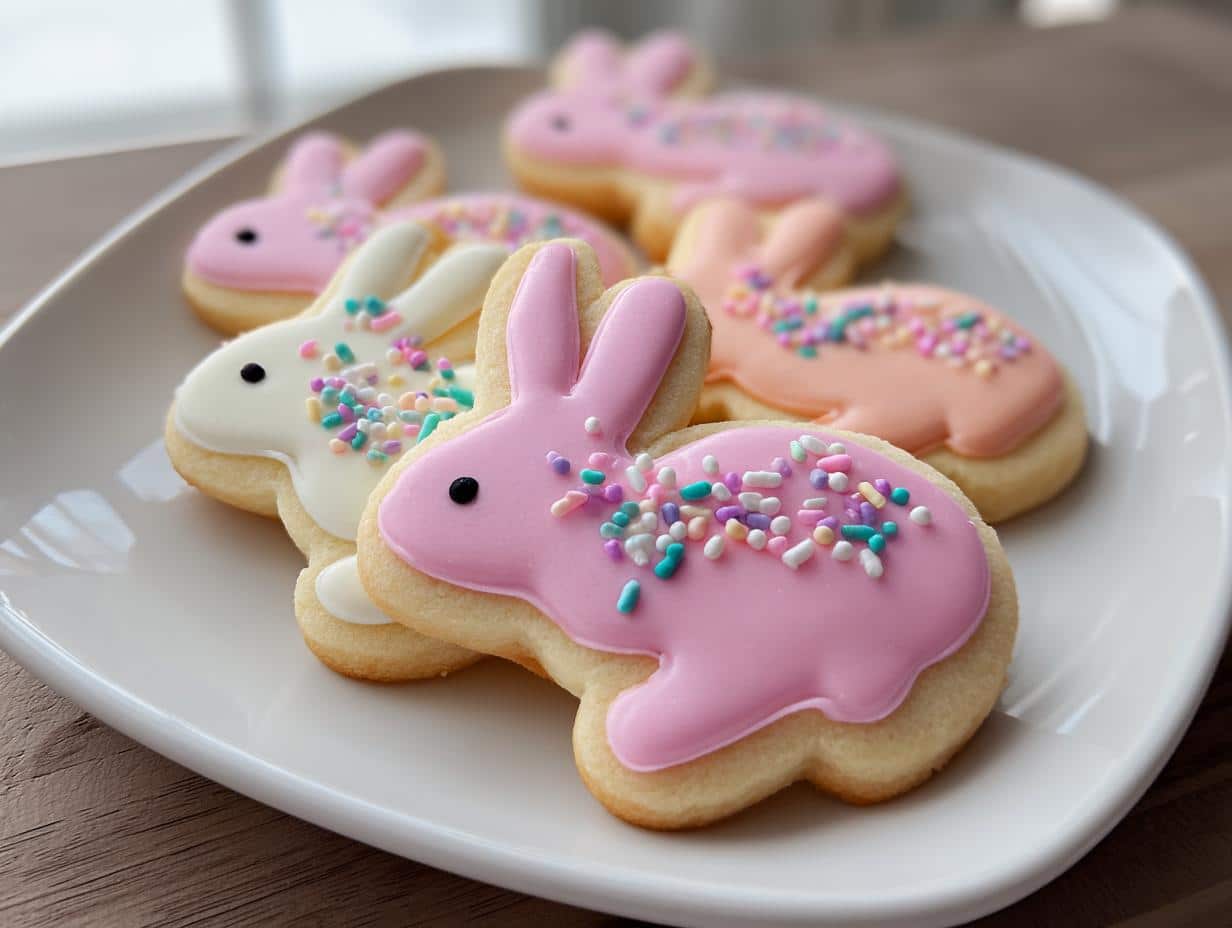
Nothing says Easter like the smell of freshly baked cookies filling your kitchen! These Easter Bunny Button Cookies Magic Treat have been my family’s favorite spring tradition ever since my grandmother first showed me how to shape the dough into perfect little rounds. I still remember her hands guiding mine as we pressed thumbprints into each cookie – “Just like bunny paws,” she’d whisper.
The magic happens when you decorate them! Watching kids’ faces light up as they pipe on icing whiskers and sprinkle noses is pure joy. These simple cookies transform into edible works of art that make Easter baskets extra special. What I love most is how they bring everyone together – grandparents, parents, and little ones all gathered around the table, laughing while creating their own bunny masterpieces.
After years of tweaking the recipe, I’ve perfected these Easter Bunny Button Cookies Magic Treat to be just sweet enough, with that perfect soft-yet-slightly-crunchy texture that holds up to all your creative decorations. They’re the kind of treat that disappears fast at Easter brunches, with guests sneaking seconds when they think no one’s looking!
Why You’ll Love These Easter Bunny Button Cookies Magic Treat
Oh my goodness, where do I even begin? These Easter Bunny Button Cookies Magic Treat aren’t just cookies – they’re little bundles of joy that make the whole season brighter! Here’s why they’ve become my absolute must-make every year:
- Kid-approved fun: My nieces and nephews go wild for decorating these! The simple round shape means even tiny hands can help press the dough, and everyone gets creative with their bunny faces.
- Edible Easter cards: I package them in clear bags with pretty ribbons – instant homemade gifts that teachers and neighbors actually get excited about!
- Your artistic playground: Go classic with pink icing ears or get wild with rainbow sprinkles. Last year we did “punk rock bunnies” with edible glitter – no rules!
- That perfect bite: They’ve got this magical balance – crisp edges with a tender center that melts when you nibble those candy button noses.
Trust me, once you make these, you’ll understand why my friends start asking about “the bunny cookies” right after Valentine’s Day!
Ingredients for Easter Bunny Button Cookies Magic Treat
Gathering your ingredients is like assembling a little Easter magic kit! Here’s everything you’ll need to create these adorable bunny cookies – I promise it’s all simple pantry staples you probably already have:
- 2 cups all-purpose flour (spooned and leveled – don’t pack it down!)
- 1/2 cup granulated sugar (the regular white kind works best here)
- 1/2 cup unsalted butter, softened (leave it out for about 30 minutes – you want it cool but spreadable)
- 1 large egg (room temperature helps everything blend smoothly)
- 1 tsp vanilla extract (the good stuff makes all the difference)
- 1/2 tsp baking powder (this gives them just the right lift)
- 1/4 tsp salt (balances all that sweetness perfectly)
- Assorted colored icing (I use gel food coloring for vibrant hues that won’t thin out the icing)
- Sprinkles for decoration (those tiny round ones make perfect bunny noses!)
Pro tip: For the icing, I swear by Americolor food gels – a tiny drop gives you Easter egg-bright colors without changing the consistency. But regular liquid food coloring works too – just add it slowly!
Ingredient Substitutions
Don’t stress if you’re missing something! Here are my tried-and-true swaps that still make delicious bunny cookies:
- Gluten-free flour: Use a 1:1 gluten-free baking blend (I like King Arthur’s). The texture might be slightly more delicate, so handle gently.
- Dairy-free butter: Earth Balance sticks work great! Just make sure it’s the baking kind, not the spreadable tub version.
- Egg substitute: For each egg, mix 1 tbsp ground flaxseed with 3 tbsp water and let sit 5 minutes. The cookies will be slightly denser but still tasty.
- Natural food dyes: Beet powder for pink, turmeric for yellow, or spirulina for green – just know the colors will be more muted.
Remember: Every substitution changes the texture a bit, so don’t be afraid to adjust baking time by a minute or two if needed!
Equipment Needed for Easter Bunny Button Cookies Magic Treat
You won’t need any fancy gadgets to make these adorable bunny cookies – just basic baking tools that most kitchens already have! Here’s what I always pull out of my cabinets:
- Mixing bowls (one medium for dry ingredients, one large for creaming butter and sugar)
- Electric mixer (a hand mixer works perfectly, though I’ve made these with just a sturdy wooden spoon when feeling nostalgic)
- Baking sheets (two standard half-sheet pans are ideal – no need to grease them if you use parchment!)
- Parchment paper (my secret weapon for perfect cookies that never stick)
- Measuring cups and spoons (for those precise measurements that make all the difference)
Now for the fun extras that take your bunny cookies to the next level:
- Piping bags or small zip-top bags (for those perfect icing details – snip just the tiniest corner off!)
- Small offset spatula (helps spread icing smoothly if you’re not piping)
- Round cookie cutter (about 2-inch diameter gives the perfect bunny face shape, but a drinking glass works in a pinch)
- Tweezers (sounds silly, but they’re amazing for placing those tiny sprinkle noses just right)
Don’t worry if you’re missing some of the extras – I’ve decorated plenty of bunny cookies with just a butter knife and steady hands! The most important tool is definitely your imagination.
How to Make Easter Bunny Button Cookies Magic Treat
Okay, let’s get to the fun part – making these adorable bunny cookies come to life! I’ve made this recipe so many times I could probably do it in my sleep, but I’ll walk you through each step carefully so yours turn out perfect on the first try.
- Preheat and prep: Get your oven to 350°F (175°C) – that sweet spot where the cookies bake evenly without browning too fast. Line your baking sheets with parchment paper (trust me, it’s worth the extra step for no-stick perfection).
- Mix the dry team: In a medium bowl, whisk together the flour, baking powder, and salt. I like to give it about 15 whisks to make sure everything’s evenly distributed – no one wants a bite with too much baking powder!
- Cream the dream team: In your large bowl, beat the softened butter and sugar together until they’re light and fluffy – about 2 minutes with a mixer. This is where the magic starts! Add the egg and vanilla, mixing until just combined (overbeating here can make cookies tough).
- Bring it all together: Gradually add your dry ingredients to the wet mixture, mixing on low speed until a soft dough forms. The dough should pull away from the sides of the bowl but still feel slightly sticky – that’s perfect!
- Shape your bunnies: Roll tablespoon-sized portions of dough into smooth balls between your palms. Place them about 2 inches apart on your prepared sheets, then gently flatten each one slightly with your fingers (just enough to make a good decorating surface).
- Bake to golden perfection: Pop them in the oven for 8-10 minutes. You’ll know they’re ready when the edges get that lovely light golden color but the centers still look slightly soft. They’ll firm up as they cool – resist the urge to overbake!
- Cool completely: Let the cookies rest on the baking sheet for 5 minutes before transferring to a wire rack. This patience pays off – decorating warm cookies leads to icing disasters I’ve learned about the hard way!
Decorating Tips
Now for my favorite part – turning these simple rounds into adorable bunny faces! Here are my top three decorating secrets:
- Icing consistency is key: Your royal icing should be the thickness of honey – thick enough to hold shape but thin enough to pipe smoothly. Test a small amount first – if it holds a line for 5 seconds before settling, it’s perfect!
- Work in stages: Start with the ears first and let them dry for 15 minutes before adding facial features. This prevents colors from bleeding together and gives you crisp details.
- Sprinkle strategy: For those tiny nose sprinkles, pour some into your palm and use a toothpick to pick up and place each one precisely. It’s tedious but makes such a difference in those cute bunny expressions!
Remember – no two bunnies need to look alike! Some of my favorite cookies have been the “imperfect” ones where kids got creative with crazy ear shapes or mismatched eyes. That’s part of the magic!
Tips for Perfect Easter Bunny Button Cookies Magic Treat
After making hundreds (okay, maybe thousands) of these Easter Bunny Button Cookies Magic Treat over the years, I’ve picked up some tricks that guarantee perfect results every time. Here are my absolute must-know tips:
- Chill sticky dough: If your dough feels too soft after mixing (especially on warm days), pop it in the fridge for 15-20 minutes. Cold dough holds its shape better and prevents those “flat bunny” cookies that spread too much!
- Rotate baking sheets: Ovens have hot spots – I swear mine bakes faster on the right side! Halfway through baking, rotate your pans 180 degrees and switch racks if using two. This ensures all your bunnies get evenly golden.
- Cool completely before decorating: I know it’s tempting to start icing right away, but warm cookies melt icing into a puddle. Wait until they’re completely room temperature – about 30 minutes – for those crisp bunny details.
- Store with parchment layers: When stacking decorated cookies in containers, place parchment between layers. Those adorable icing ears will stay perfect instead of sticking to the cookie above them!
One bonus tip from my grandma? Always make extra dough balls and freeze them before baking. Then you can bake fresh batches whenever unexpected guests drop by – nothing beats warm bunny cookies with tea!
Storage and Serving Suggestions
Now that you’ve created your adorable Easter Bunny Button Cookies Magic Treat, let’s talk about keeping them fresh and showing them off! These cookies actually get better after a day as the flavors meld together – if you can resist eating them all immediately, that is.
Storage secrets: The key is keeping them in an airtight container at room temperature. I swear by my grandma’s old cookie tins lined with parchment paper – they keep the cookies perfectly fresh for up to a week. If your kitchen gets warm, you can pop them in the fridge, but let them come to room temperature before serving for the best texture.
Serving ideas that wow: These aren’t just cookies – they’re edible Easter decorations! Here are my favorite ways to serve them:
- Arrange them on a pastel-colored platter as the centerpiece of your Easter dessert table
- Tie them in clear cellophane bags with pretty ribbon for adorable party favors
- Hide them in Easter baskets (wrap first to prevent icing smudges!)
- Package them in mini Easter egg cartons for a playful presentation
Pro tip: If you’re making them ahead, store undecorated cookies in the freezer for up to a month, then thaw and decorate fresh. The icing colors stay brighter that way!
Easter Bunny Button Cookies Magic Treat Nutritional Information
Okay, let’s be real – we’re not eating bunny cookies for their nutritional value! But since some folks like to know what they’re nibbling on, here’s the scoop on these sweet treats. Remember, these numbers are estimates based on standard ingredients – your actual counts might dance around a bit depending on how generous you are with those sprinkles!
Per cookie (based on 24 cookies per batch):
- Calories: About 95 (but who’s counting when it’s Easter?)
- Sugar: 5g (mostly from that delicious icing smile)
- Sodium: 25mg (just a pinch to balance flavors)
- Fat: 4g (thank that glorious butter for the perfect texture)
- Saturated Fat: 2.5g (worth every creamy bite)
- Carbohydrates: 13g (all the better to fuel your Easter egg hunts!)
- Protein: 1g (surprise! There’s a bit of egg power in there)
A quick heads up – these numbers can hop around based on:
- The exact brands of ingredients you use
- How thick you spread your icing (no judgment if you go heavy!)
- Whether you add extra sprinkles (and let’s be honest – you should)
- If you use alternative ingredients from the substitutions list
At the end of the day, these Easter Bunny Button Cookies Magic Treat are all about joy, not macros. So grab one (or three), savor every bite, and enjoy the magic of the season!
Frequently Asked Questions
Can I freeze undecorated cookies?
Absolutely! Freeze the baked (but undecorated) cookies in airtight containers for up to 2 months. Thaw at room temperature before icing – they’ll taste just as fresh as the day you baked them!
How long does icing take to dry?
Royal icing typically sets in about 1-2 hours, but for full hardness (especially if stacking), let them dry overnight. Pro tip: Use a fan on low speed to speed up drying time!
Can I use natural food dyes?
Yes! Beet powder, turmeric, and spirulina work beautifully. Just know colors will be more muted than artificial dyes. Mix powders with a drop of vodka first for smoother blending into icing.
Can kids help decorate?
Oh please do! Give them their own cookies and let creativity flow. The “imperfect” ones often become family favorites. Just keep wet wipes handy – little fingers get messy!
Why did my cookies spread too much?
Likely your butter was too warm or dough needed chilling. Next time, refrigerate dough balls for 15 minutes before baking – this helps them hold their perfect bunny shape!
Share Your Easter Bunny Button Cookies Magic Treat
Oh my goodness, I just know your Easter Bunny Button Cookies Magic Treat are going to be absolutely adorable! There’s nothing I love more than seeing all the creative ways people decorate these sweet little cookies. Did you go classic with pink ears? Get wild with rainbow sprinkles? Maybe give your bunnies some funky sunglasses with black icing?
Please please please share your cookie masterpieces with me! Snap a quick photo and tag me @BunnyCookieQueen (or whatever your handle is) – I swear I squeal with delight every time I see a new batch pop up in my feed. Your creations might even inspire next year’s cookie designs!
And hey, don’t be shy if they’re not “perfect” – some of my favorite cookies over the years have been the ones where kids went rogue with the decorating. Those lopsided ears and mismatched eyes? Pure magic. After all, the real joy is in the making and sharing, not Instagram-perfect cookies (though yours will probably be gorgeous anyway!).
Can’t wait to see your bunny families come to life – happy baking, my friend!
Print
Easter Bunny Button Cookies Magic Treat – 24 Irresistible Bites of Joy
- Total Time: 30 minutes
- Yield: 24 cookies
- Diet: Vegetarian
Description
Delightful Easter Bunny Button Cookies that bring magic to your Easter celebrations. These cute treats are fun to make and perfect for sharing.
Ingredients
- 2 cups all-purpose flour
- 1/2 cup granulated sugar
- 1/2 cup unsalted butter, softened
- 1 large egg
- 1 tsp vanilla extract
- 1/2 tsp baking powder
- 1/4 tsp salt
- Assorted colored icing
- Sprinkles for decoration
Instructions
- Preheat oven to 350°F (175°C). Line baking sheets with parchment paper.
- In a bowl, mix flour, baking powder, and salt.
- In another bowl, cream butter and sugar until fluffy. Beat in egg and vanilla.
- Gradually add dry ingredients to wet ingredients, mixing until combined.
- Roll dough into small balls and place on baking sheets. Flatten slightly.
- Bake for 8-10 minutes until edges are lightly golden.
- Let cool completely before decorating with icing and sprinkles.
Notes
- Store cookies in an airtight container for up to 1 week.
- Use food-safe markers to draw bunny faces if desired.
- Kids can help with decorating for fun family activity.
- Prep Time: 20 minutes
- Cook Time: 10 minutes
- Category: Dessert
- Method: Baking
- Cuisine: American