Skip to content
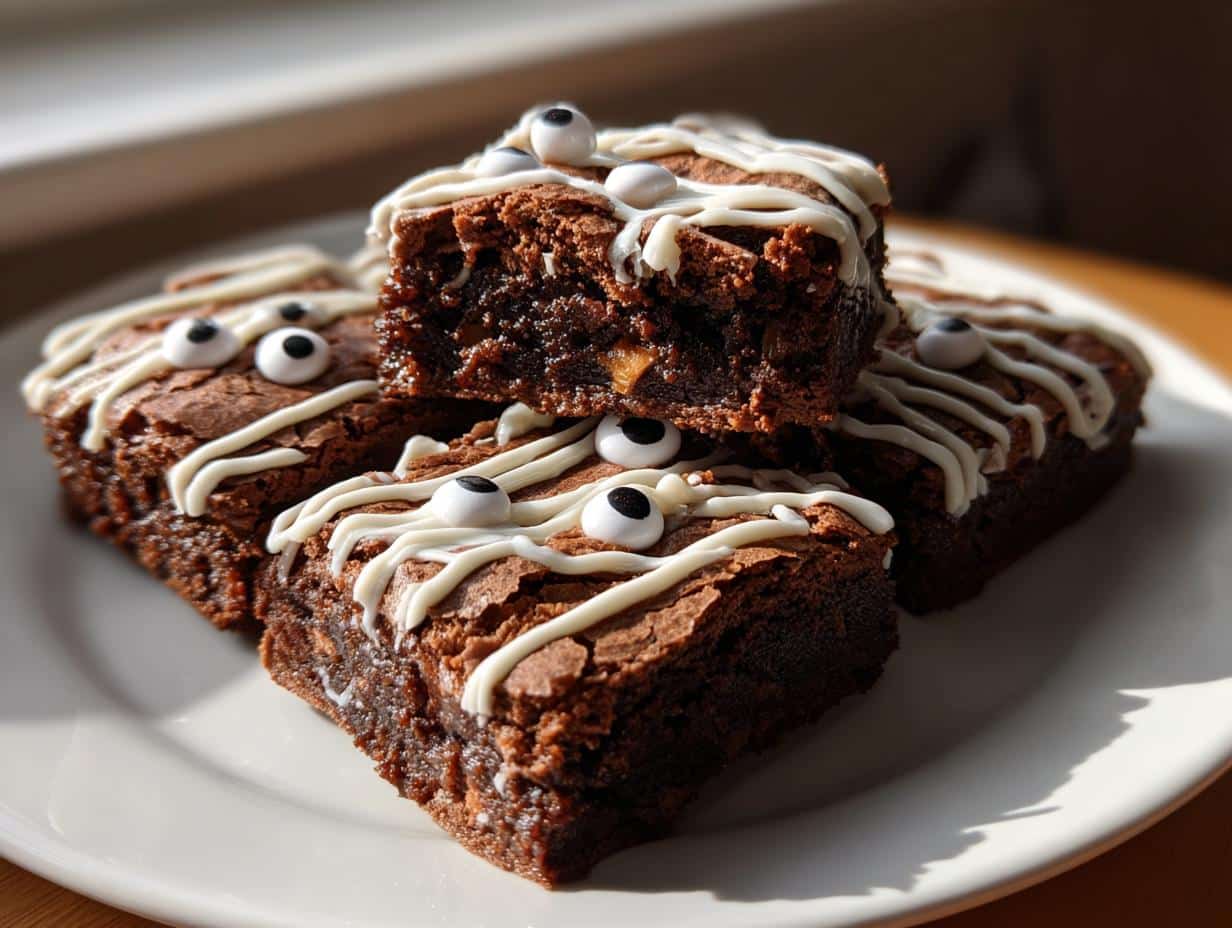
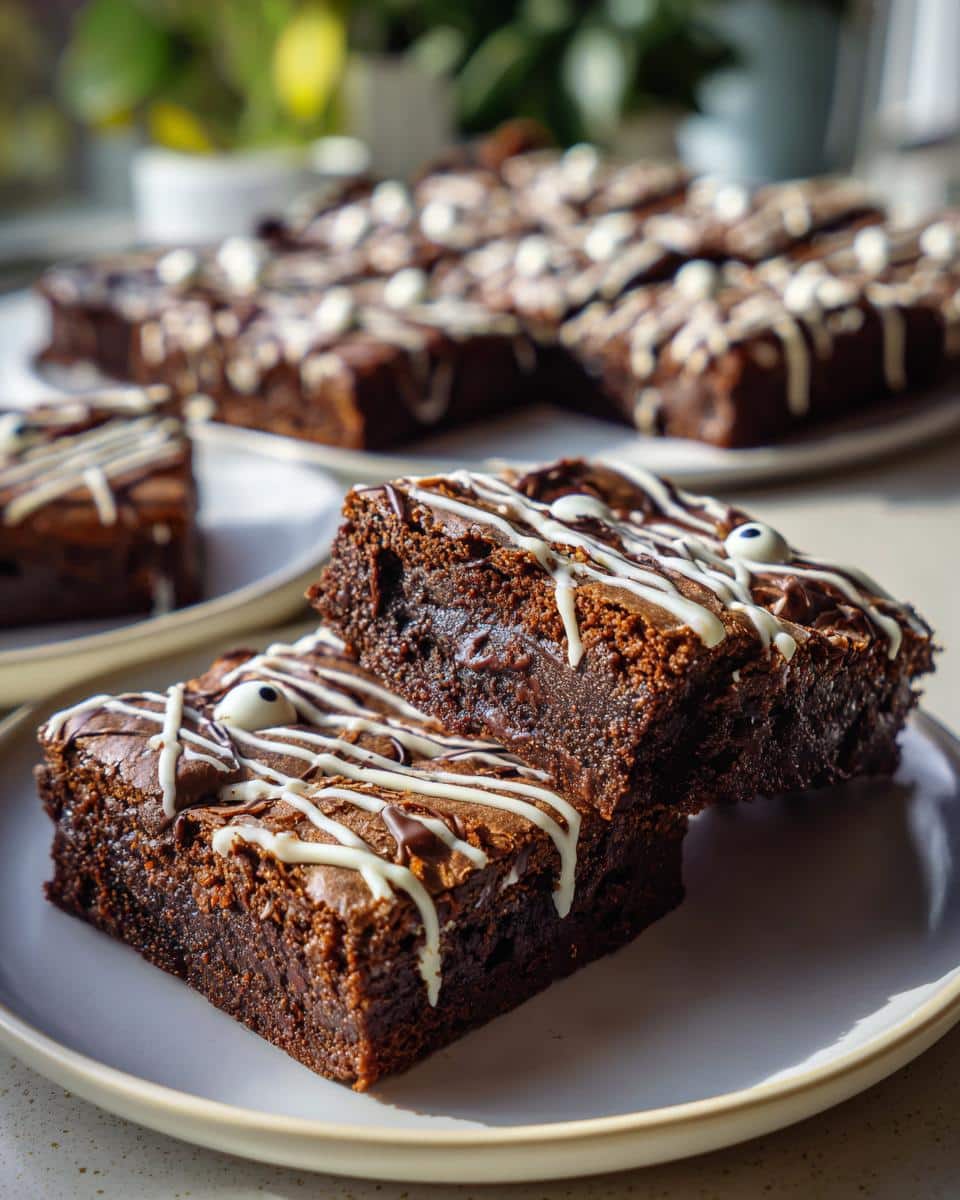
Picture this: it’s Halloween night, the air is crisp, and your kitchen smells like chocolatey goodness. That’s the magic of these Spooky Mummy Brownies—they’re the perfect mix of delicious and downright adorable. I first made these for my niece’s Halloween party, and let me tell you, they disappeared faster than a ghost in the night! The best part? They’re so easy, even if you’re more “boo” than “baker.”
With just a box of brownie mix (or your favorite homemade recipe), some melted white chocolate, and a handful of candy eyes, you’ve got a treat that’ll steal the show at any spooky gathering. The drizzled “bandages” make them look like little mummies peeking out from their wrappings—fun for kids and irresistible for adults. Trust me, once you see those tiny edible eyes staring back at you, you’ll be hooked.
Whether you’re hosting a party or just want to surprise your family, these brownies are a no-fuss way to bring some Halloween cheer. Plus, they’re so simple, you can whip them up between carving pumpkins and handing out candy!
TABLE OF CONTENTS:
Why You’ll Love These Spooky Mummy Brownies for a Delightful Halloween Treat
Listen, I know Halloween can get hectic—between costumes and decorations, who has time for complicated desserts? That’s why these mummy brownies are my go-to every year. Here’s why they’re absolutely perfect:
- Faster than a zombie shuffle: From bowl to plate in under an hour (most of that’s just baking time while you do other things!)
- Kid-approved magic: The moment those candy eyes go on, you’ll hear “SO COOL!” from every little monster at your party
- Secretly easy: Looks fancy, but honestly—if you can melt chocolate and drizzle, you’ve already mastered the hard part
- Instantly festive: No need for fancy decorating skills when “messy bandages” are the whole vibe (my kinda aesthetic)
Last year, my neighbor’s teenager actually took a picture of them for Instagram—that’s how you know they’re winner. And when the sugar rush hits? Totally worth it.
Ingredients for Spooky Mummy Brownies for a Delightful Halloween Treat
Okay, let’s raid the pantry—here’s everything you’ll need to bring these adorable mummies to life. Pro tip: I always set everything out on the counter first because nothing kills Halloween vibes faster than realizing you’re out of chocolate chips mid-recipe!
- 1 box (18-20 oz) brownie mix – or enough homemade batter for a 9×13 pan (use your favorite recipe if you’re feeling fancy)
- 1 cup white chocolate chips – the “bandages” that make these look mummy-fied
- 1 tablespoon coconut oil – makes the chocolate drizzle smooth as a ghost’s whisper
- 1/2 cup edible candy eyes – the bigger the better for maximum cuteness
- Oil/eggs/water – whatever your brownie mix calls for (I always add an extra egg yolk for fudgier brownies)
See? Nothing weird here—just regular baking staples with a Halloween twist. That tiny bag of candy eyes will last you through years of spooky treats (trust me, I’ve been using the same bag since 2019). And if you’re like me and always have brownie mix stashed for emergencies, you’re already halfway done!
Equipment You’ll Need
Don’t worry—you won’t need any fancy gadgets for these mummy brownies. Just grab these basics from your kitchen (chances are, they’re already lurking in your drawers!):
- 9×13 inch baking pan – or whatever size your brownie mix calls for
- Mixing bowl & spoon – for stirring up that brownie batter (or just use the box if you’re lazy like me sometimes)
- Microwave-safe bowl – for melting the white chocolate without scary clumps
- Piping bag or ziplock bag – or just a spoon if you want that “haunted house messy” look
- Spatula – to scrape every last bit of batter (brownie batter theft is a serious crime in my kitchen)
That’s it! No stand mixers, no special tools—just stuff you probably already have. If you’re really in a pinch, you can even melt the chocolate in a saucepan over low heat (but watch it like a hawk—burnt chocolate is the opposite of spooky fun).
How to Make Spooky Mummy Brownies for a Delightful Halloween Treat
Alright, let’s get these little mummies wrapped up! I’ve made this recipe more times than I can count (usually while wearing a witch hat, because why not?), so follow these steps and you’ll have the cutest Halloween treats on the block.
Step 1: Bake the Brownies
First things first—fire up that oven to 350°F (175°C). Grab your 9×13 inch pan and give it a quick grease or line it with parchment paper (trust me, you’ll thank me later when they pop out perfectly).
Now, mix up that brownie batter—either follow the box instructions or whip up your favorite homemade version. Pour it into the pan and slide it into the oven for about 20-25 minutes (or until a toothpick comes out with a few moist crumbs—no wet batter!).
Here’s the hard part: let them cool completely. I know, I know—waiting is torture when your kitchen smells like chocolate heaven. But if you try to decorate warm brownies, you’ll end up with melty, sad mummies instead of cute ones. Take it from someone who learned the hard way!
Step 2: Decorate Like Mummies
Time for the fun part! Cut the cooled brownies into rectangles—I usually go for 12 big ones or 24 smaller squares if it’s a kids’ party.
Now, melt your white chocolate chips with the coconut oil in 30-second bursts in the microwave, stirring between each. You want it smooth but not too hot—think “drizzle-able.” If it’s too thick, add a tiny bit more oil.
Pour the melted chocolate into a piping bag or a ziplock with the corner snipped off (about 1/8 inch opening). Now, channel your inner mummy-wrapping artist! Drizzle the chocolate back and forth over each brownie in messy “bandage” lines—leave little gaps so the brownie peeks through.
Quickly press on 2-3 candy eyes while the chocolate is still wet. Tip: Angle them slightly so they look like they’re peeking out from the bandages! Let the chocolate set completely (about 15 minutes) before serving.
And that’s it! You’ve just made the easiest, most adorable Halloween treat ever. Watch them disappear faster than a ghost at sunrise!
Tips for Perfect Spooky Mummy Brownies for a Delightful Halloween Treat
After making more mummy brownies than I’d like to admit (what? Halloween comes every year!), I’ve picked up some tricks that’ll take yours from “cute” to “showstopper.” These are the little things that make all the difference:
- Chill before cutting: Pop your baked brownies in the fridge for 15 minutes before slicing—clean cuts mean neater mummies! No more crumbly edges ruining your spooky vibe.
- Toothpick precision: If your chocolate drizzle goes rogue, use a toothpick to nudge it into place or create finer “bandage” details. Works like magic!
- Eyes on the prize: Press those candy eyes in slightly so they sink in as the chocolate sets—otherwise they might pop off when someone takes a bite (horror movie scream optional).
- Temperature matters: If your kitchen’s warm, chill the decorated brownies for 10 minutes to set the chocolate faster. But don’t refrigerate overnight—that can dry them out.
My biggest lesson? Embrace the imperfections! Last year my drizzle looked more like a spiderweb than bandages—but you know what? The kids thought it was even cooler that way. Halloween treats should be fun, not perfect!
Variations for Spooky Mummy Brownies for a Delightful Halloween Treat
Listen, rules were made to be broken—especially when it comes to Halloween treats! Here are some fun twists I’ve tried (and loved) over the years to mix up these mummy brownies:
- Orange you glad? Add a drop of orange food coloring to the melted white chocolate for pumpkin-spiced mummies. The color looks amazing against the dark brownie!
- Dark chocolate drama Swap the white chocolate for dark—the contrast makes those “bandages” look extra creepy (perfect for teen parties).
- Peanut butter ghosts Mix peanut butter into half the melted chocolate for a tasty surprise. Drizzle both colors for “double-wrapped” mummies!
- Spooky sprinkles Toss some black sanding sugar or Halloween sprinkles on the wet chocolate for a glittery, graveyard effect.
Last year, I even tried crumbling Oreos on top before baking for “dirt-covered” mummies—messy but delicious! The best part? No matter how you tweak them, those candy eyes make everything instantly adorable.
Pro tip: If you’re feeling extra, pipe little chocolate “mouths” screaming under the bandages. Takes 2 seconds but gets big laughs every time!

Serving and Storing Spooky Mummy Brownies for a Delightful Halloween Treat
Okay, confession time—I’ve never actually had leftovers of these mummy brownies (they vanish like magic!), but just in case your willpower is stronger than mine, here’s how to keep them fresh:
Room temp is best: Store them in an airtight container at room temperature for up to 3 days. The coconut oil in the chocolate helps keep them soft—no one wants crunchy mummy bandages!
Stack with care: If you need to layer them, place parchment paper between layers so the eyes don’t get squished. Those little candy peepers are tougher than they look, but they’ll pop off if handled roughly.
Freezing for future frights: Yes, you can freeze them! Wrap individual brownies tightly in plastic wrap, then pop them in a freezer bag for up to 1 month. Thaw at room temperature when the Halloween craving hits.
Serving tip: Arrange them on a black platter with some plastic spiders crawling around—instant graveyard vibes! For parties, I like to label them “Mummy’s Little Secrets” with a cute sign.
One warning: The eyes might bleed color if stored too long (spooky, but not tasty). If you’re making these more than a day ahead, add the eyes right before serving. Otherwise, they’re perfect for pre-party prep when you’ve got a million other Halloween things to do!
Nutritional Information
Okay, let’s be real—nobody eats Halloween treats for their health benefits (unless counting “joy” as a nutrient!). But since some of us like to know what we’re indulging in, here’s the scoop on these mummy brownies. Remember, these are estimates based on using a standard brownie mix—your numbers might do the monster mash depending on your specific ingredients!
- Serving size: 1 brownie (about 2×3 inches)
- Calories: 180-200 (mostly from that glorious chocolate!)
- Fat: 8g (because butter makes everything better)
- Saturated fat: 3g (blame the white chocolate drizzle)
- Carbs: 25g (perfect for fueling trick-or-treat marathons)
- Sugar: 15g (it’s Halloween—let’s not kid ourselves)
- Protein: 2g (surprise! There’s a tiny bit in the eggs)
Quick disclaimer: These numbers will boogie up or down if you use homemade brownies, different chocolate brands, or go wild with extra toppings. The candy eyes? Basically negligible—they’re just sugar and joy. Now go enjoy your mummy treats guilt-free—Halloween calories don’t count if you eat them in costume!
Questions About Spooky Mummy Brownies for a Delightful Halloween Treat
Over the years, I’ve gotten so many questions about these adorable mummy brownies—usually while people are stuffing their faces with them! Here are the most common ones I hear, along with my tried-and-true answers:
Q: Can I use homemade brownie batter instead of a mix?
Absolutely! My grandma’s fudge brownie recipe works beautifully here—just bake it in a 9×13 pan until set. The box mix is just my lazy shortcut when I’m drowning in Halloween prep. Homemade will taste richer, but honestly? Kids go wild for either version once those eyes go on.
Q: Help! My white chocolate seized up—can I fix it?
Oh honey, I’ve been there—nothing kills the Halloween spirit like clumpy chocolate. Try adding a teaspoon more coconut oil and microwaving for 10-second bursts, stirring like crazy between each. If it’s beyond saving, grab some white frosting and thin it with milk until drizzle-able. Crisis averted!
Q: How far in advance can I make these?
The brownies themselves can be baked 2 days ahead—just wait to decorate until the day of so the chocolate stays fresh-looking. Assembled mummies are best within 24 hours (though they’ll still taste amazing for 3 days—the eyes might just get a little “sleepy” looking).
Q: My candy eyes keep falling off—what am I doing wrong?
Two tricks: First, press them in firmly while the chocolate is still wet. Second, if your kitchen’s warm, pop the tray in the fridge for 5 minutes to set the chocolate quickly. And hey—if a few eyes go rogue? Call them “zombie mummies” and lean into the spookiness!
Q: Can I make these gluten-free or dairy-free?
You bet! Use your favorite GF brownie mix and dairy-free chocolate chips. For the eyes, check craft stores for allergen-free versions (or get creative with mini marshmallows and food-safe markers!). Halloween should be fun for everyone.
Now go forth and create your mummy army! Tag me on Instagram with your spooky creations—I live for seeing your Halloween kitchen adventures! Check out more spooky ideas!


Spooky Mummy Brownies: 3 Easy Steps to Halloween Magic
- Total Time: 40 minutes
- Yield: 12 mummy brownies
- Diet: Vegetarian
Description
Decadent brownies shaped like mummies for a fun Halloween treat. Perfect for parties or spooky gatherings.
Ingredients
- 1 box of brownie mix (or homemade brownie batter)
- 1 cup white chocolate chips
- 1 tablespoon coconut oil
- 1/2 cup edible candy eyes
Instructions
- Preheat oven to 350°F (175°C).
- Prepare brownie mix according to package instructions and bake in a greased pan.
- Let brownies cool completely, then cut into rectangles.
- Melt white chocolate chips with coconut oil in a microwave-safe bowl.
- Drizzle melted white chocolate over brownies in a criss-cross pattern to resemble mummy bandages.
- Press candy eyes onto the brownies before the chocolate sets.
- Let chocolate harden before serving.
Notes
- Use store-bought brownie mix for convenience or homemade for better flavor.
- Add a drop of food coloring to the white chocolate for a spooky effect.
- Store in an airtight container for up to 3 days.
- Prep Time: 15 minutes
- Cook Time: 25 minutes
- Category: Dessert
- Method: Baking
- Cuisine: American