Skip to content
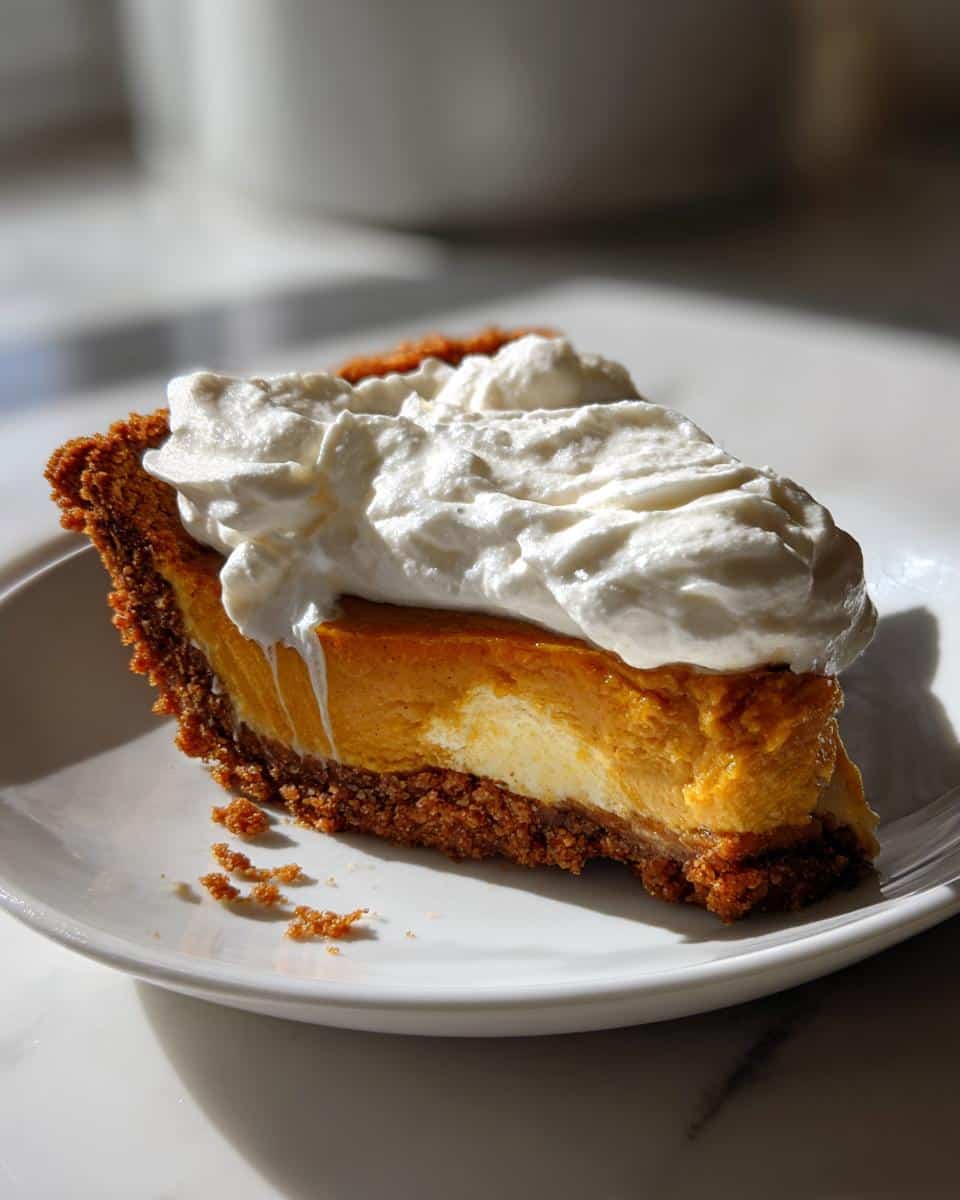
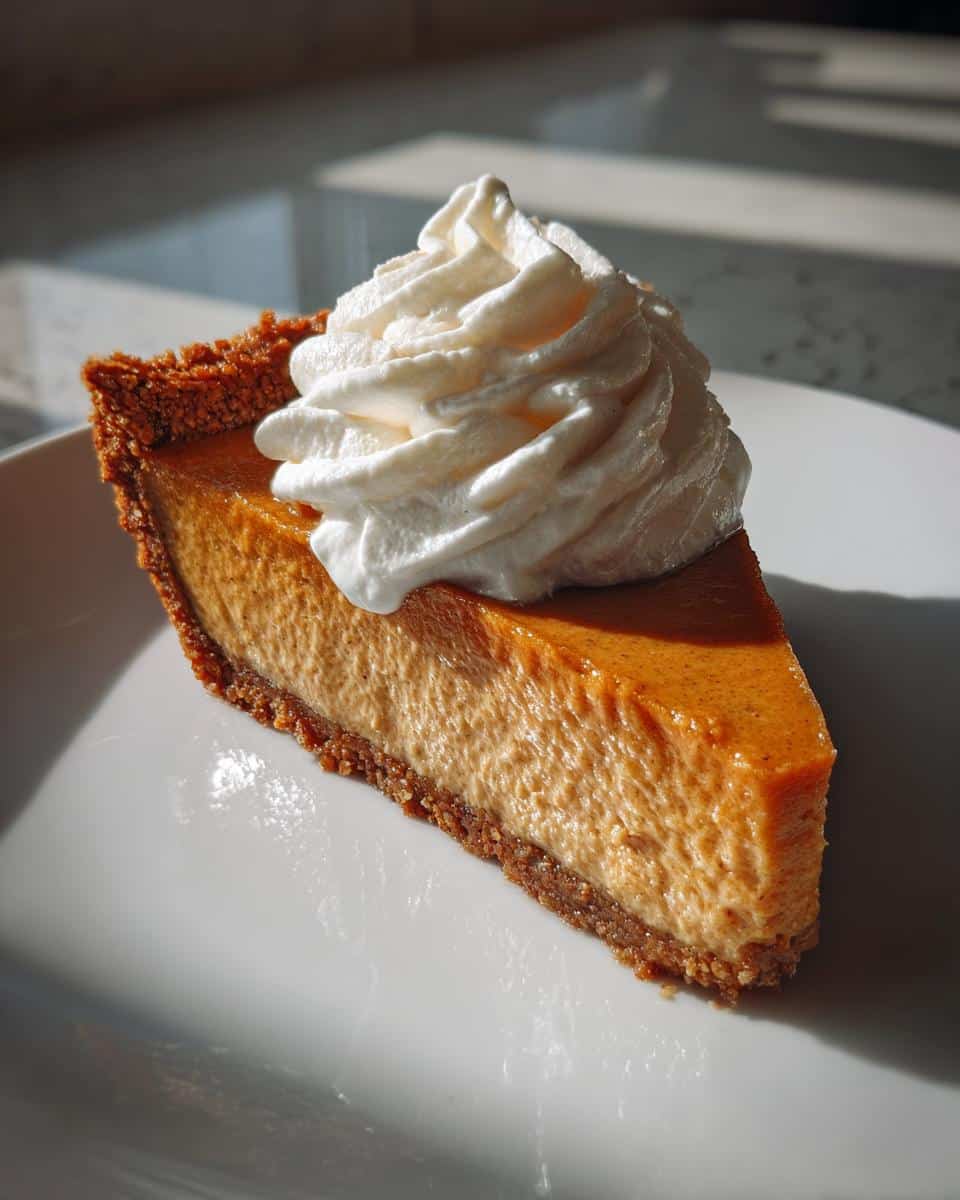
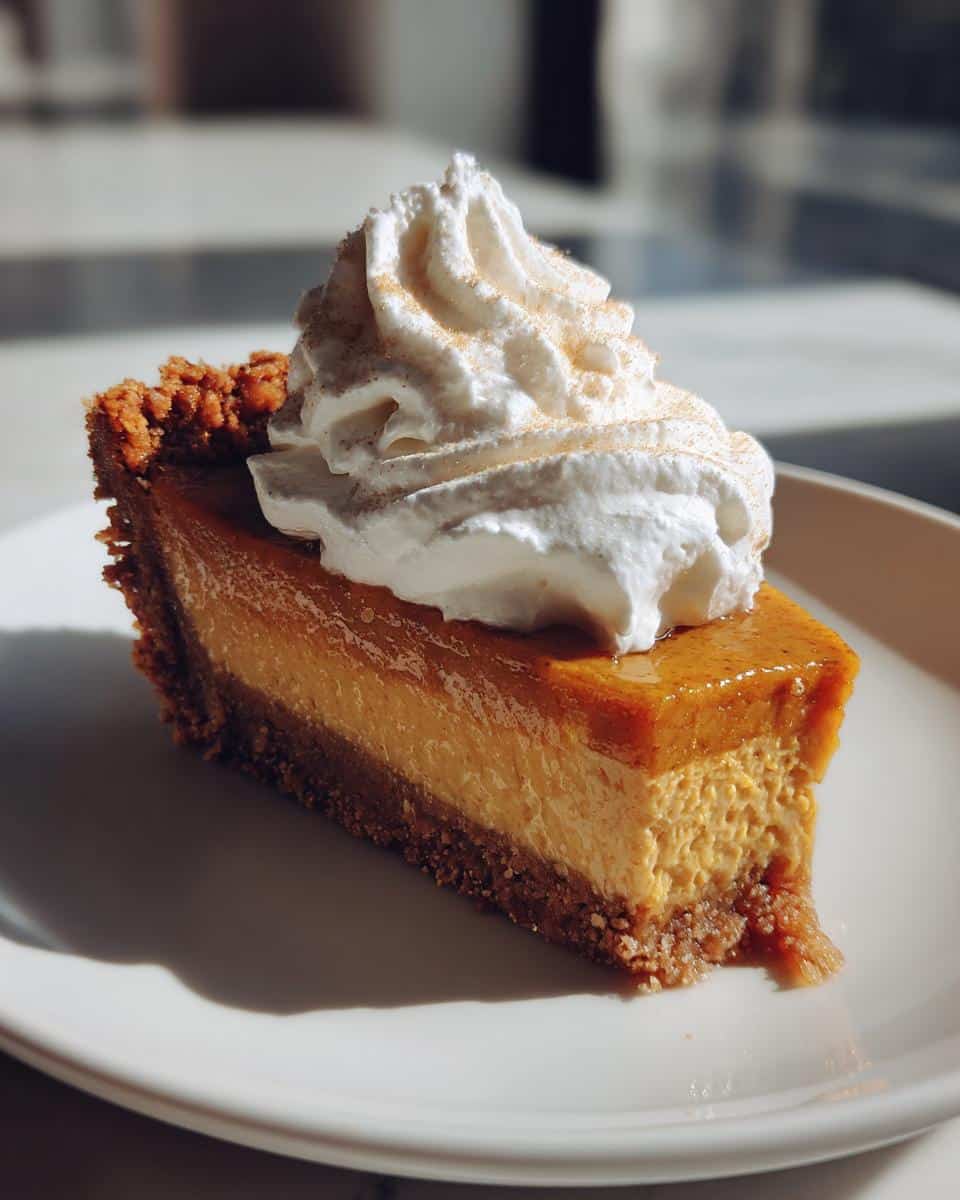
There’s something magical about pumpkin pie season, isn’t there? Every Thanksgiving, my kitchen transforms into a spice-scented workshop where I’ve spent years perfecting this silky pumpkin pie with gingersnap crust. I remember the first time I swapped out the traditional pastry crust for crushed gingersnaps – the way that spicy crunch played against the creamy filling made my family’s eyes light up. Now it’s the only version they’ll let me make!
The secret? A velvety smooth filling that practically melts on your tongue, thanks to just the right balance of heavy cream and eggs. That gingersnap crust? It’s not just a container – it’s a flavor bomb that makes every bite exciting. And don’t get me started on the fresh whipped cream topping – that cool, pillowy cloud is the perfect foil to the warm spices. After a dozen Thanksgivings of tweaking, I’ve landed on what I truly believe is pumpkin pie perfection.
Table of contents:
Why You’ll Love This Silky Pumpkin Pie with Gingersnap Crust and Whipped Cream
This isn’t just any pumpkin pie—it’s the one that’ll have your guests begging for seconds. Here’s why:
- No-fuss crust: Crushed gingersnaps and butter come together in minutes—no rolling pin required!
- Velvety texture: The filling is so smooth it practically glides off your fork (I call it “pumpkin silk”).
- Spice magic: Cinnamon, ginger, nutmeg, and cloves create that warm hug of flavor without overpowering.
- Perfect contrast: That crispy-spicy crust against the creamy filling? Absolute dessert harmony.
- Make-ahead easy: It actually gets better after chilling—one less thing to stress about on the big day!
Trust me, after one bite, you’ll understand why this pie disappears faster than the turkey every year.
Ingredients for Silky Pumpkin Pie with Gingersnap Crust and Whipped Cream
Gathering the right ingredients makes all the difference with this pie. I’ve learned through trial and error that quality matters – especially with the pumpkin puree and spices. Here’s exactly what you’ll need, broken down into each component:
Crust Ingredients
- 1 1/2 cups gingersnap cookie crumbs (about 25 cookies, finely ground – I use Nabisco’s for their extra spice kick)
- 1/4 cup unsalted butter, melted (and slightly cooled – trust me, hot butter makes the crust greasy)
Filling Ingredients
- 1 can (15 oz) pure pumpkin puree (Libby’s is my go-to – not pie filling! That extra sugar will throw everything off)
- 3/4 cup packed dark brown sugar (light brown works in a pinch, but dark adds caramel notes that are just dreamy)
- 1 teaspoon ground cinnamon (freshly opened if possible – stale cinnamon loses its magic)
- 1/2 teaspoon ground ginger (the powdered kind – save fresh ginger for stir fries)
- 1/4 teaspoon ground nutmeg (I grate mine fresh, but pre-ground is fine)
- 1/4 teaspoon ground cloves (just a pinch – these little guys are powerful!)
- 1/2 teaspoon fine sea salt (balances all that sweetness beautifully)
- 2 large eggs (room temperature – cold eggs make the filling lumpy)
- 1 cup heavy whipping cream (the higher the fat content, the silkier the pie)
- 1 teaspoon pure vanilla extract (skip the imitation stuff here)
Whipped Cream Topping Ingredients
- 1/2 cup heavy whipping cream (chilled is best – it whips up faster)
- 1 tablespoon powdered sugar (sifted to avoid lumps)
- Pinch of cinnamon (optional, but adds a pretty speckled look)
A quick tip before we start – measure everything before you begin. There’s nothing worse than realizing you’re short on gingersnaps halfway through crushing them!
Equipment You’ll Need
You don’t need fancy gadgets to make this pie, but these tools are absolute must-haves in my kitchen when pumpkin pie season rolls around:
- 9-inch pie dish (glass or ceramic works best—metal pans can make the crust too dark)
- Food processor (for crushing those gingersnaps to perfect crumbs in seconds, though a zip-top bag and rolling pin works in a pinch!)
- Medium mixing bowl (for the crust—I like one with a rubber base so it doesn’t slide while I’m mixing)
- Large mixing bowl and whisk (a balloon whisk makes the filling silky smooth without overmixing)
- Electric hand mixer (for whipping the cream to soft peaks—though a stand mixer works if you’ve got one)
- Rubber spatula (to scrape every last bit of that precious filling into the crust!)
That’s it! No special pie weights or fancy tools—just good old-fashioned baking essentials.
How to Make Silky Pumpkin Pie with Gingersnap Crust and Whipped Cream
Now for the fun part! Don’t let the steps intimidate you – this pie comes together easier than you’d think. Just follow these simple stages, and you’ll have a showstopper dessert that’ll make everyone think you spent all day in the kitchen.
Preparing the Gingersnap Crust
First things first – preheat that oven to 350°F (175°C). While it’s heating up, toss your gingersnap crumbs into a bowl with the melted butter. Mix until it looks like wet sand – you’ll know it’s right when you can squeeze a handful and it holds its shape. Press this heavenly scented mixture firmly into your pie dish, going up the sides just a bit. Pop it in the oven for 8 minutes – no longer, or those sugars will burn! Let it cool completely before adding the filling. I usually set it on a rack and walk away – patience here prevents a soggy bottom later.
Making the Pumpkin Filling
In your largest bowl, whisk together the pumpkin puree and brown sugar until they’re best friends. Now add all those gorgeous spices – cinnamon, ginger, nutmeg, and cloves – plus the salt. Crack in the eggs one at a time, whisking well after each. The secret to that silky texture? Slowly stream in the heavy cream while whisking, then add the vanilla. Don’t overmix – just get everything combined and smooth. If you see a few tiny lumps, don’t panic! They’ll disappear during baking.
Baking and Chilling the Pie
Pour your velvety filling into the cooled crust – it should come right to the top. Bake for 45-50 minutes. Here’s my golden rule: the center should jiggle like Jell-O when you gently shake the pan, not like a wave pool. Overbaking leads to cracks! Let it cool on a rack for an hour, then refrigerate for at least 2 hours (overnight is even better). This chill time is non-negotiable – it lets the flavors marry and the texture set up perfectly.
Whipping the Cream Topping
Right before serving, whip your chilled heavy cream with powdered sugar until soft peaks form. I stop when the whisk leaves trails that slowly disappear. Dollop generously over slices – that cool, creamy cloud is the perfect finish to each spicy-sweet bite. If you’re feeling fancy, dust with a little cinnamon or extra gingersnap crumbs!
Tips for the Perfect Silky Pumpkin Pie
After years of Thanksgiving trial and error (and more pumpkin pies than I can count), I’ve learned these foolproof tricks that guarantee pie perfection every time:
- Chill that crust! After pre-baking, let it cool completely—I pop mine in the fridge for 15 minutes. A hot crust melts the filling before it even hits the oven.
- Room temp eggs are non-negotiable. Cold eggs make the filling lumpy. If you forget, just submerge them in warm water for 5 minutes.
- The jiggle test never lies. When the center wobbles like set gelatin—not liquid—it’s done. Overbaking causes cracks (though whipped cream hides a multitude of sins!).
- Patience makes perfect. Let the pie cool slowly on a rack, then refrigerate at least 2 hours. Rushing this leads to a weepy mess when slicing.
- Crust insurance: If edges brown too fast, shield them with foil strips—I save the foil from my butter wrapper for this!
Remember—even “imperfect” pies still taste incredible. The real secret? Serving it with love (and extra whipped cream!).
Variations for Silky Pumpkin Pie with Gingersnap Crust
One of the best things about this pie is how easily it adapts to different tastes and dietary needs. Over the years, I’ve played with all sorts of twists—some intentional, some happy accidents—and these are the variations my family keeps requesting:
Crust Swaps That Work Wonders
While I’m obsessed with the gingersnap crust, sometimes you’ve got to improvise. Graham crackers make a fantastic substitute—use the same 1 1/2 crumbs to 1/4 cup butter ratio, but add an extra pinch of ginger and cinnamon to keep that spicy kick. For a nutty twist, try replacing 1/4 cup of the crumbs with finely ground pecans or walnuts. My gluten-free friends swear by using gluten-free gingersnaps—just check they’re the crispy kind, not the cakey ones.
Dairy-Free Delights
That silky texture doesn’t have to mean dairy! For the filling, swap the heavy cream with full-fat coconut milk (chilled overnight—use just the thick part that rises to the top). The topping? Whip the other half of that coconut milk can with a tablespoon of maple syrup until fluffy. It’s shockingly good! Vegan butter works fine in the crust too—just opt for the stick variety rather than tub margarine.
Flavor Boosters
Want to take things up a notch? Stir 2 tablespoons bourbon or dark rum into the filling—it deepens all those warm spices beautifully. For coffee lovers, a teaspoon of instant espresso powder blended with the dry ingredients adds incredible depth (you won’t taste coffee, just richness). Last Thanksgiving, I swirled in a tablespoon of tahini before baking, and now my brother won’t let me make it any other way!
The moral? Don’t be afraid to make this pie your own. As long as you keep the basic ratios the same, almost any tweak turns out delicious. After all, my perfect gingersnap crust started as a “what if?” experiment during a grocery shortage—look how that turned out!
Serving and Storing Silky Pumpkin Pie
Alright, you’ve waited patiently (okay, maybe not so patiently) while that gorgeous pie chilled—now for the best part! For picture-perfect slices, keep your knife hot—I run mine under warm water and dry it quickly between cuts. The heat glides right through that creamy filling. Wipe the blade clean each time, and you’ll get those Instagram-worthy clean edges every time.
Presentation matters! I always garnish with a few extra gingersnap crumbs and a dusting of cinnamon for that bakery-finished look. If you really want to wow guests, pipe the whipped cream in pretty swirls using a star tip—though I usually just go for the rustic “dollop with love” method myself.
Leftovers? Ha—good luck having any! But if by some miracle you do, cover the pie tightly with plastic wrap (press it right against any cut edges) and stash it in the fridge. It’ll stay dreamy for 3 days—just refresh the whipped cream when serving. One warning though—that crust loses its crunch by day two, so if you’re making ahead, I’d wait to add the whipped cream topping until just before serving.
Now here’s my controversial opinion—skip freezing this one. The texture just isn’t the same after thawing. That silky filling turns grainy, and the crust gets soggy. Trust me, it’s so good fresh that you won’t have to worry about leftovers anyway!
Nutritional Information
Now, I’m no nutritionist, but after years of making this pie (and enjoying one too many slices myself), I’ve learned a thing or two about what’s in each bite. Here’s the scoop on what you’re getting in that heavenly slice:
Per serving (1/8 of pie):
- 320 calories (worth every single one!)
- 18g fat (10g saturated – thank that glorious heavy cream)
- 36g carbohydrates (22g from sugars – mostly that brown sugar magic)
- 4g protein (who knew dessert could pack a little protein punch?)
- 2g fiber (blame the pumpkin for trying to be healthy)
- 280mg sodium (that pinch of salt does more than just flavor)
Now, let’s be real—this is an estimate. Your actual numbers might dance around a bit depending on your specific ingredients. Using organic heavy cream? Might be a tad more fat. Forget the whipped cream topping? You’ll save about 50 calories (but seriously, why would you?). The important thing? This isn’t health food—it’s holiday magic. Enjoy every silky, spicy, creamy bite without guilt!
Frequently Asked Questions
Over the years, I’ve gotten the same questions popping up about this silky pumpkin pie—usually while friends are hovering over the dessert table with a fork in hand! Here are the answers to everything you might wonder before diving in:
Can I make this pie ahead?
Absolutely! In fact, I always make mine the day before. That gingersnap crust actually gets better after a night in the fridge—it soaks up just enough moisture from the filling to stay crisp but not soggy. Just hold off on the whipped cream topping until right before serving (store it in the fridge covered with plastic wrap pressed directly on the surface). The whole pie keeps beautifully for up to 3 days refrigerated—if it lasts that long!
What’s the best way to slice clean pieces?
Here’s my foolproof method: Run your sharpest knife under very hot water for 10 seconds, dry it quickly, and make your first cut. Wipe the blade clean between each slice—those little bits of filling clinging to the knife are what cause ragged edges. For extra insurance, chill the pie for 15 minutes after cutting the first slice (the cold helps “set” the cuts). And if all else fails? Just cover any messy bits with extra whipped cream—no one will ever know!
Can I substitute the spices?
You bet! While I love my classic blend, pumpkin pie spices are deeply personal. Out of cloves? Double the nutmeg. Not a ginger fan? Try allspice instead. My neighbor swears by adding a pinch of black pepper for depth (sounds weird, tastes amazing). Just keep the total amount of spices around 2 teaspoons—any more can overwhelm the pumpkin. Pro tip: If using pre-mixed pumpkin pie spice, start with 1 1/2 teaspoons and adjust to taste.
Print
Silky Pumpkin Pie with Gingersnap Crust – 5 Secrets to Perfection
- Total Time: 3 hrs 10 mins (includes chilling)
- Yield: 8 servings
- Diet: Vegetarian
Description
A smooth and creamy pumpkin pie with a spiced gingersnap crust, topped with light whipped cream.
Ingredients
- 1 1/2 cups gingersnap cookie crumbs
- 1/4 cup melted butter
- 1 can (15 oz) pumpkin puree
- 3/4 cup brown sugar
- 1 tsp cinnamon
- 1/2 tsp ginger
- 1/4 tsp nutmeg
- 1/4 tsp cloves
- 1/2 tsp salt
- 2 large eggs
- 1 cup heavy cream
- 1 tsp vanilla extract
- 1/2 cup heavy cream (for topping)
- 1 tbsp powdered sugar (for topping)
Instructions
- Preheat oven to 350°F (175°C).
- Mix gingersnap crumbs with melted butter and press into a 9-inch pie dish.
- Bake crust for 8 minutes, then let cool.
- Whisk pumpkin puree, brown sugar, spices, salt, eggs, heavy cream, and vanilla until smooth.
- Pour filling into crust and bake for 45-50 minutes until set.
- Cool completely, then refrigerate for at least 2 hours.
- Whip remaining heavy cream with powdered sugar and spread over pie before serving.
Notes
- Use fresh pumpkin puree for best flavor.
- Chill pie thoroughly before slicing for clean cuts.
- Store leftovers covered in the refrigerator.
- Prep Time: 20 mins
- Cook Time: 50 mins
- Category: Dessert
- Method: Baking
- Cuisine: American