Skip to content
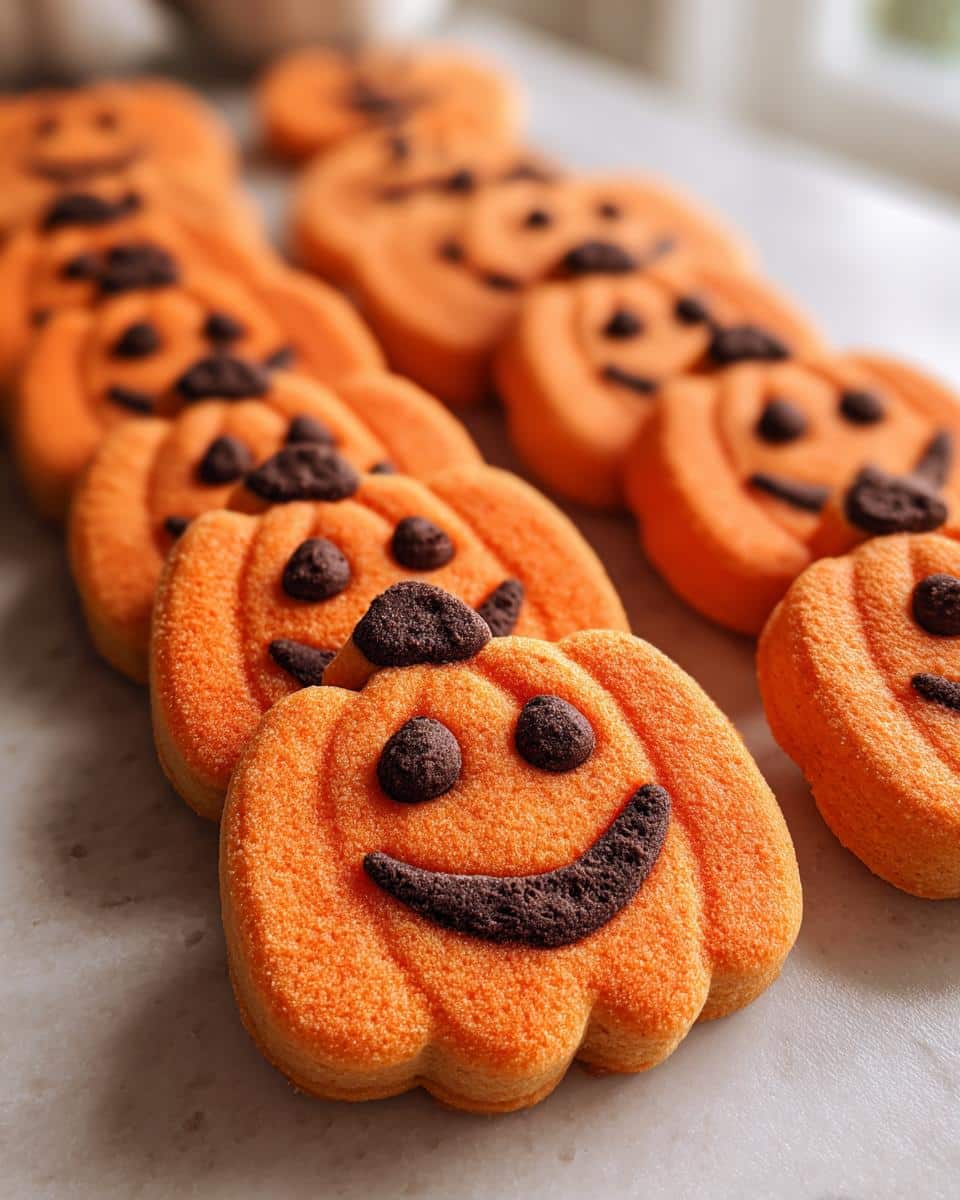
There’s nothing quite like the smell of pumpkin-spiced everything filling the kitchen when fall rolls around. But you know what I get really excited about? Pumpkin-shaped cookies! Every October, my kitchen turns into a pumpkin patch – the edible kind, of course. These adorable cookies have become our family’s favorite Halloween tradition, ever since my niece declared them “too cute to eat” (though she always manages to finish hers first!).
What I love most about these pumpkin-shaped cookies is how they bring everyone together. The kids go wild decorating funny faces with chocolate chips, while the adults sneak bites of dough (don’t pretend you don’t do this too). They’re simple enough for beginner bakers but special enough to impress at any autumn gathering. Whether you’re hosting a Halloween party or just want to make an ordinary Tuesday feel festive, these cheerful orange treats will do the trick.
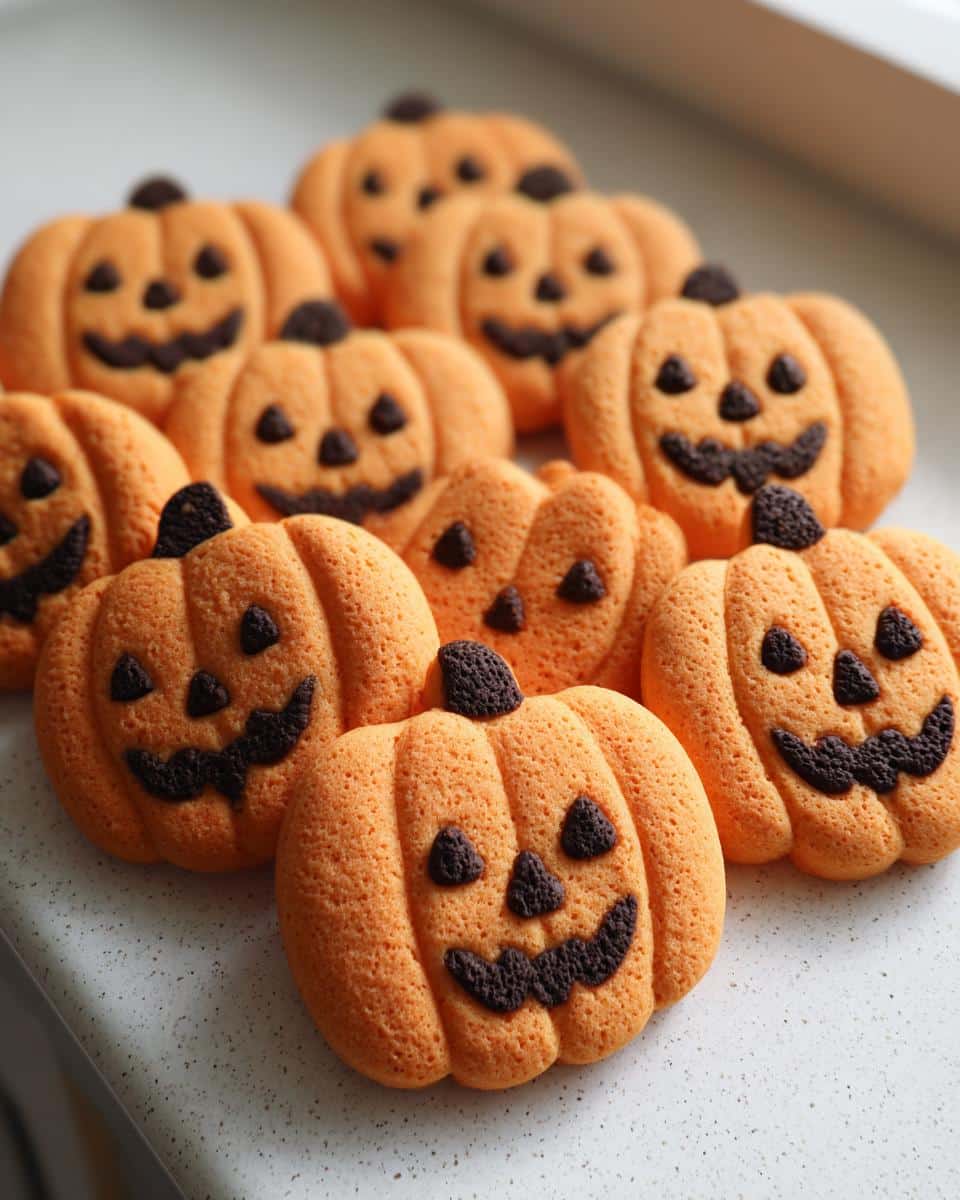
Table of contents:
The best part? You don’t need any fancy cookie cutters – just your hands and a butter knife to create those signature pumpkin ridges. In about 30 minutes, you’ll have a batch of cookies that look straight out of a storybook pumpkin patch. Let me show you how we make ours!
Ingredients for Pumpkin-Shaped Cookies
Here’s everything you’ll need to make these adorable pumpkin cookies (and yes, I’ve tried cheaper brands – these are the ones that work best):
- Dry ingredients: 2 1/2 cups all-purpose flour (spooned and leveled!), 1/2 teaspoon baking powder, 1/4 teaspoon salt
- Wet ingredients: 1 cup unsalted butter (softened but still cool to touch), 1 cup granulated sugar, 1 large egg (room temp!), 1 teaspoon pure vanilla extract
- For color & decoration: Orange gel food coloring (I use Wilton’s “Orange”), mini chocolate chips or black icing for faces, optional green decorator’s icing for stems
Ingredient Substitutions & Notes
No vanilla extract? Almond extract makes a fun twist! For gluten-free, I’ve had success with Cup4Cup flour blend. Coconut oil can replace butter – but chill dough longer. Warning: Liquid food coloring makes dough sticky – gel gives vibrant color without altering texture. Brown sugar instead of white makes deeper orange cookies (reduce oven temp by 25°F). And please – real butter only! Margarine makes sad, flat pumpkins.
How to Make Pumpkin-Shaped Cookies
Ready to turn your kitchen into a pumpkin cookie factory? Here’s the step-by-step magic:
- Preheat your oven to 350°F (175°C) – no cheating on this step! Line baking sheets with parchment paper (trust me, you’ll thank me later).
- Whisk together the flour, baking powder, and salt in a bowl. I like to do this while my butter’s softening – multitasking at its finest!
- Cream the butter and sugar for a solid 2-3 minutes until it’s light, fluffy, and almost white. This is where the magic starts – don’t rush it!
- Add the egg and vanilla, mixing until fully incorporated. Now’s when I add my orange gel food coloring (about 10 drops for vibrant pumpkins).
- Gradually mix in dry ingredients until just combined. The dough should pull away from the bowl’s sides – if it sticks, chill for 30 minutes.
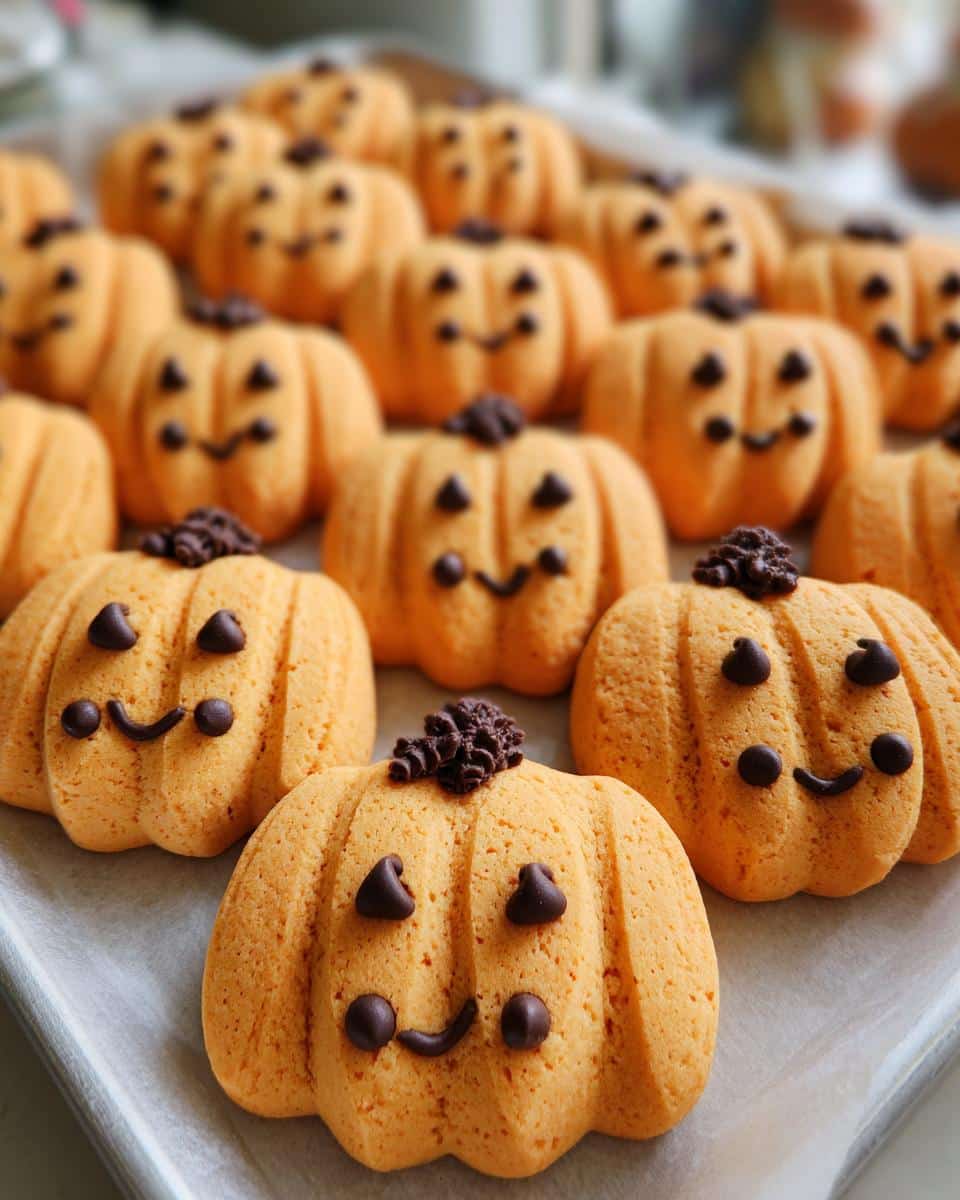
- Shape your pumpkins! Roll tablespoon-sized balls, flatten slightly, then use a butter knife to make 6-8 shallow ridges around the edges.
- Bake for 10-12 minutes until the edges just start turning golden. They’ll keep cooking a bit on the tray after you pull them out.
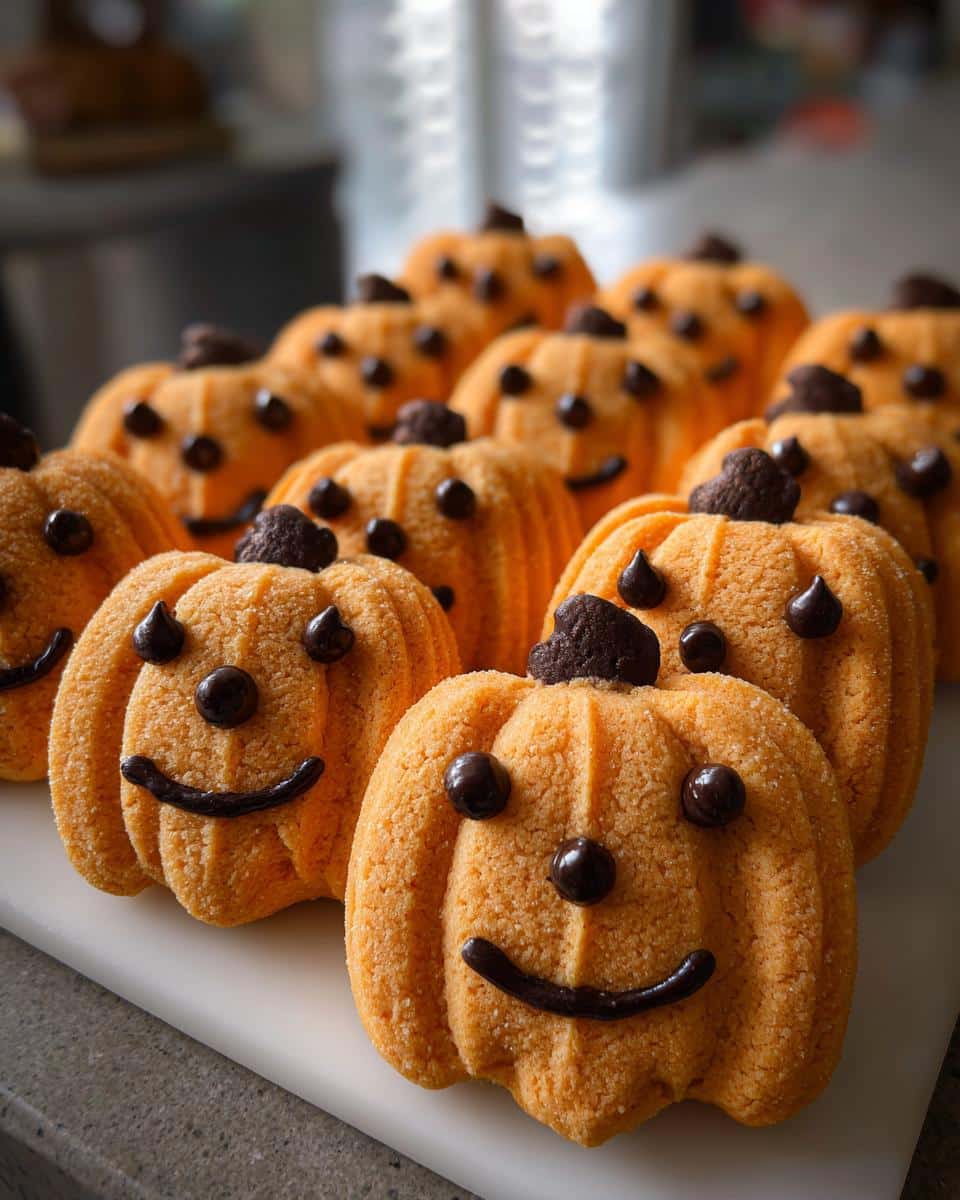
Shaping and Decorating Tips
My secret for perfect pumpkin ridges? Lightly flour the knife first! For faces, press chocolate chips into warm cookies right after baking (they’ll melt slightly for cute expressions). Feeling fancy? Pipe green icing stems or use black gel icing for spooky Halloween faces. Pro tip: Let kids decorate with candy eyes and sprinkles – the messier, the more memorable!
Why You’ll Love These Pumpkin-Shaped Cookies
Listen, I know you’re going to adore these cookies as much as we do – here’s why:
- Instant festive vibes: One bite and your kitchen smells like autumn magic. The bright orange color alone makes everyone smile!
- Kid-approved fun: My little cousins literally beg to help decorate these. (Warning: May result in chocolate-covered fingers and giggle fits.)
- Pantry-simple ingredients: No weird extracts or specialty flours – just good ol’ baking staples you probably have already.
- Total creative freedom: Make ’em spooky, silly, or sophisticated. Last year we did polka-dot pumpkins with white chocolate chips!
Honestly? They disappear faster than Halloween candy at my house.
Storage and Serving Suggestions
These pumpkin-shaped cookies stay fresh in an airtight container for up to 5 days – if they last that long! For parties, I layer them between parchment paper so the decorations don’t smudge. They’re perfect with hot apple cider (the cinnamon sticks make cute stirrers) or as part of a Halloween cookie platter. Want to bake ahead? The dough freezes beautifully for up to 3 months – just thaw in the fridge overnight before shaping and baking.
Pumpkin-Shaped Cookies Nutritional Information
Just between us? These pumpkin-shaped cookies are definitely a treat – but here’s the scoop on what you’re biting into (all values are approximate per cookie):
- Calories: 120
- Sugar: 8g
- Fat: 6g (4g saturated)
- Carbs: 15g
Remember, nutrition info can vary based on exact ingredients and decorations used. Everything in moderation – except maybe smiles when you see these adorable pumpkins!
Common Questions About Pumpkin-Shaped Cookies
Over years of making these pumpkin-shaped cookies, I’ve gotten some great questions – here are the ones that pop up most often:
Can I freeze the dough?
Absolutely! Shape the dough into balls first, then freeze on a tray before transferring to a freezer bag. They’ll keep for 3 months – no thawing needed, just add 1-2 minutes to the bake time. This trick saved me last Halloween when unexpected guests showed up!
How do I prevent cookie spreading?
Two secrets: 1) Make sure your butter isn’t too soft (cool to the touch is perfect), and 2) Chill dough for 30 minutes if your kitchen is warm. I learned this the hard way after my first batch turned into pumpkin pancakes!
What’s the best icing for decorating?
For beginners, melted chocolate chips are foolproof. My favorite royal icing recipe uses powdered sugar, meringue powder, and water – it dries hard so cookies stack nicely. Gel food coloring gives the brightest colors without thinning the icing.
Can I make these gluten-free?
Yes! I’ve had great results with Cup4Cup flour blend. The texture is slightly more delicate, so handle cooled cookies gently when decorating.
Why use gel food coloring?
Liquid coloring adds extra moisture that can alter cookie texture. Gel gives vibrant orange color without affecting the dough – just start with a little and add more until you get that perfect pumpkin hue!
Share Your Pumpkin-Shaped Cookies!
I’d love to see your creations! Snap a photo of your pumpkin-shaped cookies (especially those silly faces!) and tag me – nothing makes me happier than seeing your kitchen adventures. Did the kids go wild with the decorations? Tell me all about it! You can also find more inspiration on Pinterest.

Irresistible 30-Minute Pumpkin-Shaped Cookies Everyone Loves
- Total Time: 32 minutes
- Yield: 24 cookies
- Diet: Vegetarian
Description
Make fun and festive pumpkin-shaped cookies for Halloween or fall events. These cookies are easy to bake and decorate.
Ingredients
- 2 1/2 cups all-purpose flour
- 1/2 teaspoon baking powder
- 1/4 teaspoon salt
- 1 cup unsalted butter, softened
- 1 cup granulated sugar
- 1 large egg
- 1 teaspoon vanilla extract
- Orange food coloring
- Chocolate chips or icing for decoration
Instructions
- Preheat oven to 350°F (175°C). Line baking sheets with parchment paper.
- Whisk flour, baking powder, and salt in a bowl.
- Cream butter and sugar until light and fluffy. Add egg and vanilla, mixing well.
- Gradually add dry ingredients to the wet mixture. Add orange food coloring until desired shade is reached.
- Roll dough into balls, then flatten slightly. Use a knife to create pumpkin ridges.
- Bake for 10-12 minutes. Let cool before decorating with chocolate chips or icing for the pumpkin face.
Notes
- Chill dough for 30 minutes if too soft to shape.
- Use gel food coloring for vibrant color.
- Store in an airtight container for up to 5 days.
- Prep Time: 20 minutes
- Cook Time: 12 minutes
- Category: Dessert
- Method: Baking
- Cuisine: American