Skip to content
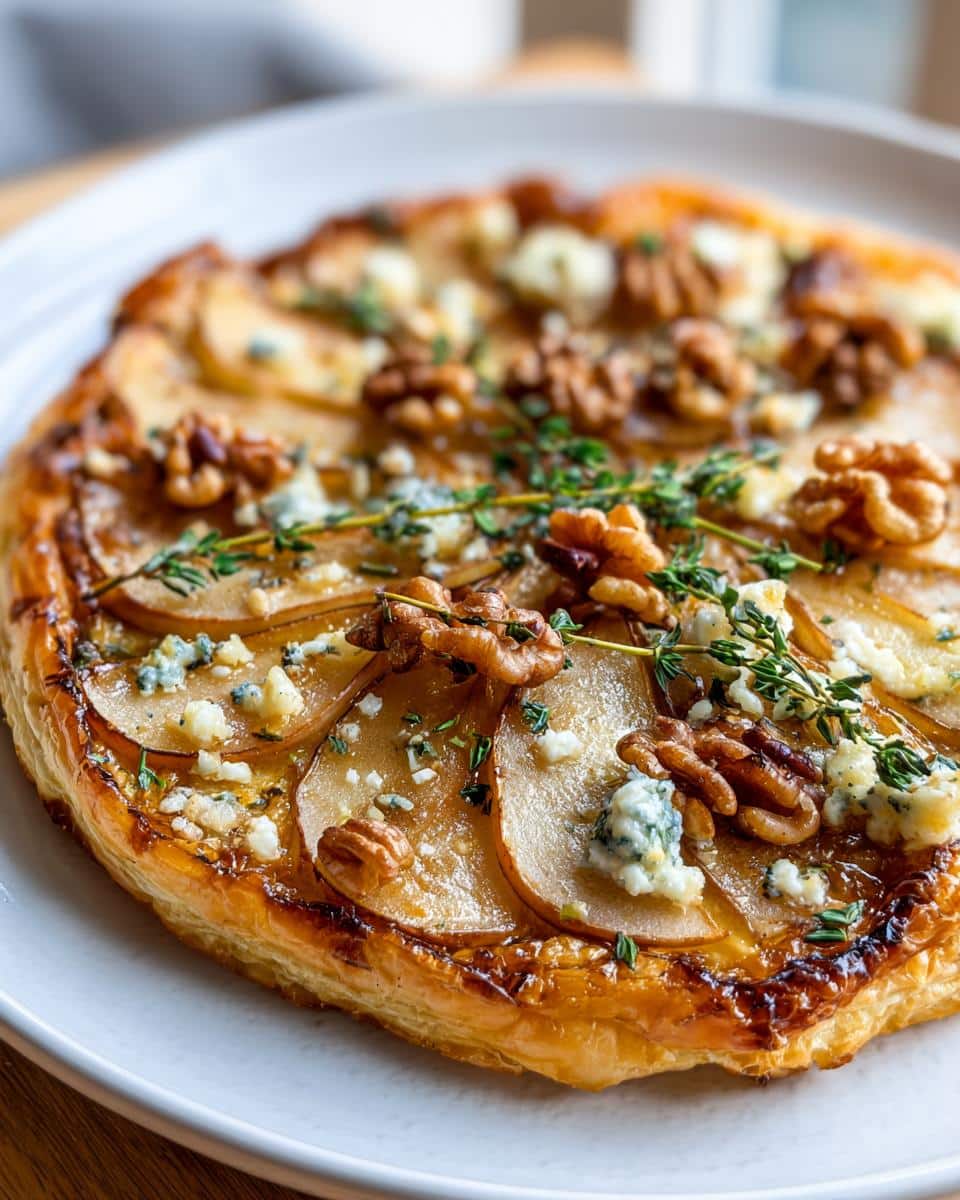
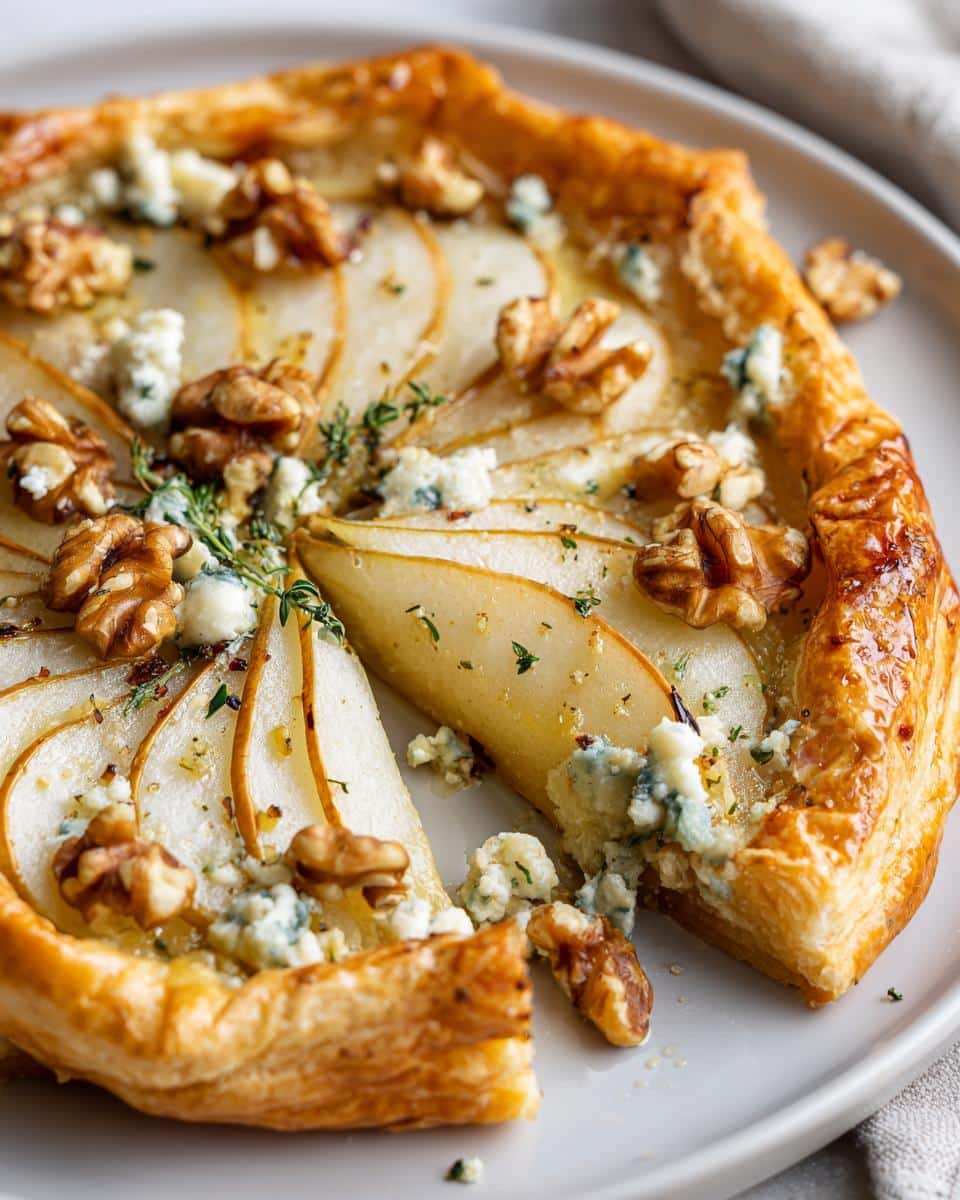
Picture this: It’s a crisp autumn evening, and your friends are coming over for wine and nibbles. You want something that looks fancy but secretly takes almost no effort. That’s when this pear, walnut, and blue cheese tart saves the day every time. I’ve been making this since my catering days—it was always the first appetizer to disappear at events! The magic is in how the sweet pears play off the tangy cheese (use plant-based for dairy-free—it’s just as good) and crunchy walnuts. In 40 minutes flat, you’ve got a showstopper that tastes like you spent hours in the kitchen.
Why You’ll Love This Pear, Walnut & Blue Cheese Tart
This tart is my go-to for so many reasons—here’s why it’ll become yours too:
- Effortless elegance: Looks like you fussed, but that flaky puff pastry does all the work for you
- Dairy-free magic: Simply swap in plant-based cheese—I promise no one will know the difference
- Flavor fireworks: Sweet pears, salty cheese, and toasty walnuts create the most addictive contrast
- Crowd-pleaser: Works equally well at fancy dinners and casual get-togethers
Ingredients for Pear, Walnut & Blue Cheese Tart
Gathering everything for this tart is a breeze – most ingredients are pantry staples you probably have on hand already. Here’s what you’ll need to create that perfect sweet-salty harmony:
- 1 sheet puff pastry, thawed – That frozen sheet in your freezer? Yes, that magical shortcut is your base. Just let it sit out for 40 minutes while you prep the other ingredients.
- 2 ripe pears, thinly sliced (~1/8 inch) – I prefer Bosc or Anjou pears because they hold their shape beautifully when baked. No need to peel them – the skins add pretty color and extra fiber!
- 1/2 cup walnuts, chopped (toasted optional) – Toasting them first makes all the difference – just 5 minutes in a dry pan until fragrant. Trust me, it’s worth the extra step.
- 1/2 cup crumbled blue cheese (or plant-based cheese) – My dairy-free friends love Violife or Follow Your Heart’s vegan blue cheese here. It melts just like the real deal.
- 2 tbsp olive oil – A good drizzle helps everything get golden and delicious. I sometimes use walnut oil when I’m feeling fancy.
- 1 tsp fresh thyme leaves – Those little green flecks make it look so professional. If you must use dried, reduce to 1/2 tsp.
- Salt & pepper to taste – Don’t skip seasoning! Even sweet tarts need that flavor boost.
See? Nothing crazy or hard to find. Now let’s turn these simple ingredients into something spectacular!
Equipment You’ll Need
One of the best things about this tart? You don’t need any fancy gadgets to make it shine. Just grab these basic tools from your kitchen:
- Baking sheet – A standard half-sheet pan is perfect. No need for a special tart pan!
- Parchment paper – Your insurance policy against sticking. I always keep a roll in my drawer.
- Rolling pin – To gently stretch the pastry just enough. No rolling pin? A wine bottle works in a pinch!
- Sharp knife – For those pretty pear slices. A dull blade will bruise the fruit.
Nice-to-haves if you’re feeling fancy:
- Pastry brush – For that perfect olive oil drizzle. But honestly? Your fingers work just fine.
- Pizza cutter – Makes cutting the baked tart into servings a breeze.
See? Nothing here should send you running to the store. Now let’s get to the fun part – assembling this beauty!
How to Make Pear, Walnut & Blue Cheese Tart
Okay, friends – let’s turn those simple ingredients into something magical! I promise this tart comes together faster than you’d think. Just follow these easy steps, and you’ll have everyone thinking you trained at a French patisserie.
Step 1: Prepare the Pastry
First things first – preheat that oven to 400°F (200°C). While it’s warming up, let’s get the pastry ready. Unfold your thawed puff pastry sheet onto a parchment-lined baking sheet. I like to give it a few gentle rolls with my rolling pin just to smooth out any creases – no need to go crazy, just enough to make it even.
Here’s my pro tip: use a fork to dock (that’s fancy chef talk for poking holes) all over the pastry, leaving about a 1-inch border untouched. This little step prevents the center from puffing up like a balloon while baking – we want a nice flat surface for our toppings!
Step 2: Layer the Ingredients
Now for the fun part! Arrange those beautiful pear slices in overlapping rows across the pastry. I like to work from one corner to the other, creating little pear “scales” that look so pretty when baked. Don’t worry about being perfect – rustic is part of the charm!
Sprinkle your chopped walnuts evenly over the pears. If you took my advice and toasted them first, you’re already smelling how amazing this will taste. Then comes the cheese – crumble it right over everything with abandon! Those little pockets of tangy blue cheese (or plant-based alternative) will melt into pure deliciousness.
Finish with a drizzle of olive oil – I just use my fingers to flick it evenly across the top. Sprinkle with fresh thyme, a pinch of salt, and a few grinds of black pepper. Your masterpiece is ready for the oven!
Step 3: Bake to Perfection
Slide your tart into that preheated oven and let the magic happen. After about 15 minutes, start peeking through the oven window – you’re looking for the edges to turn a beautiful golden brown and the pears to become tender when poked with a fork.
The full bake usually takes 20-25 minutes in my oven, but every oven is different. When it’s done, the cheese will be melty, the walnuts toasty, and your kitchen will smell incredible! Let it cool for about 5 minutes before slicing – I know it’s hard to wait, but this gives the juices time to settle.
Pro tip: If some spots brown faster than others, just tear off little bits of foil to cover those areas while the rest catches up. No one will ever know!
Expert Tips for Pear, Walnut & Blue Cheese Tart
After making this tart more times than I can count (and receiving countless “how did you make this?!” compliments), I’ve picked up some game-changing tricks that take it from good to “oh my god, what IS this?” territory. Here are my hard-earned secrets:
Toast those walnuts! I know I already mentioned it, but it bears repeating. Just 5 minutes in a dry skillet over medium heat transforms them from “nice crunch” to “depth charge of flavor.” You’ll know they’re ready when your kitchen smells like a cozy winter cabin. Let them cool before sprinkling – hot nuts can make the pastry soggy.
Chill the pastry if you can spare 15 minutes. After assembling but before baking, pop the whole tray in the fridge. This helps the pastry stay crisp and prevents shrinking. No time? No worries – it’ll still taste amazing. But if you’re hosting special guests? Take the extra step.
Slice pears uniformly. My catering chef would tap my wrist with a spoon if I didn’t stress this. About 1/8-inch thick is perfect – thin enough to soften nicely but thick enough to hold their shape. A mandoline makes quick work of this, but a sharp knife works too. Pro tip: rub the slices with a little lemon juice if prepping ahead to prevent browning. For more tips on fruit preparation, check out food safety guidelines.
Go for the “ugly” cheese crumbles. When scattering the blue cheese, don’t aim for perfect little chunks. Vary the sizes – some big crumbles for bold pockets of flavor, some tiny bits that melt into the pears. The irregularity creates an incredible texture experience in every bite.
Remember: this tart is supposed to look rustic and effortless. If your pear slices aren’t perfectly aligned or your cheese distribution looks “artistic” rather than precise? That’s exactly right. The imperfections are what make it feel homemade and full of love.
Ingredient Substitutions & Variations
One of the best things about this tart? It’s practically begging to be customized! Over the years, I’ve played with so many variations – sometimes by choice, sometimes because I was missing an ingredient (we’ve all been there). Here are my favorite swaps that keep the magic alive:
Cheese options: Not a blue cheese fan? I get it – that tang isn’t for everyone. Try crumbled goat cheese for something milder, or vegan feta if you’re going dairy-free. My sister swears by smoked gouda when she makes this – the savory smokiness with the sweet pears? Absolute heaven.
Nut alternatives: Walnuts are classic, but pecans bring a buttery richness that’s divine. For nut-free versions, I’ve used toasted pumpkin seeds with great success – just reduce the amount slightly since they’re more dense. Sunflower seeds work too in a pinch!
Sweet additions: Sometimes I drizzle a little honey over the baked tart for extra luxury – especially if my pears weren’t super ripe. A balsamic glaze reduction is another showstopper move. My neighbor adds a sprinkle of brown sugar with the pears before baking for extra caramelization.
Herb variations: Thyme is my go-to, but rosemary adds a lovely piney note. In summer, I’ll use fresh basil for something brighter. Dried herbs work too – just use half the amount since they’re more concentrated.
Pastry possibilities: No puff pastry? A pre-made pie crust works in a pinch (bake at 375°F instead). For gluten-free friends, I’ve had success with gluten-free puff pastry – just check the baking time as it browns faster.
The beauty is how forgiving this recipe is. As long as you keep that sweet-savory balance, you really can’t go wrong. My philosophy? Use what you love and what you have – cooking should be joyful, not stressful!
Serving Suggestions
Oh, the places this tart can go! I’ve served it everywhere from fancy dinner parties to lazy Sunday picnics – it’s that versatile. Here’s how I love to present it:
As an appetizer: Cut into small rectangles (about 2×3 inches) for perfect one-bite hors d’oeuvres. They disappear FAST at parties – I always make extra! Arrange them on a wooden board with some grapes and honey drizzle for that rustic-chic look.
For brunch: Pair thick wedges with a simple arugula salad dressed lightly in lemon and olive oil. The peppery greens cut through the richness beautifully. Add a mimosa or latte, and you’ve got yourself the most sophisticated effortless brunch.
As a light meal: Serve larger slices with roasted vegetable soup or a charcuterie board. My husband and I make this our Friday night “fancy pizza” alternative – it feels special but takes half the effort.
Temperature tips: It’s heavenly warm from the oven when the cheese is melty, but don’t discount it at room temp either! The flavors actually deepen as it cools. Leftovers? Cold straight from the fridge tastes like gourmet pear pizza – no reheating needed.
Garnish game: A final flourish makes all the difference! Right before serving, I’ll add:
- A handful of fresh microgreens or baby arugula
- A light drizzle of honey or balsamic glaze
- Extra thyme sprigs or edible flowers if I’m feeling fancy
- A sprinkle of flaky sea salt for that professional bakery touch
The beauty is there’s no wrong way to serve it. Whether you’re plating it on fine china or wrapping slices in parchment for a picnic, this tart always feels like a special occasion.
Storing & Reheating Pear, Walnut & Blue Cheese Tart
Okay, let’s be real – this tart rarely lasts long enough to need storing in my house! But on the off chance you have leftovers (or want to get ahead for a party), here’s how to keep it tasting fresh and fabulous:
Room temp: If you’re serving it within a few hours, just leave it uncovered on the counter. The pastry stays crispest this way. I often make it in the morning for evening gatherings – the flavors actually improve as they mingle!
Refrigerating: For longer storage, pop it in an airtight container (or wrap tightly in foil) and refrigerate for up to 2 days. The pastry will soften slightly, but the flavors will still be amazing. Pro tip: Place a paper towel underneath to absorb any excess moisture.
Freezing: Yes, you can freeze this tart! Wrap individual slices in parchment paper, then foil, and freeze for up to 1 month. Thaw overnight in the fridge before reheating.
Reheating magic: To bring back that just-baked crispness, reheat slices in a 350°F (175°C) oven for about 5 minutes. No oven? A quick zap in the toaster oven works too – just watch closely so the nuts don’t burn. Microwave? I wouldn’t – you’ll lose all that lovely texture.
Fun fact: The cold tart makes an incredible next-day breakfast straight from the fridge (no judgment here). The flavors intensify overnight, and the chilled cheese becomes almost spreadable on the pastry. Trust me – it’s a revelation!
Nutritional Information
Okay, let’s talk numbers – but don’t worry, I won’t make this boring! Here’s the scoop on what’s in each delicious slice of this tart. Just remember these are estimates (brands and exact ingredients can change things), but it gives you a good ballpark:
- Calories: About 280 per slice (and trust me, you won’t stop at one)
- Fat: 18g (the good kind from walnuts and olive oil!)
- Carbs: 24g (mostly from that flaky pastry and sweet pears)
- Fiber: 3g (thank you, pear skins and walnuts!)
- Protein: 6g (cheese and nuts pack a nice little punch)
- Sugar: 8g (natural sweetness from the fruit)
Dairy-free bonus: If you use plant-based cheese, you’ll cut the cholesterol down to 0mg – pretty great for something that tastes this indulgent!
Now, here’s my philosophy: This tart is all about balance. You’ve got fruit, nuts, and just enough cheese to make it special. It’s the kind of treat that feels luxurious but still gives you some good nutrients. Life’s too short to stress over every calorie – especially when something tastes this good!
Disclaimer: Nutritional info varies based on specific brands and ingredient sizes. These estimates are calculated using generic USDA data – your results may differ slightly.
Common Questions About Pear, Walnut & Blue Cheese Tart
I get so many questions about this tart—it’s such a crowd-pleaser! Here are the answers to the ones I hear most often. Trust me, I’ve made every mistake so you don’t have to.
Can I make this tart ahead of time? Absolutely! In fact, I often assemble it the night before, cover it tightly with plastic wrap, and pop it in the fridge. The cold helps the pastry stay crisp when baked. Just add an extra 2-3 minutes to the baking time if it’s going straight from the fridge to the oven.
What’s the best type of pear to use? Firm but ripe pears are key. I love Bosc pears because they hold their shape beautifully when baked. Anjou pears work great too. Just avoid super soft varieties like Bartlett—they can turn to mush in the oven.
What’s your favorite vegan cheese for this tart? Miyoko’s vegan blue cheese is my go-to—it’s tangy and crumbles perfectly. If you can’t find it, Follow Your Heart’s vegan feta works wonders. Feeling adventurous? Homemade cashew cheese is surprisingly easy and tastes amazing! For more dairy-free options, explore vegan cheese recipes.
Can I use store-bought puff pastry? Yes, and I do it all the time! Frozen puff pastry is a total lifesaver. Just make sure to thaw it in the fridge overnight or on the counter for about 40 minutes before using.
What if I don’t have fresh thyme? No worries! Dried thyme works—just use half the amount since it’s more concentrated. I’ve also used rosemary or oregano in a pinch, and it still tastes delicious.
Can I make this nut-free? Totally! Swap the walnuts for toasted pumpkin seeds or sunflower seeds. They add a similar crunch without the nuts.
Got more questions? Drop them in the comments—I’m happy to help! This tart is all about flexibility and fun, so don’t stress. It’s hard to mess up something this good!