Skip to content
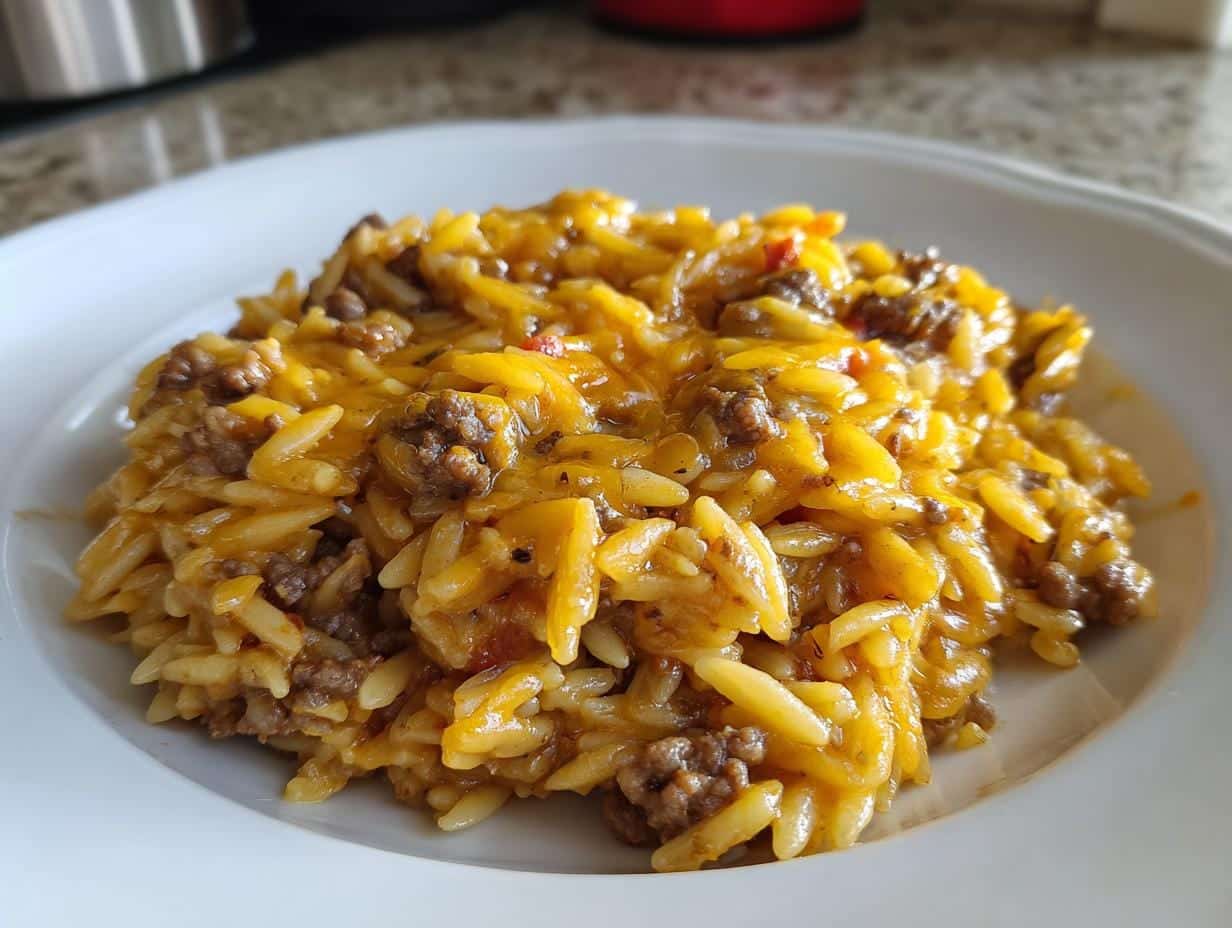
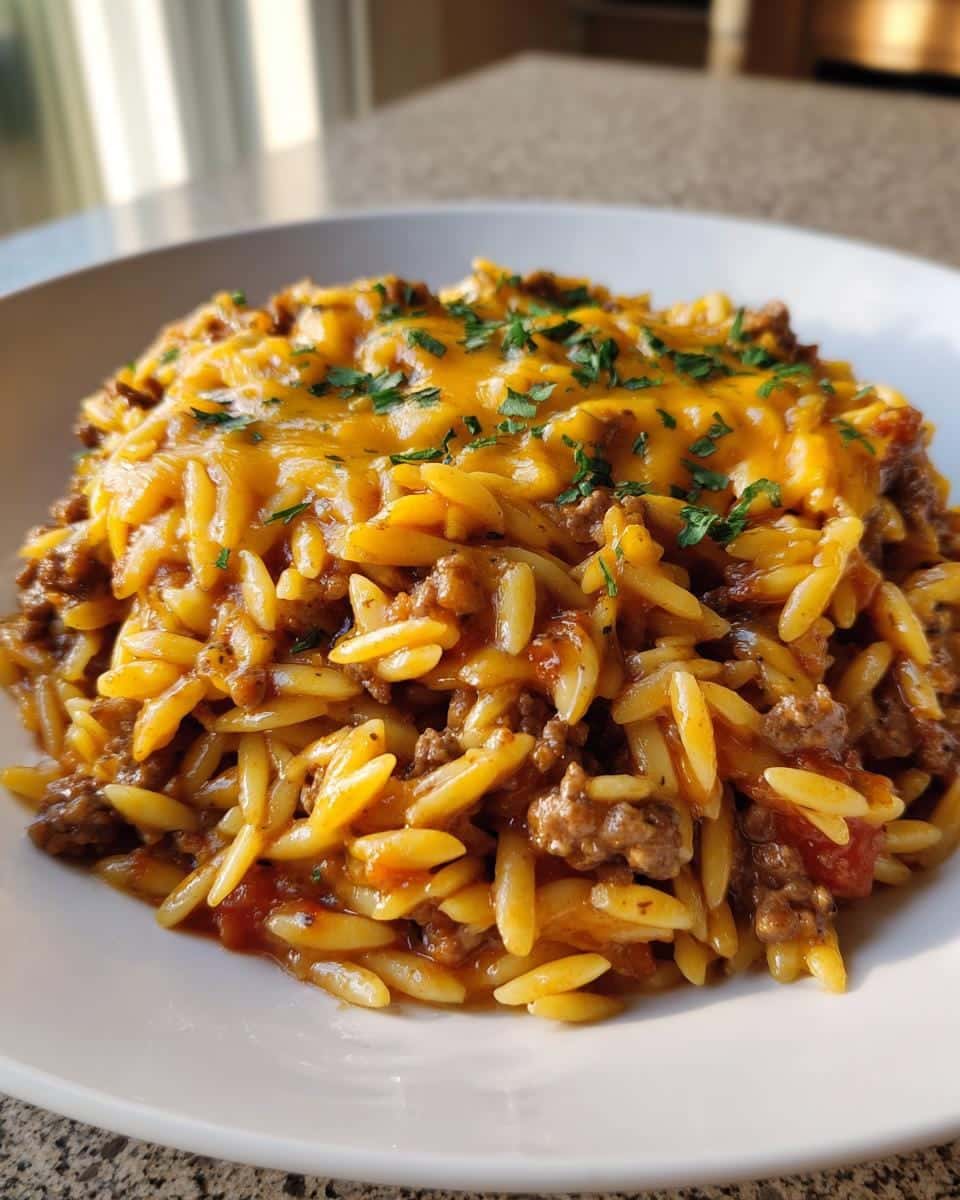
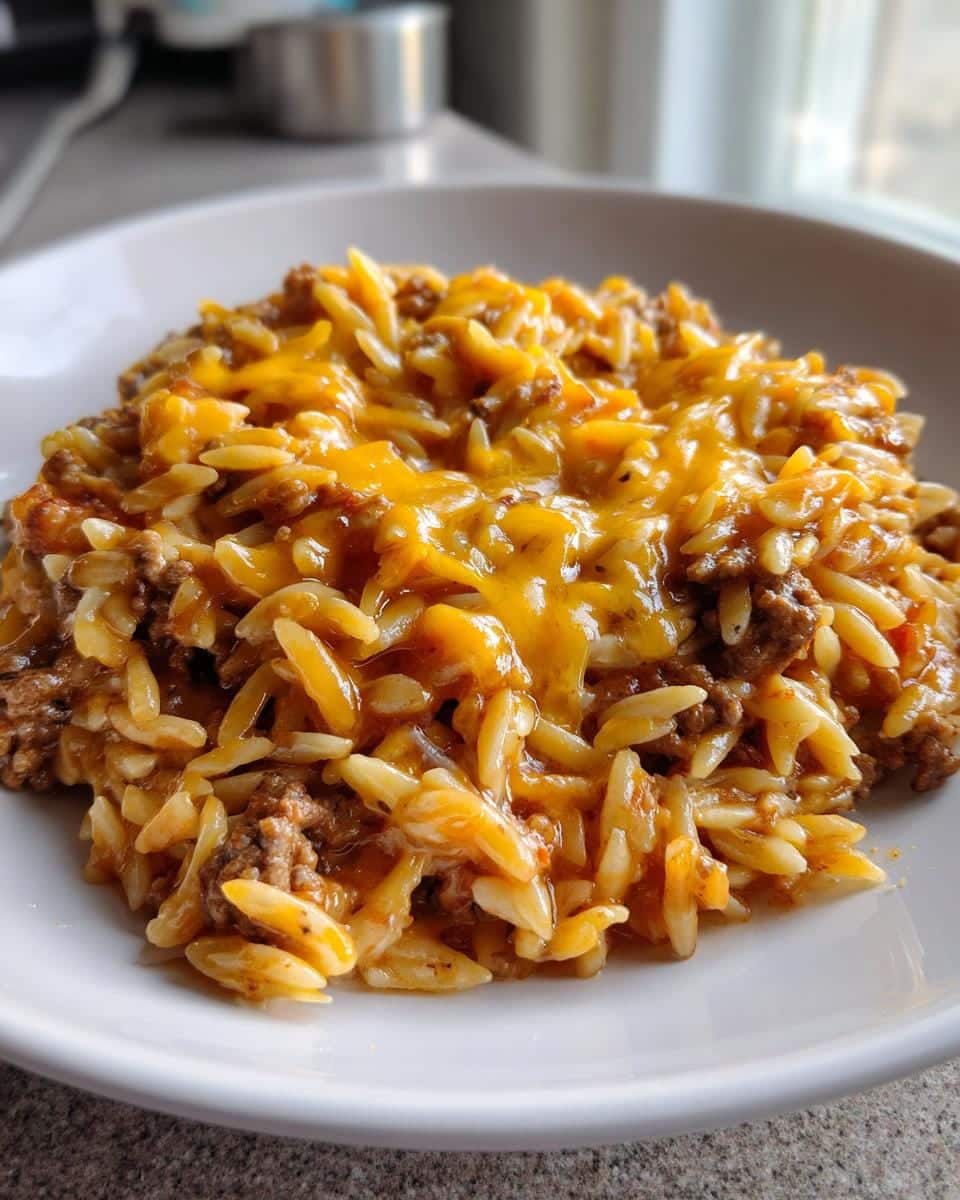
Listen, I know busy weeknights – you’re staring into the fridge wondering how to make dinner happen fast without sacrificing flavor. That’s exactly why I’m obsessed with this One-Pot Cheeseburger Orzo Skillet! It’s become my go-to when the kids are hangry and I’ve got zero energy for a million dishes. Seriously, one pan, 30 minutes, and you’ve got all those nostalgic cheeseburger flavors wrapped up in creamy orzo pasta.
The first time I threw this together was pure desperation – ground beef, some pantry staples, and whatever pasta I had left. Now? My family requests it weekly. That magical combo of melty cheddar, tangy ketchup and mustard swirled through tender orzo? It’s like your favorite burger decided to cozy up with mac and cheese. Plus – and this is key – the only cleanup is that single skillet you’re already eyeing with love.

Table of contents:
Why You’ll Love This One-Pot Cheeseburger Orzo Skillet
Okay, let me count the ways this skillet has saved my sanity on busy nights:
- Fast & foolproof: From fridge to table in 30 minutes flat – no boiling water separately, no fancy techniques. Just dump, stir, and watch magic happen.
- Kid-approved magic: Picky eaters? Mine gobble this up because hello – it tastes like a cheeseburger! (Pro tip: Let them sprinkle extra cheese on top for “ownership”).
- One pan wonder: That beautiful moment when you realize the cooking AND serving dish is the same skillet? *chef’s kiss* Fewer dishes = more Netflix time.
- Flavor bomb: The Worcestershire-ketchup-mustard trio gives that signature burger taste, while the orzo soaks up all the cheesy goodness like a flavor sponge.
Trust me – this isn’t just dinner. It’s your new weeknight superhero.
Ingredients for One-Pot Cheeseburger Orzo Skillet
Here’s everything you’ll need to make this flavor-packed skillet happen. I’ve learned a few things through trial and error (like that time I used a giant onion and cried through dinner prep), so pay attention to those little details!
The Protein
- 1 lb lean ground beef (90/10): The slight fat keeps it juicy without making the dish greasy. Trust me, I’ve tried super-lean beef and missed that burger richness.
The Veggies & Flavor Boosters
- 1/2 cup finely diced yellow onion: Small dice here – nobody wants giant onion chunks interrupting their cheeseburger bliss.
- 1/4 cup ketchup: This isn’t the time for fancy artisanal stuff – classic Heinz-style works best.
- 1 tbsp yellow mustard: That bright tang cuts through the richness perfectly.
- 1 tsp Worcestershire sauce: Our secret umami weapon! The bottle hiding in your pantry finally gets its moment.
The Pasta & Liquids
- 1 cup uncooked orzo pasta: Measure this dry – it plumps up beautifully while cooking.
- 2 cups beef broth: Low-sodium lets you control the salt. And boxed is totally fine here – we’re keeping it real.
- 1 tbsp olive oil: Just enough to get things sizzling without weighing it down.
The Cheese (The Star!)
- 1 cup shredded sharp cheddar cheese: Pre-shredded works in a pinch, but I swear by hand-shredding for that ultra-melty texture. Pack it lightly in the measuring cup – no need to cram it in.
Finishing Touches
- Salt and pepper to taste: Wait until the end – the broth and cheese add saltiness as they cook down.
See? Mostly pantry staples with a few fresh items. Now let’s turn this into magic!
How to Make One-Pot Cheeseburger Orzo Skillet
Okay, let’s get cooking! I promise this is easier than making an actual cheeseburger. Just follow these simple steps and you’ll have dinner on the table before the kids start asking “What’s for dinner?” for the third time.
Browning the Beef and Onions
- Heat the oil in a large skillet (I use my trusty 12-inch cast iron) over medium heat. You’ll know it’s ready when a tiny piece of onion sizzles immediately.
- Add the onions and cook for about 2 minutes until they start getting translucent. This is when my kitchen starts smelling amazing!
- Break in the ground beef and cook, stirring occasionally, until no pink remains – about 5 minutes. If there’s more than a tablespoon of fat, tilt the skillet and spoon some out (but leave a little for flavor!).
Cooking the Orzo
- Stir in the orzo and let it toast for 30 seconds – you’ll smell a nutty aroma. This little trick gives the pasta extra flavor.
- Pour in the beef broth, ketchup, mustard, and Worcestershire sauce. Stir well to combine – I use a wooden spoon to scrape up any tasty browned bits from the bottom.
- Bring to a boil, then immediately reduce heat to medium-low. Simmer uncovered for 10 minutes, stirring every couple minutes to prevent sticking. You’ll know it’s ready when the orzo is tender and most liquid is absorbed, but it’s still slightly saucy.
Melting the Cheese
- Turn off the heat – this is crucial for smooth cheese melting! Sprinkle the cheddar evenly over the top and let it sit for 1 minute to soften.
- Gently stir until the cheese is fully melted into the orzo. If it seems thick, add a splash of broth or water to loosen it up.
- Taste and season with salt and pepper – remember the cheese adds saltiness, so go easy at first!
That’s it! Serve right from the skillet for maximum “wow” factor and minimal cleanup. Now go enjoy that cheeseburger-pasta hybrid goodness!
Tips for the Perfect One-Pot Cheeseburger Orzo Skillet
After making this skillet more times than I can count (hello, family favorite!), I’ve picked up some game-changing tricks that take it from good to “can I lick the pan?” amazing:
Size matters for your skillet
Use a wide 12-inch skillet – sounds specific, but trust me on this. Too small and the orzo steams instead of simmering properly. My first attempt in a 10-inch pan gave me mushy pasta with dry spots. The extra surface area lets everything cook evenly and develop those delicious caramelized bits.
Broth control is key
Want perfectly al dente orzo? Start with 1 3/4 cups broth instead of 2 cups. The pasta keeps cooking as it rests, and I prefer that slight bite. If you see it drying out too fast during cooking (happens with electric stoves sometimes), just splash in extra broth 1/4 cup at a time. Opposite problem? Remove the lid to let liquid evaporate faster.
Patience makes perfect cheese
Resist stirring the cheese in immediately! Let it sit for 60 seconds after sprinkling – this lets the residual heat soften it gradually. I learned this the hard way when I got impatient and ended up with stringy clumps instead of silky sauce. Now I use this time to set the table or sneak a quick taste test.
Rest time = flavor time
Turn off the heat and let the skillet sit covered for 5 minutes before serving. This lets the flavors meld and the orzo absorb any remaining liquid evenly. My husband always complains this is torture, but even he admits it tastes better when we wait!
Bonus tip from my last disaster: If you forget and leave it on warm too long (who, me?), revive it with a splash of broth while stirring. Works like magic to bring back that creamy texture!
Ingredient Substitutions and Variations
Look, I know we don’t always have exactly what a recipe calls for – or sometimes you just want to mix things up! Here are all the ways I’ve tweaked this skillet over the years (some intentional, some “oh-crap-the-kids-ate-my-cheese” moments that turned out delicious):
For a Lighter Version
- Ground turkey or chicken instead of beef – just add an extra teaspoon of Worcestershire to boost that umami.
- Vegetable broth works surprisingly well if you’re cutting back on red meat.
- Reduced-fat cheese melts just fine, though I’d avoid fat-free (it gets weirdly rubbery).
For Extra Crunch & Texture
- Diced pickles stirred in at the end – sounds crazy, but that briny crunch is SO good.
- Crispy bacon bits on top (because everything’s better with bacon).
- Toasted breadcrumbs sprinkled over for that burger-bun feel.
When Dietary Needs Come Calling
- Gluten-free orzo works perfectly – just check cooking times as some brands differ.
- Dairy-free cheese can substitute, though I recommend shredding it yourself from a block for better melt.
- Cauliflower rice instead of orzo for low-carb – reduce broth to 1 cup and cook just until tender.
Flavor Twists That Wow
- Add 1/4 tsp smoked paprika with the spices for a subtle BBQ vibe.
- Swap half the cheddar for pepper jack if you like a little kick.
- Stir in 1 cup baby spinach at the end for color and nutrients (it wilts perfectly in the residual heat).
My golden rule? Whatever substitutions you make, keep the liquid-to-pasta ratio balanced. Everything else is fair game for your cheeseburger-pasta masterpiece!
Serving Suggestions for One-Pot Cheeseburger Orzo Skillet
Okay, confession time – I’ve absolutely eaten this skillet straight from the pan with just a fork (no judgment, right?). But when I want to feel fancy or stretch it for a crowd, here’s how I love to serve it:
The Classic Pairings
- A crisp green salad – My go-to is just romaine with cherry tomatoes and a tangy vinaigrette to cut through the richness.
- Garlic bread or toast – Because mopping up that cheesy sauce is practically mandatory. Try our Golden Crust Garlic Rosemary Bread!
- Pickle spears on the side – For that authentic cheeseburger experience (my kids think this is hilarious).
When You Want to Go All Out
- Loaded baked potato wedges – Swap the garlic bread for these crispy-on-the-outside, fluffy-on-the-inside beauties.
- Roasted broccoli – The caramelized edges play surprisingly well with the burger flavors.
- Crispy onion strings on top – Because sometimes you just need that extra crunch.
Quick Weeknight Shortcuts
When I’m extra lazy (which is often):
- Bagged salad kit + frozen garlic bread = dinner hero
- Pre-made coleslaw from the deli section
- A handful of baby carrots and ranch for dipping
Honestly? This skillet stands great on its own too. No need to overthink it – just dig in!
Storing and Reheating
Here’s the good news – this skillet tastes almost as amazing leftover as it does fresh! But only if you store and reheat it right. I learned this the hard way after ruining a batch by zapping it into rubber (RIP, delicious dinner). Here’s how to keep that cheeseburger magic alive:
Storing Like a Pro
- Airtight is everything: Transfer cooled leftovers to a container with a tight-fitting lid. Glass works best – plastic can absorb those burger flavors (learned that after my lunchbox smelled like onions for a week).
- 3-day max in the fridge: The orzo starts getting mushy after that. For longer storage, freeze immediately (see my freezer tips below).
- Separate toppings: If you added extras like pickles or crispy onions, store those separately to maintain texture.
Reheating Without the Sadness
Stovetop is king: My foolproof method:
- Add a splash of broth or water (about 2 tbsp per serving) to a skillet.
- Heat over medium-low, stirring frequently, until warmed through – about 5 minutes.
- If it looks dry, add more liquid 1 tbsp at a time until creamy again.
Microwave last resort: If you must:
- Use a microwave-safe container and cover loosely.
- Add 1 tbsp water per cup of orzo.
- Heat in 30-second bursts, stirring between each.
- Accept that it’ll never be quite as glorious.
Freezing? Proceed with Caution
I’ll be honest – frozen orzo gets a bit grainy. But if you must freeze:
- Portion into single servings for easier thawing.
- Leave out the cheese and add fresh when reheating (trust me on this).
- Thaw overnight in fridge before reheating with extra broth.
Psst – my favorite “leftover hack”? Press cold orzo mixture into patties and pan-fry for crispy cheeseburger arancini. Life-changing!
One-Pot Cheeseburger Orzo Skillet FAQs
I get it – you’ve got questions! Here are the ones I hear most often (and had myself when first making this skillet):
Can I use a different pasta?
Absolutely! While orzo’s small shape works perfectly here, I’ve had success with:
- Ditalini (same cooking time)
- Small shells (add 2 extra minutes cooking)
- Elbow macaroni (stir more frequently)
Just remember: larger pasta = more liquid. Start with an extra 1/4 cup broth and add as needed. Rice works too – but reduce broth by 1/4 cup since it absorbs differently.
How can I make it spicier?
Ooh, my favorite question! Here’s how I kick up the heat:
- Add 1/2 tsp cayenne with the spices
- Stir in 1 tbsp hot sauce (I love Cholula) with the liquids
- Use pepper jack cheese instead of cheddar
- Top with pickled jalapeños for that crunch + heat combo
Start small – you can always add more heat, but you can’t take it away!
Can I freeze leftovers?
Honestly? I don’t recommend it. Here’s why:
- Orzo turns mushy when frozen and reheated
- The cheese sauce can separate and get grainy
- Flavors dull after thawing
If you must freeze (hey, we’ve all been in a pinch):
- Leave out the cheese and add fresh when reheating
- Store in single portions for quicker thawing
- Expect to add extra broth when reheating to restore creaminess
My advice? Just halve the recipe if you won’t finish it in 3 days. Fresh is always best with this one!
Nutritional Information
Now, I’m no nutritionist, but here’s the general breakdown per serving (about 1 1/2 cups) based on how I make it. Remember – estimates vary based on your specific ingredients like cheese brand or lean-to-fat ratio in your beef!
- Calories: Around 450 – filling but not crazy for a main dish
- Fat: 20g (that cheesy goodness counts for something!)
- Protein: 25g – thanks to all that beef and cheese
- Carbs: 35g mostly from the orzo
- Fiber: 2g – toss in some spinach if you want more
- Sodium: About 800mg – use low-sodium broth to cut back
Try this recipe tonight and tag us on social media! I’d love to see your cheeseburger-pasta creations. For more delicious dinner ideas, check out our dinner recipes.

30-Minute One-Pot Cheeseburger Orzo Skillet You’ll Crave
- Total Time: 30 mins
- Yield: 4 servings
- Diet: Low Lactose
Description
A quick and easy one-pot meal combining the flavors of a cheeseburger with orzo pasta.
Ingredients
- 1 lb ground beef
- 1 cup orzo pasta
- 2 cups beef broth
- 1 cup shredded cheddar cheese
- 1/2 cup diced onion
- 1/4 cup ketchup
- 1 tbsp mustard
- 1 tsp Worcestershire sauce
- 1 tbsp olive oil
- Salt and pepper to taste
Instructions
- Heat olive oil in a large skillet over medium heat.
- Add onions and ground beef, cook until browned.
- Stir in orzo pasta, beef broth, ketchup, mustard, and Worcestershire sauce.
- Bring to a boil, then reduce heat and simmer for 10 minutes.
- Stir in shredded cheese until melted.
- Season with salt and pepper.
- Serve hot.
Notes
- Use lean ground beef for lower fat content.
- Substitute vegetable broth for a lighter version.
- Add pickles or tomatoes for extra flavor.
- Prep Time: 10 mins
- Cook Time: 20 mins
- Category: Main Dish
- Method: Stovetop
- Cuisine: American