Skip to content
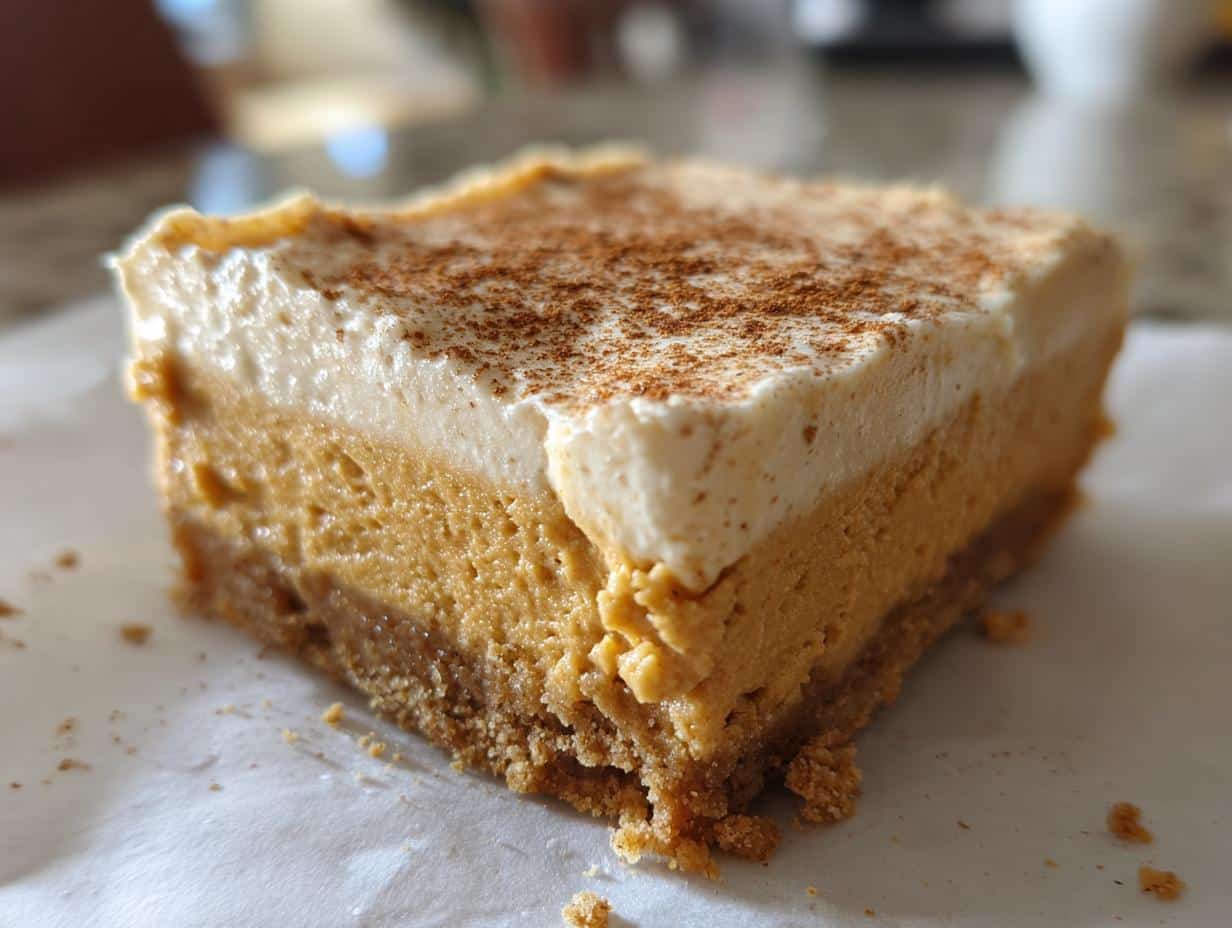
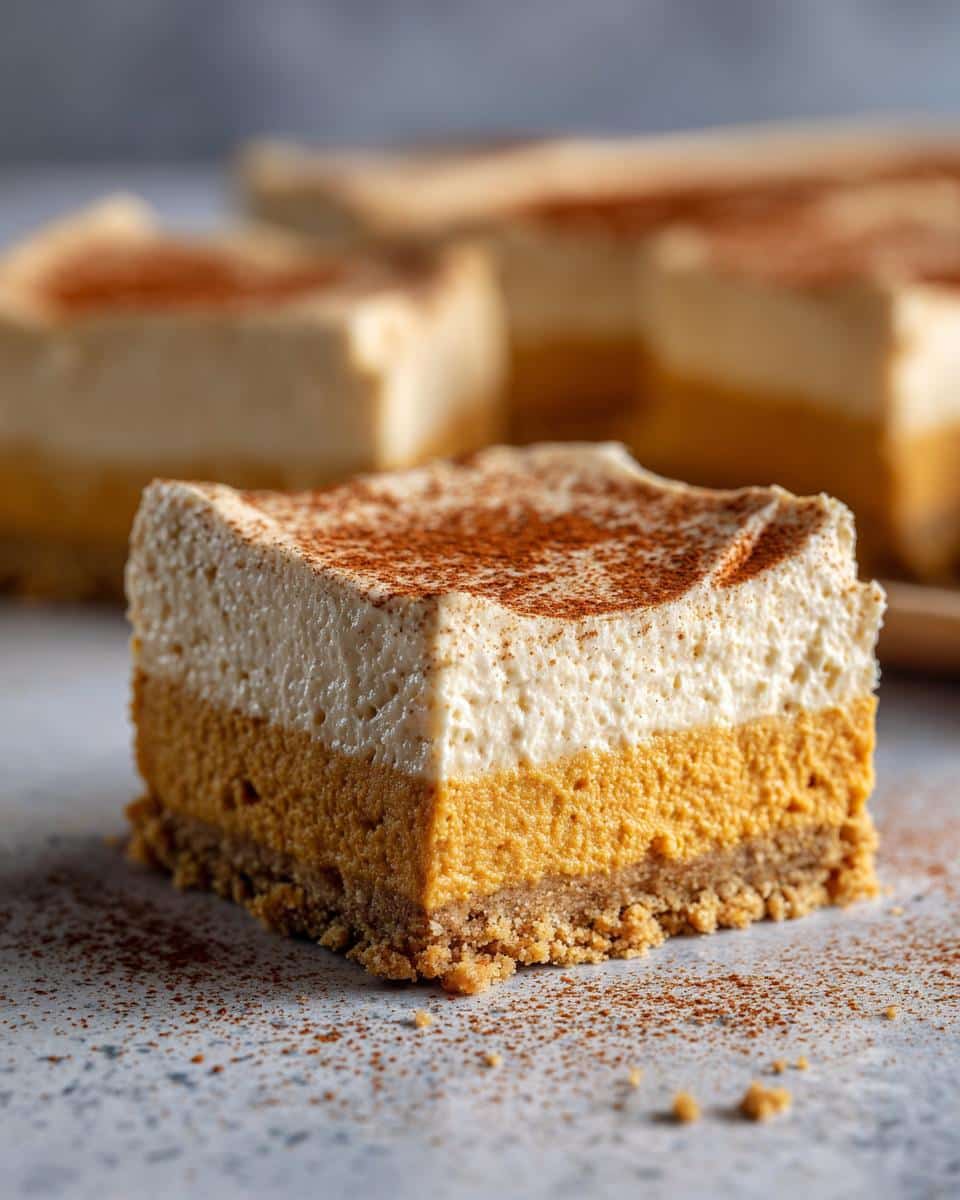
Oh my gosh, you have to try these no-bake pumpkin cheesecake bars with graham cracker crust – they’re seriously the easiest fall dessert you’ll ever make! I first whipped these up on a hectic Thanksgiving when my oven decided to quit, and guess what? They became the star of the dessert table. Now my family demands them at every autumn gathering.
What I love most is how these creamy pumpkin cheesecake bars come together in just 20 minutes of hands-on time – no baking required! The graham cracker crust gives that perfect crunch against the velvety pumpkin filling spiked with warm spices. Last year, my neighbor actually thought I’d spent hours making them “the fancy way” when really, it’s just simple ingredients and some patience while they chill.
These no-bake pumpkin cheesecake bars have saved me so many times when I needed an impressive dessert without the fuss. They travel well to potlucks and hold up beautifully in the fridge for days (if they last that long!). The pumpkin spice flavor just screams autumn, but honestly? I make them year-round because they’re that good.

Table of contents:
Why You’ll Love These No-Bake Pumpkin Cheesecake Bars
Let me count the ways these pumpkin cheesecake bars will become your new favorite dessert! I’m obsessed with them for so many reasons:
- No oven drama: Skip the stress of baking – these set beautifully in the fridge while you relax (or tackle that mountain of dishes!)
- Creamy dreamy texture: The whipped topping folded in makes the filling impossibly light yet rich, like pumpkin spice clouds
- Quick assembly: From mixing bowl to fridge in under 30 minutes – perfect for last-minute guests or sudden pumpkin cravings
- Autumn in every bite: Warm pumpkin pie spice combined with that buttery graham cracker crust? Pure fall magic
- Foolproof: Even my baking-challenged cousin couldn’t mess these up – they’re practically failsafe!
Trust me, one taste and you’ll understand why my friends beg me to bring these to every fall gathering. They’re dangerously easy to make but taste like you spent hours in the kitchen!
Ingredients for No-Bake Pumpkin Cheesecake Bars with Graham Cracker Crust
What makes these bars so magical is how simple the ingredients are – you probably have most in your kitchen already! Here’s exactly what you’ll need, broken down between that irresistible crust and the creamy pumpkin filling:
For the Graham Cracker Crust:
- 2 cups graham cracker crumbs – about 15 full sheets crushed (I like to whiz them in my food processor for perfect texture)
- 1/2 cup melted butter – unsalted works best so you can control the saltiness
- 1/4 cup granulated sugar – just enough to sweeten that crunchy crust perfectly
For the Pumpkin Cheesecake Filling:
- 16 oz cream cheese, softened – full-fat is non-negotiable here, trust me!
- 1 cup pumpkin puree – make sure it’s pure pumpkin, NOT pumpkin pie filling
- 1/2 cup powdered sugar – sifted so it blends smoothly without lumps
- 1 tsp vanilla extract – the good stuff makes all the difference
- 1 tsp pumpkin pie spice – my homemade blend (equal parts cinnamon, ginger, nutmeg, allspice)
- 1 cup whipped topping – thawed if frozen, makes the filling light as air
See? Nothing fancy – just pantry staples that come together into something spectacular. Pro tip: let your cream cheese sit out for at least an hour before starting – room temp is key for that silky smooth filling!
How to Make No-Bake Pumpkin Cheesecake Bars
Okay, let me walk you through making these dreamy pumpkin cheesecake bars – it’s so easy you’ll laugh! Just follow these simple steps and you’ll have creamy, spiced perfection in no time.
Prepare the Graham Cracker Crust
First, let’s make that irresistible crunchy base! Mix your graham cracker crumbs, melted butter, and sugar in a bowl until it looks like wet sand (you’ll know it’s right when you can squeeze a handful and it holds its shape). Dump it into your lined pan and press it firmly into an even layer – I like using the bottom of a measuring cup to really pack it down. Pop it in the fridge for 15 minutes to set up – this prevents a crumbly disaster later!
Make the Pumpkin Cheesecake Filling
Now the fun part! Beat your softened cream cheese until it’s completely smooth – no lumps allowed! Then add the pumpkin puree, powdered sugar, vanilla, and pumpkin pie spice, mixing until creamy. Here’s my secret: gently fold in the whipped topping with a spatula instead of beating it. This keeps the filling light and fluffy rather than dense. Spread this pumpkin cloud over your chilled crust like you’re frosting the best cake ever!
Chill and Serve
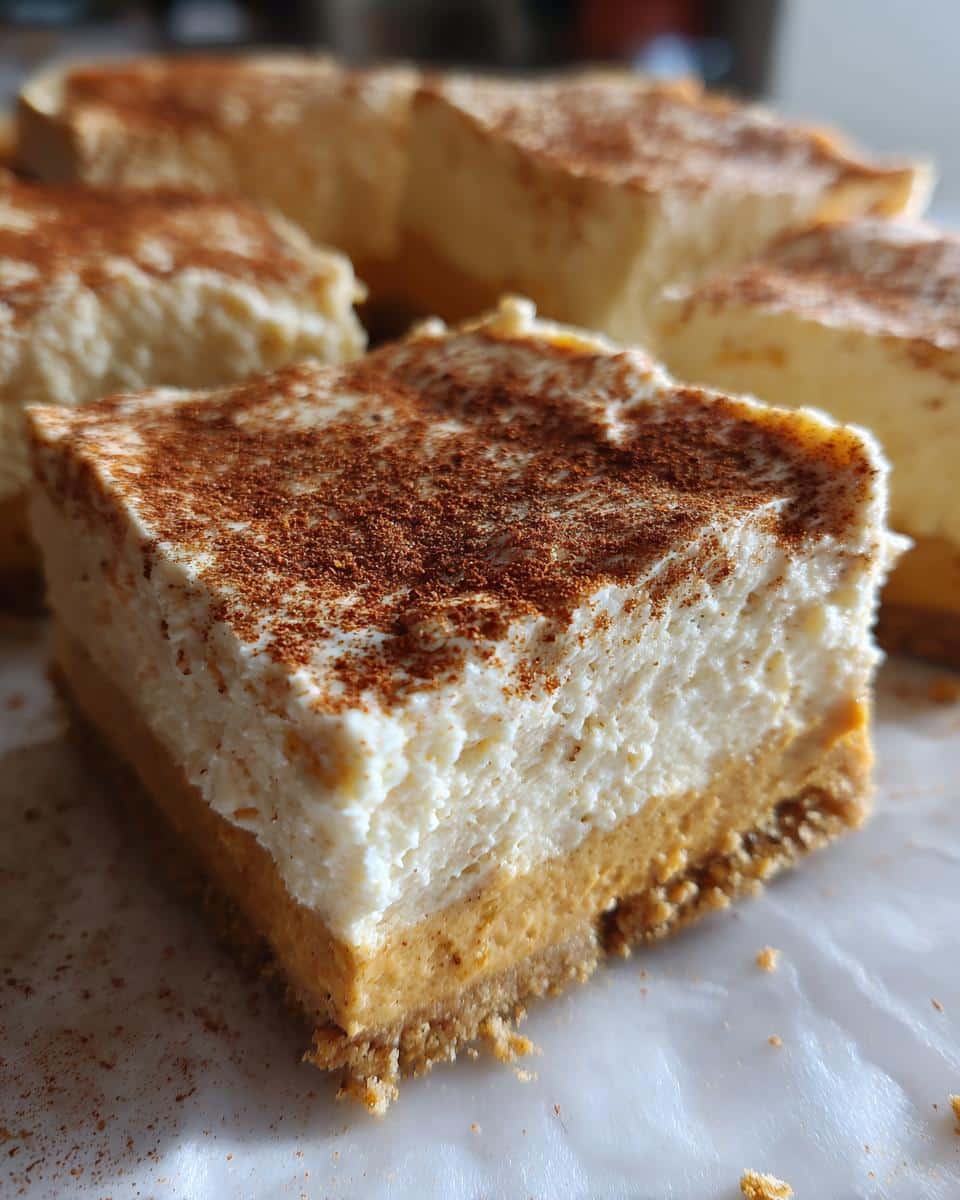
Patience time! Cover your pan and refrigerate for at least 4 hours (overnight is even better). The waiting is torture, I know, but trust me – this sets the filling perfectly for clean slices. When you’re ready, run a knife under hot water, dry it, and cut into squares. Top with extra whipped cream or a sprinkle of cinnamon if you’re feeling fancy!
Tips for Perfect No-Bake Pumpkin Cheesecake Bars
After making these pumpkin cheesecake bars more times than I can count, I’ve learned all the little tricks that take them from good to “Oh my gosh, can I have the recipe?” amazing. Here are my can’t-skip tips:
- Full-fat cream cheese is mandatory – I know, I know, but light cream cheese makes the filling weep and won’t set properly. The extra richness is worth it!
- Don’t skip chilling the crust – Those 15 minutes in the fridge make all the difference for a crust that holds together when you slice. I learned this the messy way!
- Fold, don’t mix, the whipped topping – Overmixing deflates all that airy goodness. Gentle folds with a spatula keep the filling light as a pumpkin cloud.
- Room temp ingredients blend better – Take the cream cheese out at least an hour ahead – cold cream cheese leaves lump city in your filling.
- Use pure pumpkin puree – Pumpkin pie filling has added sugars and spices that’ll throw off your perfect balance. Libby’s canned pumpkin is my ride-or-die.
Oh, and one bonus tip from my last Thanksgiving debacle – if you’re transporting these, keep them chilled in a cooler until serving. Nothing sadder than a melty pumpkin cheesecake bar at the potluck table!
Variations for No-Bake Pumpkin Cheesecake Bars
One of my favorite things about this recipe is how easily you can shake it up! Here are some delicious twists I’ve tried when I’m feeling adventurous:
- Gingersnap crust: Swap graham crackers for crushed gingersnaps – the spicy kick pairs amazingly with pumpkin
- Chocolate drizzle: Melt some chocolate chips and zigzag over the top before chilling for a fancy touch
- Nutty crunch: Add 1/2 cup chopped pecans or walnuts to the crust mixture for extra texture
- Cream cheese swirl: Reserve 1/4 cup plain cream cheese mixture and marble it through the pumpkin filling
The basic recipe is perfection, but these little changes keep it exciting year after year!
Serving and Storing No-Bake Pumpkin Cheesecake Bars
Now for the best part – enjoying your masterpiece! These pumpkin cheesecake bars are gorgeous just as they are, but I love dressing them up a bit when I’m serving guests. A dollop of fresh whipped cream and a tiny sprinkle of cinnamon or pumpkin pie spice makes them look bakery-worthy. Last Christmas, I even arranged some candied pecans on top for extra crunch – total showstopper!
When it’s just me at home? Let’s be real – I eat them straight from the pan with a fork when no one’s looking. No judgment here!
For storage (if there’s any left!), keep them in an airtight container in the fridge. They’ll stay perfect for up to 5 days – though in my house, they never last that long! The crust might soften slightly after day three, but the flavor only gets better as the spices meld.
Want to get ahead? These freeze beautifully too! Just wrap individual bars tightly in plastic wrap, then pop them in a freezer bag for up to 2 months. Thaw overnight in the fridge when that pumpkin craving hits. Perfect for when you need a quick dessert emergency stash!
Nutritional Information for No-Bake Pumpkin Cheesecake Bars
Okay, let’s talk numbers – but remember, these are just estimates! Actual nutrition can vary depending on your specific brands (especially the cream cheese and whipped topping you choose). Here’s the breakdown per one delicious bar:
- Calories: 250
- Total Fat: 16g (9g saturated)
- Cholesterol: 45mg
- Sodium: 200mg
- Total Carbohydrates: 24g
- Dietary Fiber: 1g
- Sugars: 18g
- Protein: 3g
Now, before you panic about the numbers, let me remind you – these are dessert bars! I like to think of them as getting some vitamin A from the pumpkin and calcium from the cream cheese. Everything in moderation, right? If you’re watching sugar, you could try reducing the powdered sugar slightly, but honestly, I wouldn’t mess too much with perfection.
The whipped topping does help keep calories lower than traditional baked cheesecake, and that graham cracker crust? Worth every single carb. Just saying! As my grandma used to tell me when I’d worry about dessert nutrition: “A little joy feeds the soul too.”
FAQs About No-Bake Pumpkin Cheesecake Bars
I get asked the same questions about these pumpkin cheesecake bars every time I make them, so let me save you some texting time with my most reliable answers:
Can I use fresh pumpkin instead of canned?
Oh honey, I’ve tried – and learned the hard way! Fresh pumpkin puree tends to be too watery and changes the texture. Canned pumpkin puree (not pie filling!) is concentrated and consistently perfect. If you’re determined, roast your pumpkin first, then strain the puree through cheesecloth overnight. But honestly? Save yourself the hassle and grab a can of Libby’s – that’s what I do!
How long do these need to chill before serving?
Here’s where impatience ruins everything – you must wait at least 4 hours, but overnight is golden. I once cut into them after 2 hours (I was desperate!) and ended up with pumpkin soup bars. The filling needs time to set properly for those clean, Instagram-worthy slices. Set it before bed and wake up to perfection!
Can I freeze these pumpkin cheesecake bars?
Absolutely! They freeze like a dream. Wrap individual bars tightly in plastic wrap, then pop them in a freezer bag for up to 2 months. Thaw overnight in the fridge when cravings strike. Pro tip: freeze some before the holidays so you’ve got emergency dessert ready when guests drop by!
Why did my filling turn out lumpy?
Nine times out of ten, it’s not-soft-enough cream cheese! It should feel like room temperature butter when you poke it. No shortcuts here – if you forget to take it out early, microwave it in 10-second bursts, stirring between each. Also, sift that powdered sugar – those little lumps hide until it’s too late!
Can I make these without whipped topping?
You can, but the texture changes completely. The whipped topping gives that light, mousse-like quality. If you substitute, try whipping heavy cream to stiff peaks and folding it in gently. But fair warning – it won’t be quite as stable and might weep a bit. My advice? Just use the whipped topping – it’s what makes these bars magical!
Share Your No-Bake Pumpkin Cheesecake Bars Experience
Nothing makes me happier than hearing how these pumpkin cheesecake bars turn out in your kitchen! Did your family gobble them up like mine always does? Did you try any fun variations? I want to hear all about your no-bake adventures!
Leave a rating below to let me know what you thought – was it five-star perfection, or do you have suggestions to make it even better? Your feedback helps me tweak the recipe and helps other bakers too!
Happy baking (or should I say happy no-baking?), friends! Can’t wait to hear how your pumpkin cheesecake bars turned out.
Print
20-Minute No-Bake Pumpkin Cheesecake Bars You’ll Crave
- Total Time: 4 hours 20 minutes
- Yield: 12 bars
- Diet: Vegetarian
Description
Delicious no-bake pumpkin cheesecake bars with a graham cracker crust, perfect for fall desserts.
Ingredients
- 2 cups graham cracker crumbs
- 1/2 cup melted butter
- 1/4 cup sugar
- 16 oz cream cheese, softened
- 1 cup pumpkin puree
- 1/2 cup powdered sugar
- 1 tsp vanilla extract
- 1 tsp pumpkin pie spice
- 1 cup whipped topping
Instructions
- Mix graham cracker crumbs, melted butter, and sugar. Press into a lined baking dish.
- Beat cream cheese until smooth. Add pumpkin puree, powdered sugar, vanilla, and pumpkin pie spice.
- Fold in whipped topping. Spread over crust.
- Refrigerate for 4 hours before serving.
Notes
- Use canned pumpkin puree for best results.
- Chill the crust for 15 minutes before adding filling.
- Prep Time: 20 minutes
- Cook Time: 0 minutes
- Category: Dessert
- Method: No-Bake
- Cuisine: American