Skip to content
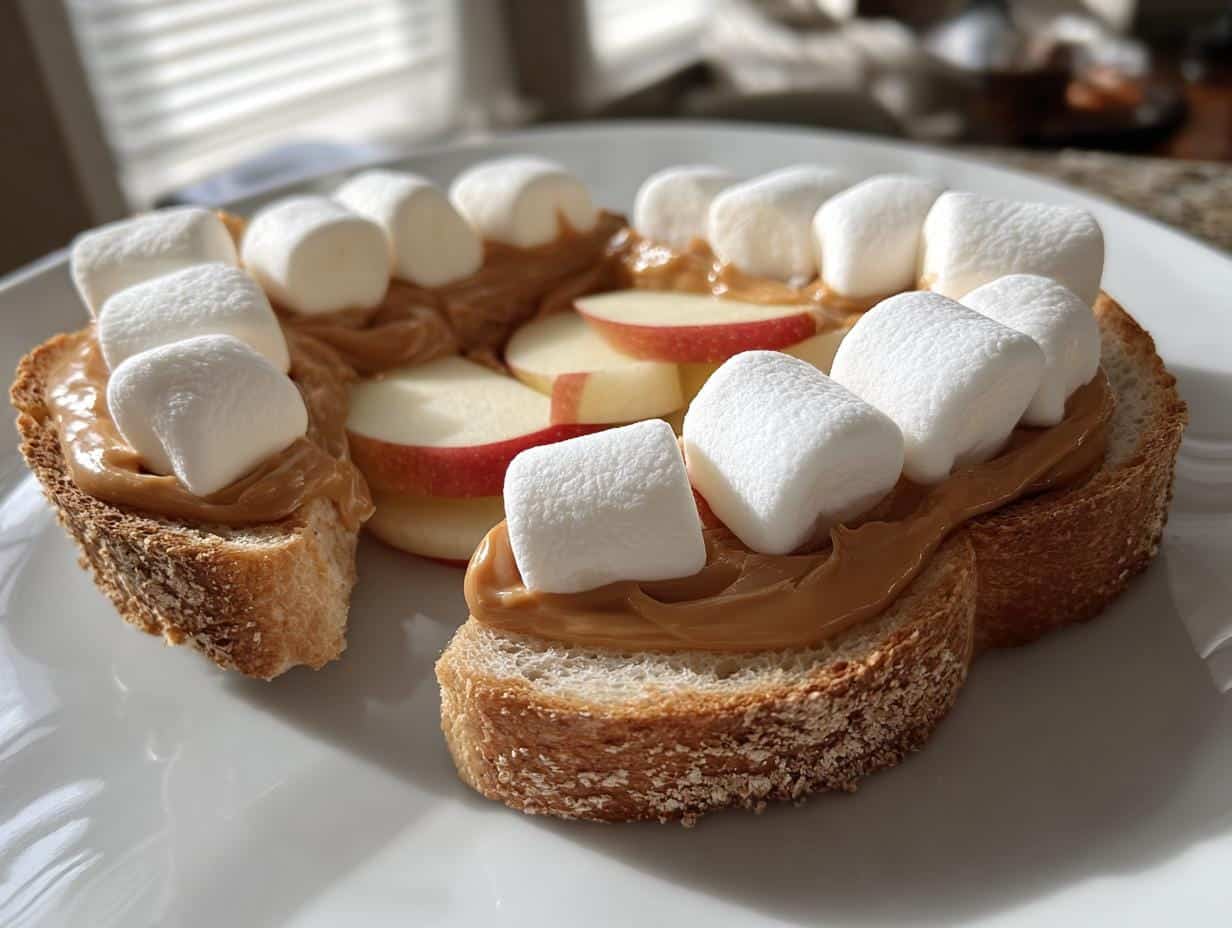
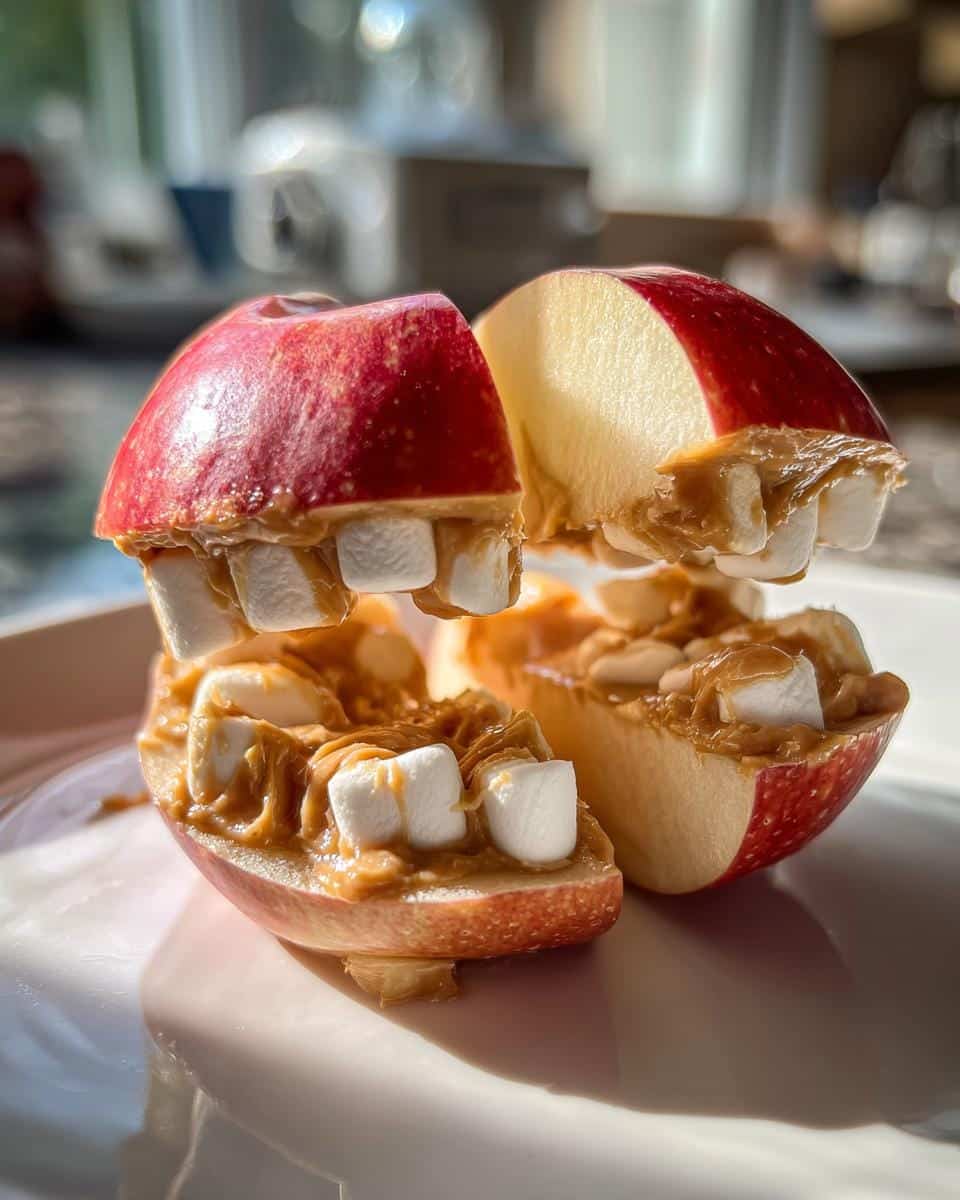
Oh my gosh, you have to try these Monster Mouth Apple Slices! They’re the silliest, most delicious snack that takes barely any time to make. I first whipped these up for my niece’s Halloween party, and let me tell you – the kids went wild. What I love is how you get that perfect combo of crisp apples, creamy peanut butter, and those adorable mini marshmallow “teeth” that make everyone giggle. Plus, it’s secretly healthy! No baking required, just 10 minutes, and you’ve got a snack that’s perfect for lunchboxes, playdates, or spooky parties. Even picky eaters can’t resist these funny little monster mouths!

Table of contents:
Why You’ll Love These Monster Mouth Apple Slices
Trust me, these little monster mouths are about to become your go-to snack. Here’s why:
- Ready in 10 minutes flat – No cooking, no fuss, just slice, spread, and stick!
- Secretly good for them – Apples for crunch, peanut butter for protein, and just enough marshmallow magic to make it fun
- Kid-approved entertainment – Watching my niece giggle while arranging “monster teeth” never gets old
- Party perfect – The hit of every playdate and Halloween spread I’ve ever brought them to
- Endlessly adaptable – Swap in whatever you’ve got (almond butter? raisins? chocolate chips? Go wild!)
Honestly, the hardest part is keeping the kids from eating all the marshmallows before they make it onto the apples!
Ingredients for Monster Mouth Apple Slices
Here’s all you need to make these adorably spooky snacks – I bet you have most of it in your kitchen right now!
- 2 medium apples – Crisp ones like Granny Smith or Honeycrisp work best (and those green skins make perfect monster skin!)
- 1/4 cup peanut butter – Creamy works great, but chunky adds extra texture. Use almond butter for nut-free versions
- 1/4 cup mini marshmallows – The star of the show! These become the perfect monster teeth
Fun extras: Want to get fancy? Toss in some raisins for “warts” or chocolate chips for “monster eyes.” The possibilities are endless!
How to Make Monster Mouth Apple Slices
Okay, let’s make some monster magic happen! These couldn’t be easier – I’ll walk you through each step so your apple slices turn out perfectly creepy-cute every time. The whole process takes about 10 minutes tops, and even little hands can help with the fun parts (though you might lose a few marshmallows to snackers along the way!).
Step 1: Prepare the Apples
First things first – give those apples a good scrub under cold water. I like to dry them with a clean towel because wet apples make the peanut butter slide right off. Now, core them (I just slice around the middle) and cut into about 8 wedges per apple. Want to prevent browning? A quick dip in lemon water works wonders, but honestly, these disappear so fast at my house that I usually skip this step!
Step 2: Add the Peanut Butter
Here’s where the magic starts! Grab a butter knife and spread about 1/2 teaspoon of peanut butter on the curved side of each apple wedge. You want enough to hold the “teeth” but not so much that it oozes everywhere – think of it like spreading frosting on a cupcake. Pro tip: If your peanut butter is too thick, pop it in the microwave for 10 seconds to make it more spreadable.
Step 3: Create the Monster Teeth
Now for the best part – making those hilarious monster grins! Press mini marshmallows into the peanut butter along the curved edge of each slice. I use about 4-5 per wedge, spacing them so they look like crooked monster teeth. Kids love helping with this part! Feeling creative? Swap marshmallows for raisins, slivered almonds, or even white chocolate chips. Sometimes I’ll add a couple at funny angles for extra personality – no two monster mouths should be alike!
That’s it! You can serve them right away or pop them in the fridge for 10 minutes if you want the peanut butter to set a bit. Just try not to eat them all yourself before the kids see them!
Tips for Perfect Monster Mouth Apple Slices
After making these countless times (and stealing bites from many little hands), here are my foolproof tricks:
- Choose your apples wisely – Crisp varieties like Granny Smith or Honeycrisp hold up best against the peanut butter
- Chill for crunch – 10 minutes in the fridge firms up the peanut butter so teeth stay put
- Serve immediately – They’re best fresh, though a squeeze of lemon juice helps slow browning
- Go thick with the PB – Too thin and those marshmallow teeth will take a tumble!
- Keep ingredients separate – Prep everything ahead, then assemble right before serving for parties
Trust me – these little tweaks make all the difference between good monster mouths and legendary ones!
Variations for Monster Mouth Apple Slices
Oh, the fun you can have with these little monsters! Here are my favorite ways to mix things up:
- Nut-free? Sunflower seed butter works like a charm and gives the same creamy texture
- Extra protein? Swap in Greek yogurt or cream cheese (just add a tiny honey drizzle to keep it sweet)
- Chocolate lovers? Press in mini chocolate chips between marshmallows for “cavities” – the kids think this is hilarious!
- Want more color? Add candy eyeballs or draw silly pupils with melted chocolate
- Halloween-ready? Use black sesame seeds for “rotten teeth” – so spooky!
Seriously, let your imagination run wild – every batch can be a new monster masterpiece!
Serving and Storing Monster Mouth Apple Slices
Here’s the deal with these adorable monsters – they’re absolute perfection when served fresh! I like to pop them in the fridge for about 10 minutes beforehand just to let the peanut butter set those marshmallow teeth in place. But honestly? They rarely last that long in my house!
If you do end up with leftovers (rare, I know), they’ll keep okay in an airtight container for a few hours, though the apples might soften a bit. Pro tip: If making these for a party, prep all your ingredients separately and assemble right before serving – that way everything stays crisp and picture-perfect!
Nutritional Information for Monster Mouth Apple Slices
Just so you know, while these monster mouths taste like pure fun, they’ve got some sneaky-good nutrition too! Here’s the scoop per serving (but remember – these are estimates and can vary):
- 120 calories – A satisfying snack that won’t ruin dinner
- 3g protein – Thanks to that peanut butter power
- 3g fiber – From all those crisp apple slices
- 12g sugar – Mostly natural from the apples and marshmallows
Not too shabby for something that makes kids giggle with every bite!
Frequently Asked Questions
I get so many questions about these silly monster snacks! Here are the answers to the ones that pop up most often:
Can I Make These Ahead of Time?
Here’s the truth – these little monsters are best friends with Father Time! The apples will start browning after about an hour. My trick? Prep everything separately (slice apples and store in lemon water, keep PB and marshmallows ready), then assemble right before serving. If you must make them ahead, a quick spritz of lemon juice helps, but nothing beats fresh!
Are Monster Mouth Apple Slices Healthy?
As a mom, I love that these taste like a treat but pack real nutrition! You’ve got fiber from the apples, protein from the peanut butter, and just enough marshmallow fun to make it exciting. The sugars are mostly natural – way better than packaged snacks. My pediatrician actually approved these as an after-school treat (just maybe go easy if you’re adding chocolate chips!).
What Apples Work Best?
After years of monster-making, I swear by crisp apples that can stand up to peanut butter. Granny Smith is my MVP – that tartness cuts through the sweetness perfectly. Honeycrisp and Fuji are great too. Avoid super soft varieties like Red Delicious unless you want mushy monster mouths (not a good look!).
Can I Use Other Nut Butters?
Absolutely! Almond butter works great, and sunflower seed butter is perfect for nut-free schools. Just make sure it’s spreadable – some natural nut butters need a quick stir or warm-up to get the right consistency. The kids will never know the difference!
Are These Gluten-Free?
Good news! As long as your peanut butter and marshmallows are gluten-free (most are), you’re golden. Always double-check labels if serving to someone with celiac, but this is one snack that’s naturally friendly to most diets.
Share Your Monster Mouth Creations
I’d love to see your monster masterpieces! Tag me on Instagram or leave a comment – let’s see who can make the silliest monster faces! You can also find more fun recipes on Pinterest.
Print
10-Min Monster Mouth Apple Slices Kids Crave (Adorable & Tasty)
- Total Time: 10 minutes
- Yield: 4 servings
- Diet: Vegetarian
Description
Fun and healthy snack featuring apple slices with peanut butter and mini marshmallows, perfect for kids and parties.
Ingredients
- 2 medium apples, sliced
- 1/4 cup peanut butter
- 1/4 cup mini marshmallows
Instructions
- Wash and slice the apples into wedges.
- Spread peanut butter on one side of each apple slice.
- Press mini marshmallows into the peanut butter to resemble teeth.
- Serve immediately or chill for 10 minutes if desired.
Notes
- Use almond butter if allergic to peanuts.
- Best eaten fresh to prevent browning.
- Add raisins for extra decoration.
- Prep Time: 10 minutes
- Cook Time: 0 minutes
- Category: Snack
- Method: No-Cook
- Cuisine: American