Skip to content
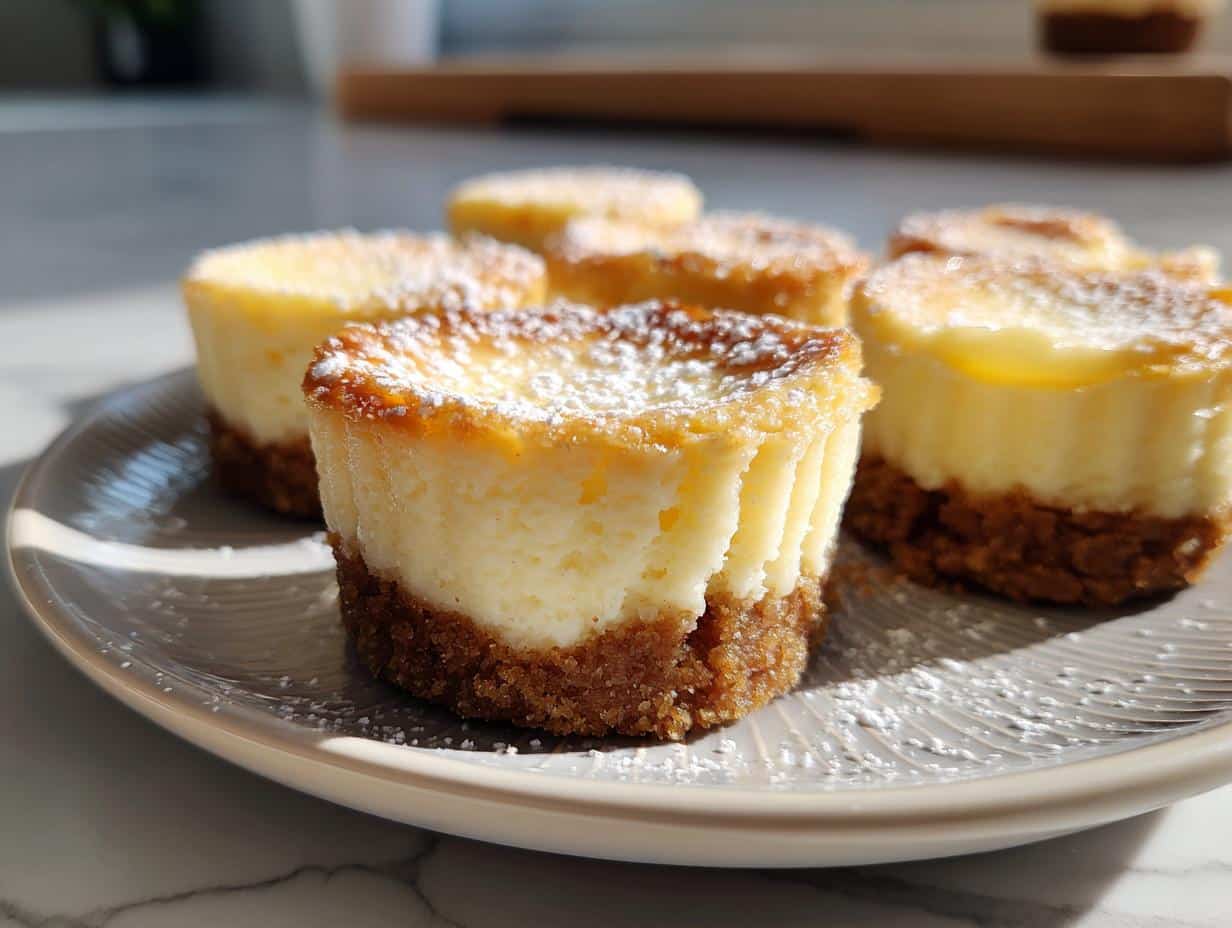
Oh my goodness, let me tell you about my little obsession—mini cheesecake bites! These adorable two-bite wonders have saved me at more parties than I can count. Last summer, I showed up to a potluck with nothing but a tray of these, and let’s just say… nobody missed the sheet cake. The best part? They’re ridiculously easy to make but look so fancy. Just graham cracker crumbs, cream cheese, and a few pantry staples transform into these perfect little domes of creamy goodness. Whether you’re hosting book club or need a quick dessert for the school bake sale, these mini cheesecake bites always steal the show.
Why You’ll Love These Mini Cheesecake Bites
Trust me, these little bites are about to become your new go-to dessert. Here’s why:
- Foolproof & fast – No water baths or fancy techniques here! You can whip these up faster than it takes to preheat the oven.
- Party perfection – One batch makes 24 perfect two-bite treats that disappear faster than you can say “seconds please!”
- Endless options – Top ’em with berries, chocolate drizzle, or keep ’em classic – they’re your blank canvas for creativity.
- No guilt, all joy – Small portions mean you can indulge without that “I ate a whole cheesecake” feeling (though no judgment if you eat five).
Ingredients for Mini Cheesecake Bites
Gather these simple ingredients – I promise you probably have most already! The key is quality and prep:
- 1 cup graham cracker crumbs (about 8 full sheets, crushed fine but not powdery)
- 2 tbsp sugar (granulated works best for the crust)
- 16 oz cream cheese, softened (leave it out for 2 hours – this is non-negotiable for smooth filling!)
- 1/2 cup sugar (same granulated works fine here too)
- 2 large eggs, room temp (cold eggs make the filling lumpy)
- 1 tsp pure vanilla extract (imitation just won’t give that rich flavor)
3 tbsp melted butter (salted gives the crust that addictive sweet-salty kick)
How to Make Mini Cheesecake Bites
Alright, let’s get to the fun part! Making these mini cheesecakes is as easy as 1-2-3. Just follow these steps, and you’ll have perfect little bites in no time. I’ve made this recipe so many times I could do it in my sleep, but I’ll walk you through every detail so yours turn out just right.
Preparing the Crust
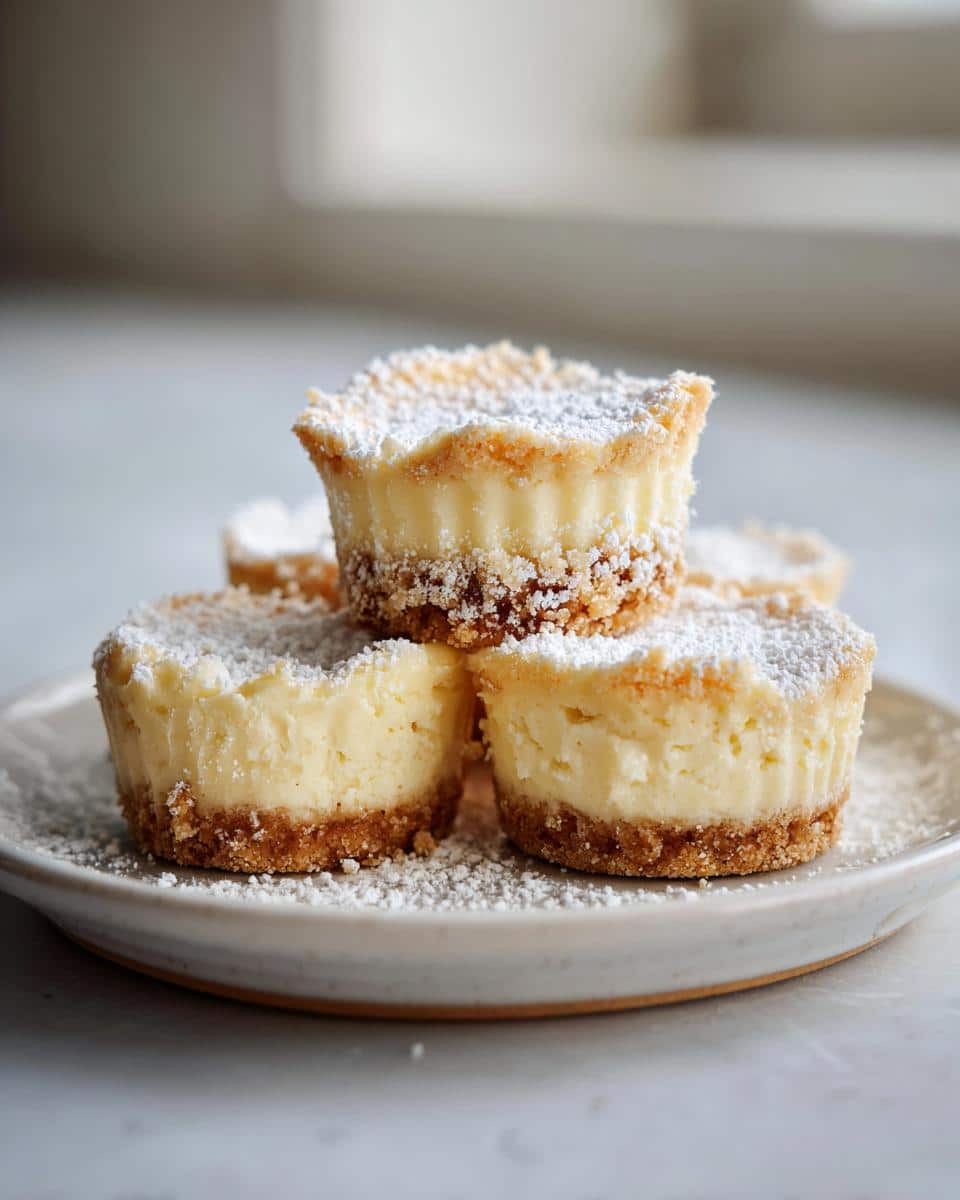
First things first – that buttery graham cracker base! In a medium bowl, mix your crumbs with sugar until they’re best friends. Then drizzle in that melted butter while stirring – you want it to look like wet sand. Here’s my secret: use a small measuring cup (1/4 cup works great) to press the mixture firmly into your lined mini muffin cups. Really pack it down – this keeps the crust from crumbling when you take your first bite. About 1 heaping teaspoon per cup is perfect.
Making the Cheesecake Filling
Now for the star of the show! Beat your softened cream cheese (I can’t stress this enough – no shortcuts here!) until it’s completely smooth. Gradually add sugar, then eggs one at a time, mixing just until combined. Stir in vanilla last. Pro tip: scrape the bowl often to avoid sneaky lumps! The filling should be silky and pourable – if it’s stiff, your cream cheese wasn’t soft enough (but don’t panic, it’ll still taste amazing).
Baking and Chilling
Fill those crusts nearly to the top – a small cookie scoop makes this mess-free. Bake on the middle rack at 325°F for 15-20 minutes until the edges look set but centers still jiggle slightly. Let them cool in the pan (patience!), then chill for at least an hour. This wait is torture, but it’s what transforms good cheesecakes into great ones. They’ll firm up beautifully in the fridge, I promise!
Tips for Perfect Mini Cheesecake Bites
After making hundreds of these little guys, I’ve learned all the tricks to cheesecake bite perfection. Here are my can’t-live-without tips:
- Paper liners are lifesavers – They pop right out without sticking, and make serving a breeze.
- Don’t overmix the filling – Once the eggs are incorporated, stop! Overbeating causes cracks.
- Room temp ingredients matter – Cold cream cheese equals lumpy filling. Plan ahead!
- Tap the pan gently – Gets rid of air bubbles for smooth tops every time.
- Chill thoroughly – I know it’s hard to wait, but they firm up so much better overnight.
Mini Cheesecake Bite Variations
Oh, the possibilities! These little bites are like blank canvases for your dessert dreams. My personal favorite? A dollop of tart lemon curd with a blueberry on top – it’s like sunshine in every bite. For chocolate lovers, drizzle melted chocolate and sprinkle with sea salt (trust me, it’s magic). Feeling fancy? Swirl in some raspberry jam before baking for a gorgeous marbled effect. And if you’re like me and can’t resist caramel, a quick drizzle of warm caramel sauce turns these into mini turtle cheesecakes. The best part? You can mix and match to make a whole platter of different flavors!
Serving and Storing Mini Cheesecake Bites
These little beauties taste best straight from the fridge—that cool, creamy texture is everything! For serving, pop them out of liners onto a pretty platter or leave them in for easy grabbing. Dress them up right before serving—fresh berries, whipped cream dollops, or chocolate shavings make them extra special. Store leftovers (if you have any!) in an airtight container in the fridge for up to 3 days. They actually get better on day two when the flavors meld together beautifully.
Mini Cheesecake Bites Nutritional Information
Now, let’s be real – we’re not eating cheesecake for its health benefits! But if you’re curious about what’s in these little bites of joy, here’s the scoop. The nutritional values will vary depending on your specific ingredients and brands. Using full-fat cream cheese versus reduced-fat, different graham cracker brands, or adding toppings will all change the numbers slightly.
That said, each mini cheesecake bite is a perfectly portioned treat – small enough to satisfy your sweet tooth without going overboard. The beauty of making them at home is you control exactly what goes in, unlike store-bought versions packed with preservatives. Just remember – nutritional info is always an estimate, so enjoy these in moderation (or don’t… I won’t tell if you eat three!).
Frequently Asked Questions
I get so many questions about these mini cheesecake bites – here are the most common ones with all my tried-and-true answers!
Can I freeze mini cheesecake bites?
Absolutely! Freeze them unfrosted in a single layer first, then transfer to an airtight container with parchment between layers. They’ll keep for 2 months – just thaw overnight in the fridge. The texture stays perfect!
Why did my cheesecakes sink in the middle?
Don’t panic – this usually means they needed just a minute or two more baking time. They’ll still taste amazing! Next time, wait until edges are set but centers still have a slight jiggle.
Can I use muffin pans without liners?
You can, but grease the pan really well first. I still prefer liners – they make removal so much easier and keep the crust intact.
How do I prevent cracks?
Avoid overmixing after adding eggs, don’t overbake, and let them cool gradually in the oven with the door slightly ajar. But hey, cracks just mean more room for toppings!