Skip to content
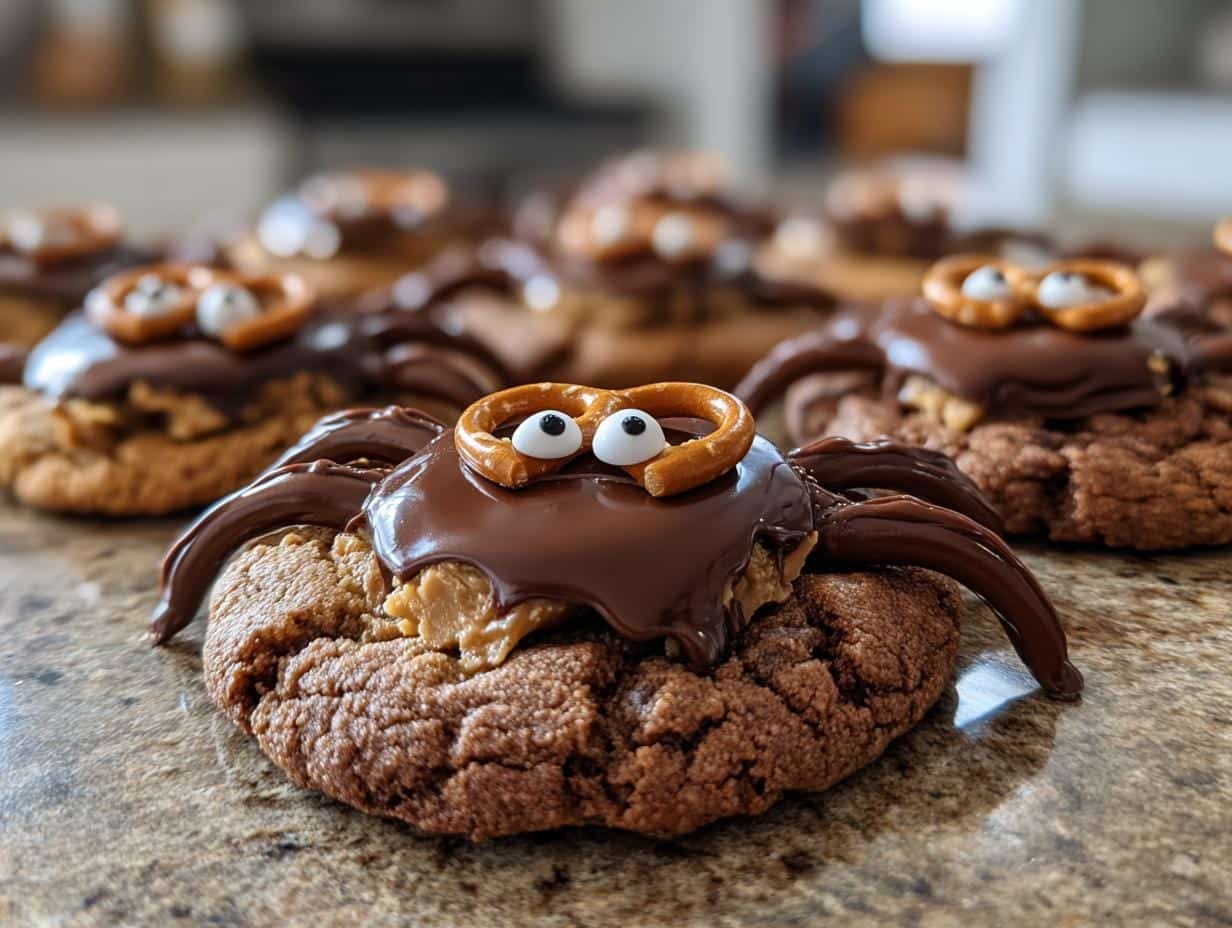
Every Halloween, my kitchen turns into a mad scientist’s lab—but instead of potions, I’m whipping up a batch of these ridiculously fun Halloween spider cookies. They’re the star of our spooky dessert table, and my kids go wild for them (okay, the adults do too). What I love most? They come together in just 30 minutes, and even if you’re not a baking pro, you can’t mess these up. My youngest still giggles when we add the pretzel legs—last year, one cookie ended up with eight legs on one side and none on the other. Oops! Trust me, these creepy-cute treats will steal the show at any Halloween party.
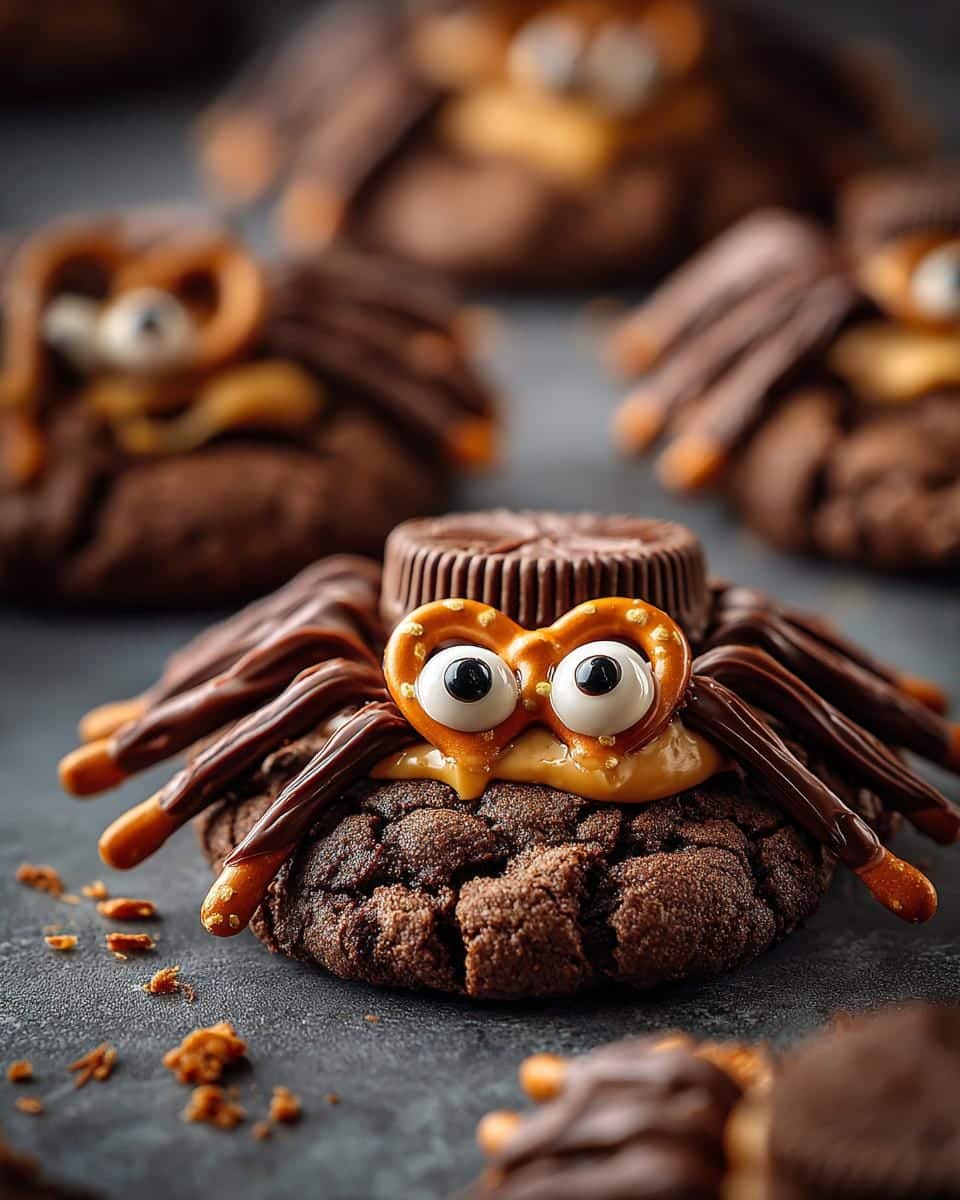
Table of contents:
Why You’ll Love These Halloween Spider Cookies
These cookies are the ultimate Halloween treat—they look terrifyingly cute and come together faster than you can say “boo!” Here’s why they’re a must-make every October:
- Kid-approved magic: Watching tiny hands place candy eyes and pretzel legs is half the fun. Even my picky eater gets excited about these eight-legged treats.
- Party perfect: They steal the spotlight on dessert tables. Last year, guests were too busy taking photos to eat them right away!
- Speed-baking win: From bowl to spider in 30 minutes flat. When you’re drowning in costume prep, this recipe is a lifesaver.
Fun and Festive
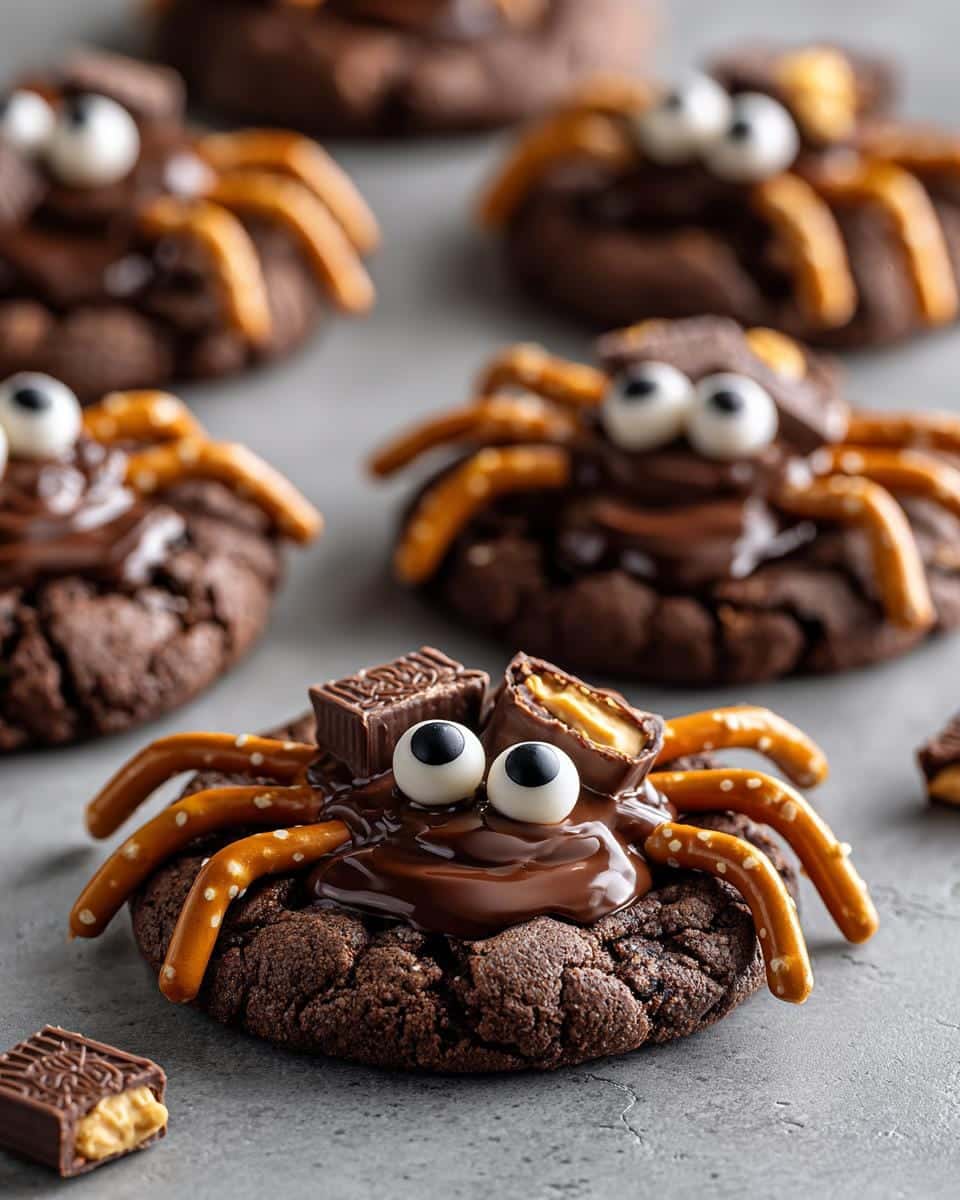
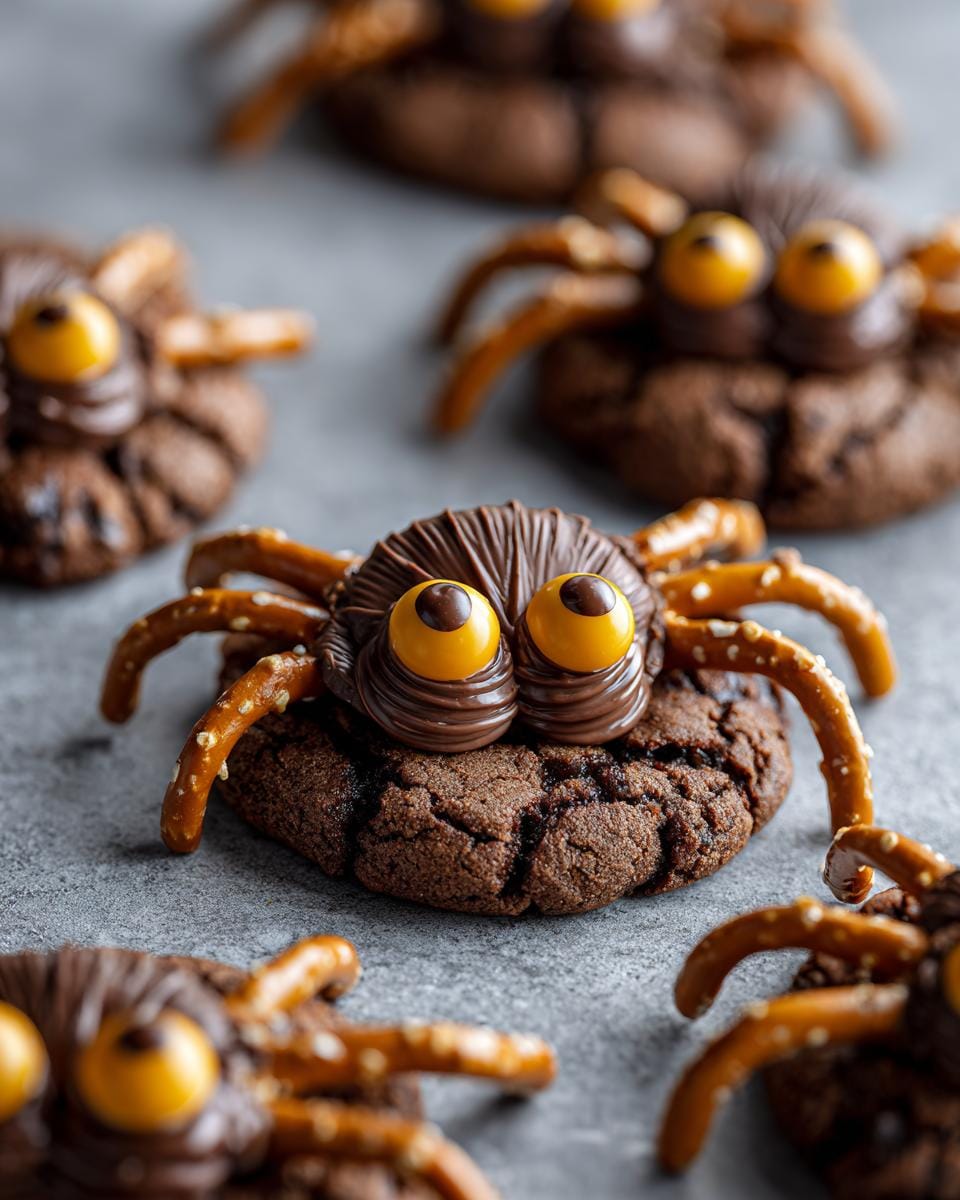
The moment those peanut butter cups melt slightly into warm cookies, magic happens—they transform into plump spider bodies just begging for legs. I always let the kids “surprise” me with their decorating skills (pretzel legs sticking straight up? Adorable). Pro tip: Use different eye sizes for extra personality—some spiders look sweet, others deliciously sinister.
Quick to Make
No fancy skills needed here! The dough comes together with basic pantry staples, and the decorating is foolproof. I’ve made these while helping with last-minute face paint disasters and they still turned out perfect. The 10-minute bake time means you can whip up a second batch when the neighborhood kids inevitably beg for more.
Ingredients for Halloween Spider Cookies
Here’s everything you’ll need to create these adorably creepy cookies—I promise, nothing too wild! The magic happens with simple ingredients you probably already have:
- 1 cup all-purpose flour – Spoon and level it, don’t scoop! This keeps the cookies tender.
- 1/2 cup unsweetened cocoa powder – Gives that deep, spooky black color. Dutch-process works too.
- 1/2 tsp baking soda – Just enough lift without puffing the spiders into balloons.
- 1/4 tsp salt – Balances the sweetness—trust me, you’ll miss it if it’s gone.
- 1/2 cup unsalted butter, softened – Leave it out for 30 minutes until it yields to a gentle press. Cold butter won’t cream right.
- 3/4 cup granulated sugar – The perfect amount to sweeten without overpowering.
- 1 large egg – Room temperature blends smoother—I pop mine in warm water for 5 minutes if I forget.
- 1 tsp vanilla extract – My secret for depth of flavor amidst all that chocolate.
- 24 mini peanut butter cups – Unwrapped and ready to become plump spider bodies!
- 48 candy eyes – Googly eyes make them extra playful.
- 1/2 cup chocolate chips, melted – “Glue” for the eyes—microwave in 15-second bursts.
- 24 thin pretzel sticks – Broken into 48 little legs (snap carefully—they love to shatter!).
See? No obscure ingredients—just pantry staples turned into something spectacularly spooky!
How to Make Halloween Spider Cookies
Ready to create your own eight-legged cookie army? Here’s the step-by-step magic—I promise it’s easier than untangling fake cobwebs! Just follow along, and you’ll have a whole spider squad in no time.
Preparing the Dough
First, grab that bowl and let’s get mixing! Start by whisking together the flour, cocoa powder, baking soda, and salt—I like to sift mine to avoid any cocoa lumps. In another bowl, cream the softened butter and sugar until it’s light and fluffy (about 2 minutes with a hand mixer).
That’s when you’ll beat in the egg and vanilla—don’t panic if it looks slightly curdled at first; it’ll smooth out once you add the dry ingredients. Now, slowly mix in your flour mixture just until the dough comes together. It should feel like Play-Doh—soft but not sticky. If it clings to your fingers, pop it in the fridge for 10 minutes. Meanwhile, line your baking sheets with parchment—trust me, it’s worth the extra step!
Baking and Decorating
Roll the dough into 1-inch balls—I use a cookie scoop for consistency—and space them 2 inches apart (they’ll spread a bit). Gently flatten each ball slightly with your palm—just enough to give your peanut butter cups a comfy seat. Bake at 350°F for exactly 10 minutes—they’ll look underdone, but that’s perfect!
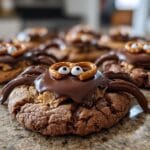
The second they’re out of the oven, press a peanut butter cup into the center of each cookie (use oven mitts—those trays are hot!). Let them cool for 5 minutes before the fun part: decorating! Dab melted chocolate where the eyes go, then stick on the candy eyes. Finally, break pretzel sticks in half and insert four “legs” on each side while the cookies are still slightly warm—this helps them stay put. Pro tip: angle the legs outward for a proper creepy-crawly effect!
Tips for Perfect Halloween Spider Cookies
After making these creepy cookies countless times (and learning from all my mistakes!), here are my foolproof tricks for spider cookie success:
- Chill sticky dough: If your dough feels too soft after mixing, wrap it in plastic and pop it in the fridge for 15 minutes—it’ll be much easier to handle.
- Tweezer tricks: Use clean tweezers or toothpicks to place those tiny candy eyes precisely—no chocolate-smudged fingers!
- Fresh pretzels: Stale pretzels snap unpredictably. Use fresh, thin sticks for legs that stay intact when inserting.
- Timing is everything: Add peanut butter cups immediately after baking—if the cookies cool too much, the cups won’t stick properly.
One year I forgot the eyes until the chocolate “glue” hardened—now I keep all decorations lined up and ready before baking!
Ingredient Substitutions for Halloween Spider Cookies
Baking should be fun, not stressful—so here’s how to adapt these spider cookies for allergies or what’s in your pantry:
- Peanut allergies? Swap peanut butter cups for chocolate-covered caramels or Rolos—they make equally plump spider bodies!
- Gluten-free: Use a 1:1 GF flour blend and gluten-free pretzels (the thin kind hold best for legs).
- No candy eyes? Pipe melted white chocolate dots and add mini chocolate chip pupils—spooky AND delicious.
See? No trick—just treats for everyone at your Halloween table!
Storing Halloween Spider Cookies
These little critters stay fresh in an airtight container for up to 3 days—if they last that long! Layer them between parchment to prevent leg breakage. Humidity is their kryptonite though—store in a cool spot, not the fridge (those pretzel legs turn soggy fast). Pro tip: Make extras! They mysteriously disappear…
Halloween Spider Cookies Nutritional Information
Just so you know what you’re biting into (spiders should be eaten responsibly, after all!): Each cookie rings in around 120 calories with 6g of fat. These are estimates though—exact numbers vary depending on your peanut butter cup brand and pretzel thickness. Mine always seem lighter… maybe because I “test” the broken pretzels!
FAQs About Halloween Spider Cookies
Got questions about these eight-legged treats? I’ve answered the most common ones here—straight from my own spider cookie adventures!
Can I freeze Halloween spider cookies?
Absolutely! Freeze undecorated baked cookies for up to 1 month. Thaw at room temperature before adding peanut butter cups and decorations. The pretzel legs are best added fresh though—they lose their crunch in the freezer.
How do I keep the legs from falling off?
The secret is inserting pretzel sticks while the cookies are still slightly warm—the melted peanut butter cup acts like glue! If some legs break, dip the ends in melted chocolate before inserting for extra hold. My kids call these “chocolate-dipped spider boots.”
Can I make these without peanut butter cups?
Of course! Chocolate-covered caramels work beautifully, or get creative with Oreo halves or even marshmallows. Just make sure whatever you use is about the same size as a mini peanut butter cup.
Why did my cookies spread too much?
Over-creaming the butter can cause spreading. Mix just until combined after adding flour—and always use room temperature (not melted) butter. Chilling the dough for 15 minutes before baking helps too!
How far in advance can I decorate these?
They’re best decorated the same day, but you can bake the cookies 1 day ahead. Store them airtight, then add peanut butter cups and decorations a few hours before serving—the eyes stay brightest this way.
30-Minute Halloween Spider Cookies That Will Delight Kids
- Total Time: 30 mins
- Yield: 24 cookies
- Diet: Vegetarian
Description
Creepy and fun Halloween spider cookies that are easy to make and perfect for spooky celebrations.
Ingredients
- 1 cup all-purpose flour
- 1/2 cup unsweetened cocoa powder
- 1/2 tsp baking soda
- 1/4 tsp salt
- 1/2 cup unsalted butter, softened
- 3/4 cup granulated sugar
- 1 large egg
- 1 tsp vanilla extract
- 24 mini peanut butter cups
- 48 candy eyes
- 1/2 cup chocolate chips, melted
- 24 thin pretzel sticks, broken into small legs
Instructions
- Preheat oven to 350°F (175°C). Line a baking sheet with parchment paper.
- Whisk flour, cocoa powder, baking soda, and salt in a bowl.
- Cream butter and sugar until fluffy. Beat in egg and vanilla.
- Gradually mix in dry ingredients until dough forms.
- Roll dough into 1-inch balls and place on baking sheet. Flatten slightly.
- Bake for 10 minutes. Press a peanut butter cup into each cookie while warm.
- Attach candy eyes with melted chocolate.
- Insert pretzel pieces as spider legs.
- Let cool before serving.
Notes
- Store in an airtight container for up to 3 days.
- Use gluten-free pretzels for a gluten-free option.
- Swap peanut butter cups for chocolate-covered caramels if allergic to peanuts.
- Prep Time: 20 mins
- Cook Time: 10 mins
- Category: Dessert
- Method: Baking
- Cuisine: American