Skip to content
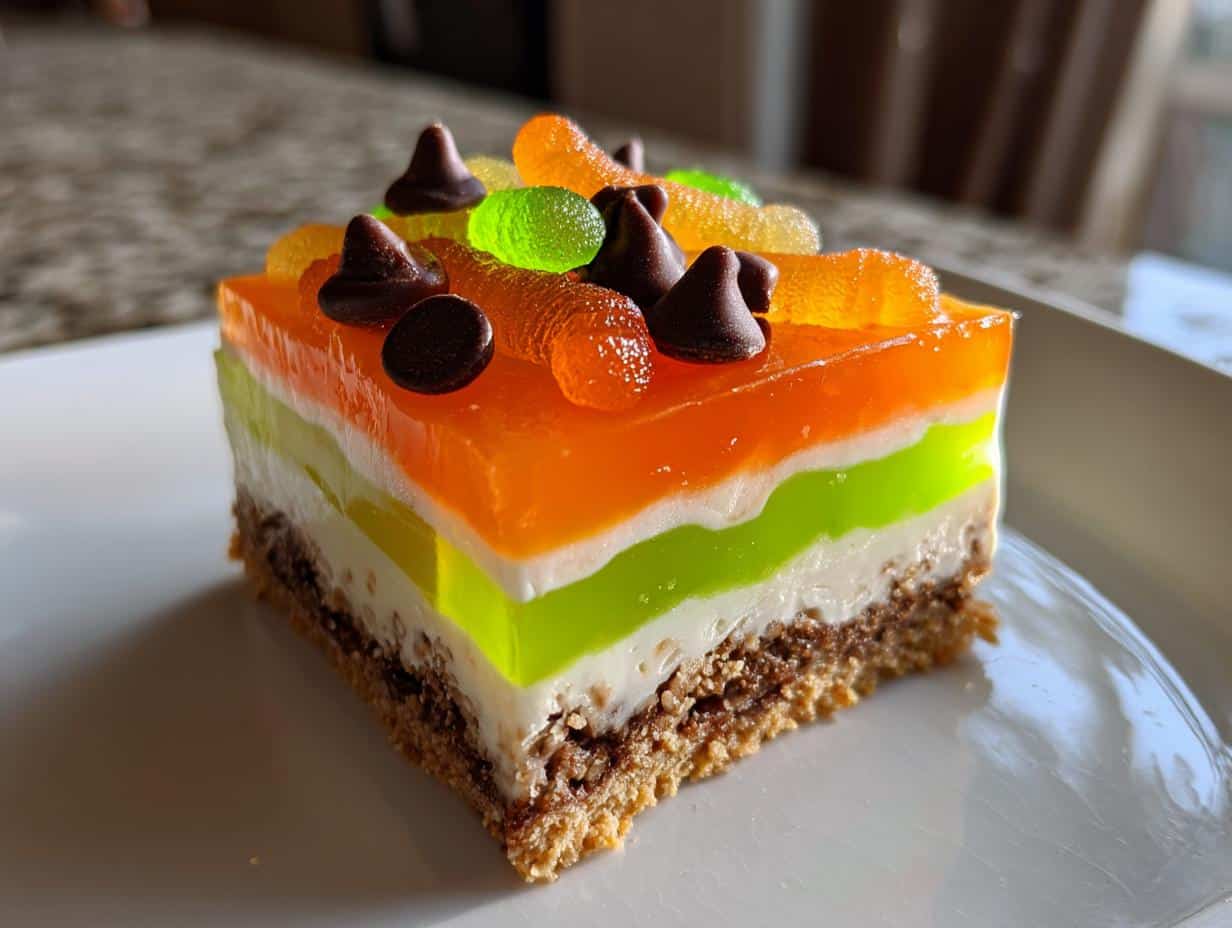
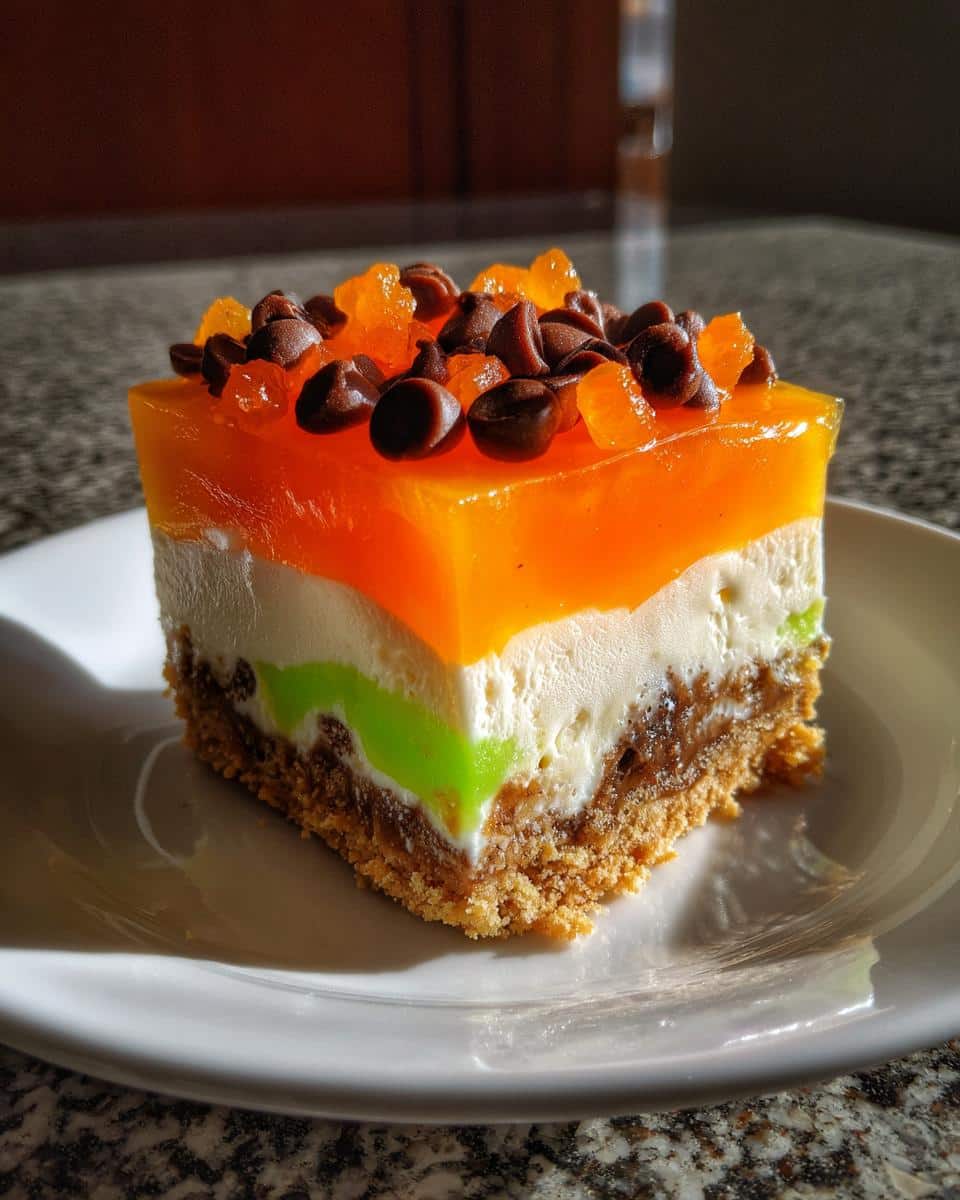
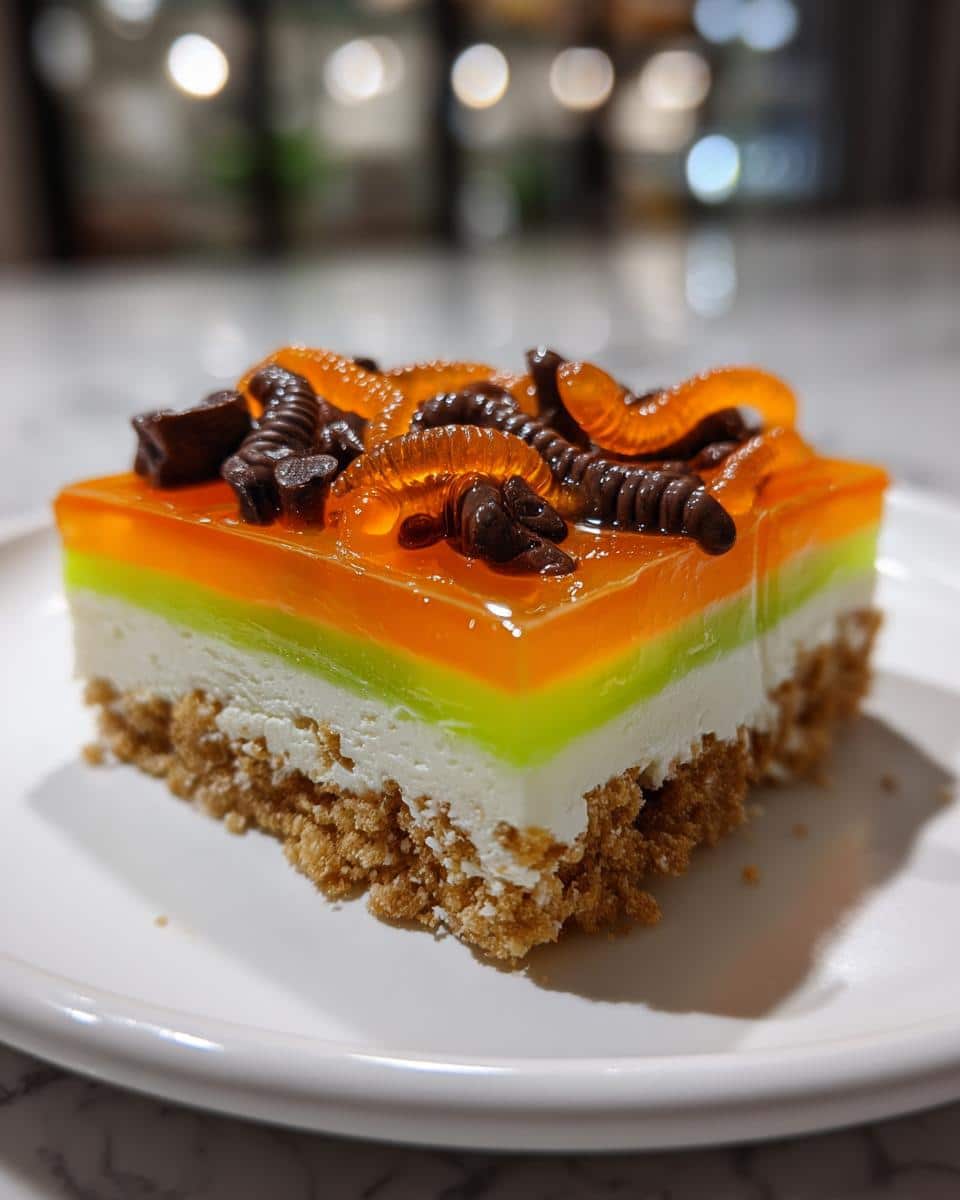
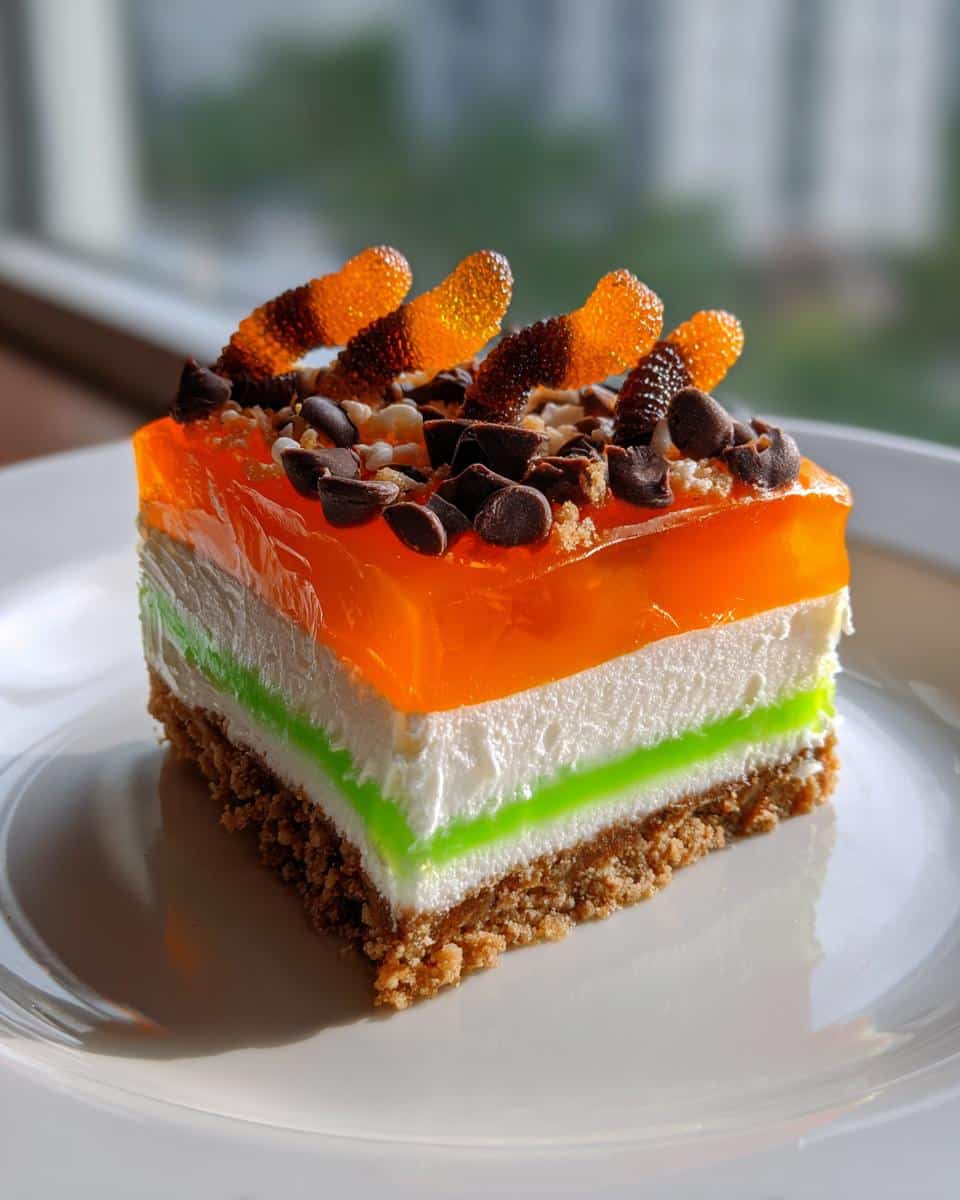
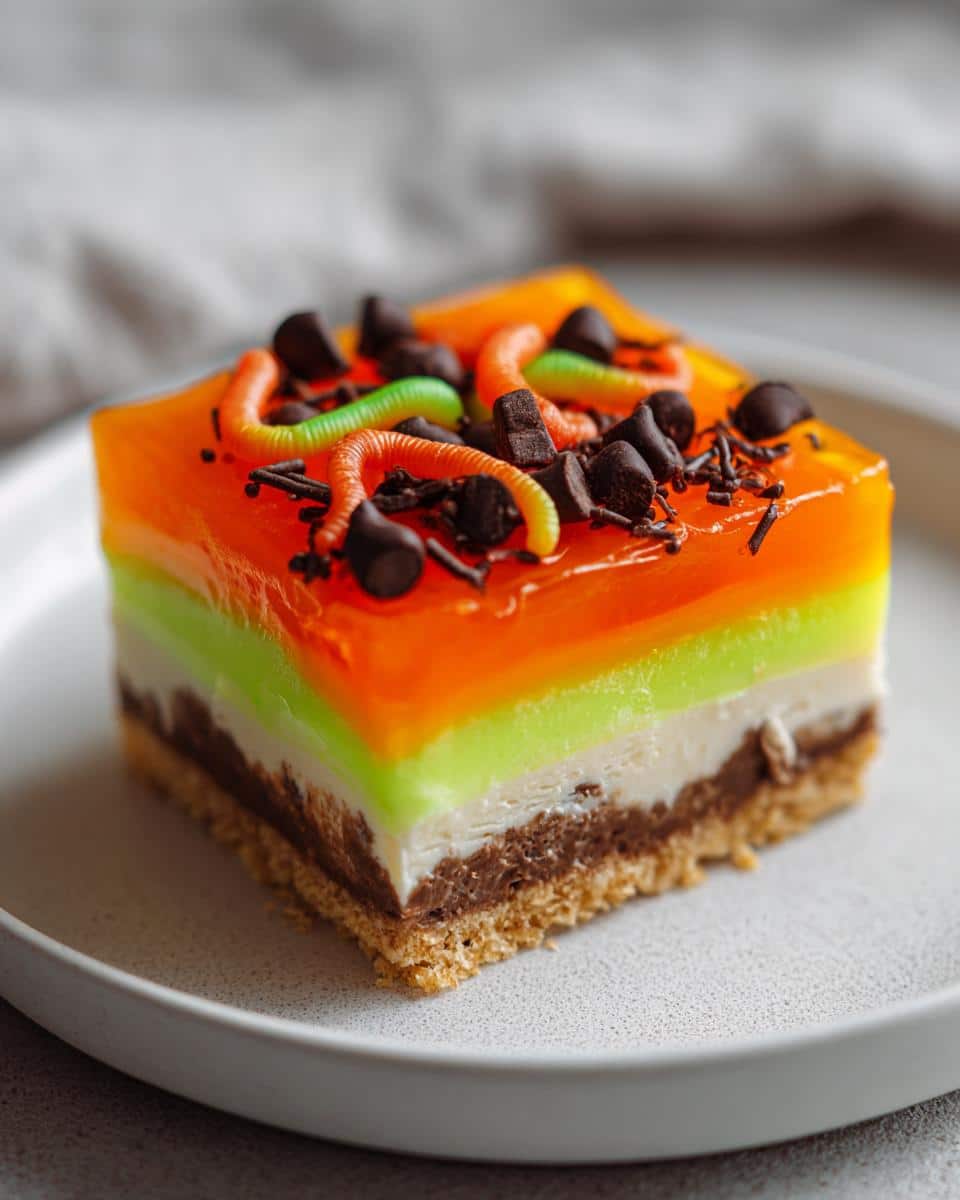
Okay, friends, gather ’round – I have to tell you about the absolute *hit* of last year’s Halloween party: this wickedly fun Halloween Lush Recipe! Picture this: layers of graham cracker crust, creamy cheesecake filling, and vibrant orange and lime gelatin that look like something straight out of a mad scientist’s lab. The best part? It’s ridiculously easy to throw together, even when you’re scrambling to finish costumes last-minute (ask me how I know).
I first made this for my niece’s spooky sleepover, and let me tell you, the kids went wild for those gummy worms crawling out of the layers. Even the adults couldn’t resist sneaking extra slices—it’s that good. What I love most is how customizable it is: swap colors for different themes, add edible glitter for extra magic, or go full creepy with black food coloring. Trust me, once you try this no-bake masterpiece, it’ll become your go-to Halloween treat just like it’s become mine!
Table of contents:
Why You’ll Love This Halloween Lush Recipe
Listen, this dessert isn’t just tasty—it’s downright *magical* for busy Halloween nights. Here’s why it’s become my must-make every October:
- Zero baking required – No oven fights while you’re elbow-deep in glitter and face paint
- Eye-popping colors that make kids (and Instagram) go nuts
- Foolproof layers – Even my disaster-prone cousin couldn’t mess this up
- Party superhero – Serves a crowd and stays chilled while you handle trick-or-treat chaos
Plus, that squishy gummy worm surprise? Pure Halloween joy in every bite.
Halloween Lush Recipe Ingredients
Alright, let’s raid the pantry for these goodies – I promise you probably have most of them already! Here’s what you’ll need to create this spooky masterpiece:
- 2 cups graham cracker crumbs – or smash up those leftover crackers from s’mores season
- 1/2 cup melted butter – the glue holding our crust together (vegan butter works great too!)
- 1 cup softened cream cheese – leave it out for an hour, or microwave for 15 seconds if you’re impatient like me
- 1/2 cup powdered sugar – sift it unless you enjoy lump-hunting
- 2 cups whipped topping – thawed Cool Whip or homemade whipped cream both work
- 1 box orange gelatin + 1 box lime gelatin – the vibrant Halloween duo
- 4 cups water total (2 boiling, 2 cold) – for perfect jiggly layers
- 1/2 cup chocolate chips – because everything’s better with chocolate
- Gummy worms (optional but highly encouraged) – the creepier the better!
Pro tip: Grab some black food coloring if you want to turn this into a proper haunted dessert!
Equipment You’ll Need
Don’t worry – you won’t need any fancy gadgets for this Halloween lush! Here’s what I always grab from my kitchen:
- 9×13-inch baking pan – The perfect stage for our spooky layers
- Mixing bowls – One for crust, one for cream cheese filling
- Whisk and spatula – My trusty sidekicks for smooth mixing
- Measuring cups – Because eyeballing gelatin never ends well
Bonus points if you’ve got a piping bag for swirls, but honestly? A zip-top bag with the corner snipped works just as well when you’re in a pinch!
How to Make the Halloween Lush Recipe
Alright, let’s dive into the fun part – building those gorgeous, wobbly layers! Don’t let the fancy look fool you; this is seriously easy stuff. Just follow these steps, and you’ll have a showstopper dessert that’ll have everyone asking for your secrets.
Step 1: Prepare the Graham Cracker Crust
First things first – let’s make that buttery base! Mix your graham cracker crumbs with melted butter until it looks like wet sand. Now, here’s my trick: line your pan with parchment paper first (trust me, you’ll thank me later when slicing perfect squares). Press the crumbs firmly into the bottom – I use the bottom of a measuring cup to get it nice and even. Pop this in the fridge while you work on the next layer. This quick chill helps prevent crumbling later!
Step 2: Make the Cream Cheese Layer
Time for the creamy magic! Beat your softened cream cheese until it’s smooth as silk – no lumps allowed! Gradually add the powdered sugar (sifted, remember?), then gently fold in the whipped topping. When spreading this over the crust, take your time smoothing it with a spatula dipped in warm water. This creates that perfect blank canvas for our colorful gelatin layers. Back in the fridge it goes for about 30 minutes – just enough time to clean up and maybe sneak a spoonful of leftover filling.
Step 3: Add the Orange Gelatin Layer
Here’s where the Halloween vibes really kick in! Dissolve your orange gelatin completely in boiling water – I stir for a full minute to be sure. Then add cold water and let it cool slightly (about 10 minutes) so it doesn’t melt our cream cheese layer. Pour gently over the chilled filling – tilt the pan to help it spread evenly. Now the hardest part: walk away! This needs at least 2 hours in the fridge to set properly. Resist poking it!
Step 4: Repeat with Lime Gelatin Layer
Same song, second verse! Repeat the gelatin process with lime flavor for that perfect Halloween color combo. Pro tip: check that your orange layer is fully set (no jiggle in the center) before adding the lime. Another 2-hour chill, and you’ll have those gorgeous, distinct layers that make this dessert so special.
Step 5: Decorate and Serve
The grand finale! Sprinkle chocolate chips like little bat droppings (see what I did there?) and artfully arrange gummy worms “crawling” out from the layers. Feeling extra? Add candy eyes or crushed Oreos for “dirt.” Use a sharp knife dipped in hot water for clean slices. Watch as your creation disappears faster than ghosts at dawn!
Tips for the Perfect Halloween Lush Recipe
Alright, let me share my hard-earned tricks for making this dessert truly spellbinding – learned through many batches (and a few happy accidents)!
- Chill like you mean it – Each layer needs its full resting time. Peek too soon, and you’ll get wobbly layers mixing together. I set a timer because I’m impatient!
- Gel food coloring is your friend – Want vampire-red or witchy purple layers? A few drops of gel coloring makes colors pop without thinning the gelatin.
- The warm knife trick – Dip your knife in hot water and wipe dry between cuts for magazine-worthy slices that show off every layer.
- Crumb coat your crust – Lightly butter the pan sides before adding crumbs to prevent sticking – especially helpful if skipping parchment paper.
Oh, and one bonus tip? Leftovers (ha!) taste even better the next day when flavors meld – if you can resist eating it all at once!
Halloween Lush Recipe Variations
Oh, the possibilities with this dessert are endless! Want to mix things up? Try swapping the graham crust for crushed Oreos (hello, cookies and cream vibes) or gingersnaps for a spicy twist. Berry gelatin gives you vampire-blood red layers, while sugar-free options work great for dietary needs. My neighbor even made a midnight version with black cherry gelatin and candy eyeballs – pure Halloween magic!
-
- Monster Mash-Up: Use grape and lemon gelatin for purple and yellow layers
Diet-Friendly: Sugar-free gelatin and coconut whipped topping make it diabetic-friendly
- Grown-Up Twist: Spike the whipped cream layer with a splash of orange liqueur
Seriously, let your Halloween spirit run wild – that’s half the fun!
Storing and Serving Suggestions
This Halloween lush keeps like a dream in the fridge – just cover it tightly with plastic wrap, and it’ll stay fresh for up to 3 days (though let’s be real, it never lasts that long in my house). For serving, I love pairing slices with warm apple cider for the kids or spiked hot chocolate for the adults. Pro tip: Let it sit at room temperature for 10 minutes before serving – those gelation layers get the perfect jiggle that way!
Halloween Lush Recipe FAQs
I get asked these questions ALL the time when I bring this dessert to parties – so let me save you the trouble of texting me at midnight!
Can I use sugar-free gelatin?
Absolutely! I’ve made this with sugar-free orange gelatin for my diabetic nephew, and it worked perfectly. Just follow the package directions exactly – sometimes they require slightly different water amounts. The texture comes out just as wobbly and fun!
How do I prevent a soggy crust?
Oh honey, I learned this the hard way! The trick is to chill your crust for at least 15 minutes before adding the cream cheese layer. Also, make sure your gelatin mixture has cooled slightly (but not started setting) before pouring. That quick chill makes all the difference!
Can I make this ahead of time?
You bet – this is actually BETTER made a day ahead! The flavors meld beautifully overnight. Just add any gummy worm decorations right before serving so they don’t get too soft. Cover tightly with plastic wrap, and it’ll keep happily in your fridge for up to 3 days.
Why is my top gelatin layer sinking into the bottom one?
Been there! This happens when the first gelatin layer isn’t fully set before adding the second. Do the jiggle test – if the center still moves like jello, give it more time. I usually wait a full 2 hours between layers, sometimes longer if my fridge is packed.
Can I use fresh whipped cream instead of Cool Whip?
Of course! I actually prefer homemade whipped cream sometimes. Just whip 1 cup heavy cream with 2 tablespoons powdered sugar until stiff peaks form. Fold it into the cream cheese mixture gently – it’s a bit less stable than Cool Whip, but oh that rich flavor is worth it!
Nutritional Information
Okay, let’s be real – this is a treat, not health food! But for those curious (or counting points), here’s the scoop per serving: about 250 calories, 20g sugar, and 12g fat. Remember, these are estimates – actual numbers vary by brands. My philosophy? Enjoy every spooky bite guilt-free – it’s Halloween, after all!
For more delicious recipes and inspiration, check out our recipes section. You might also enjoy our apple crumb cake or our easy butter cookies.
Follow us on Pinterest for more great ideas: The Foodie Empire Pinterest.
Print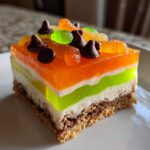
Wickedly Easy 2-Layer Halloween Lush Recipe Everyone Adores
- Total Time: 4 hours 20 minutes
- Yield: 12 servings
- Diet: Vegetarian
Description
A festive Halloween-themed lush dessert with layers of spooky colors and flavors. Perfect for parties or a fun family treat.
Ingredients
- 2 cups graham cracker crumbs
- 1/2 cup melted butter
- 1 cup cream cheese, softened
- 1/2 cup powdered sugar
- 2 cups whipped topping
- 1 box orange gelatin
- 1 box lime gelatin
- 2 cups boiling water
- 2 cups cold water
- 1/2 cup chocolate chips
- 1/2 cup gummy worms (optional)
Instructions
- Mix graham cracker crumbs and melted butter. Press into a 9×13-inch pan to form the crust.
- Beat cream cheese and powdered sugar until smooth. Fold in whipped topping. Spread over crust.
- Dissolve orange gelatin in 1 cup boiling water, then add 1 cup cold water. Pour over cream cheese layer. Chill until set, about 2 hours.
- Repeat with lime gelatin for the next layer. Chill again until set.
- Sprinkle chocolate chips and gummy worms on top before serving.
Notes
- Use black food coloring for a spookier look.
- Substitute gelatin flavors for different color themes.
- Chill between layers for best results.
- Prep Time: 20 minutes
- Cook Time: 0 minutes
- Category: Dessert
- Method: No-Bake
- Cuisine: American