Skip to content
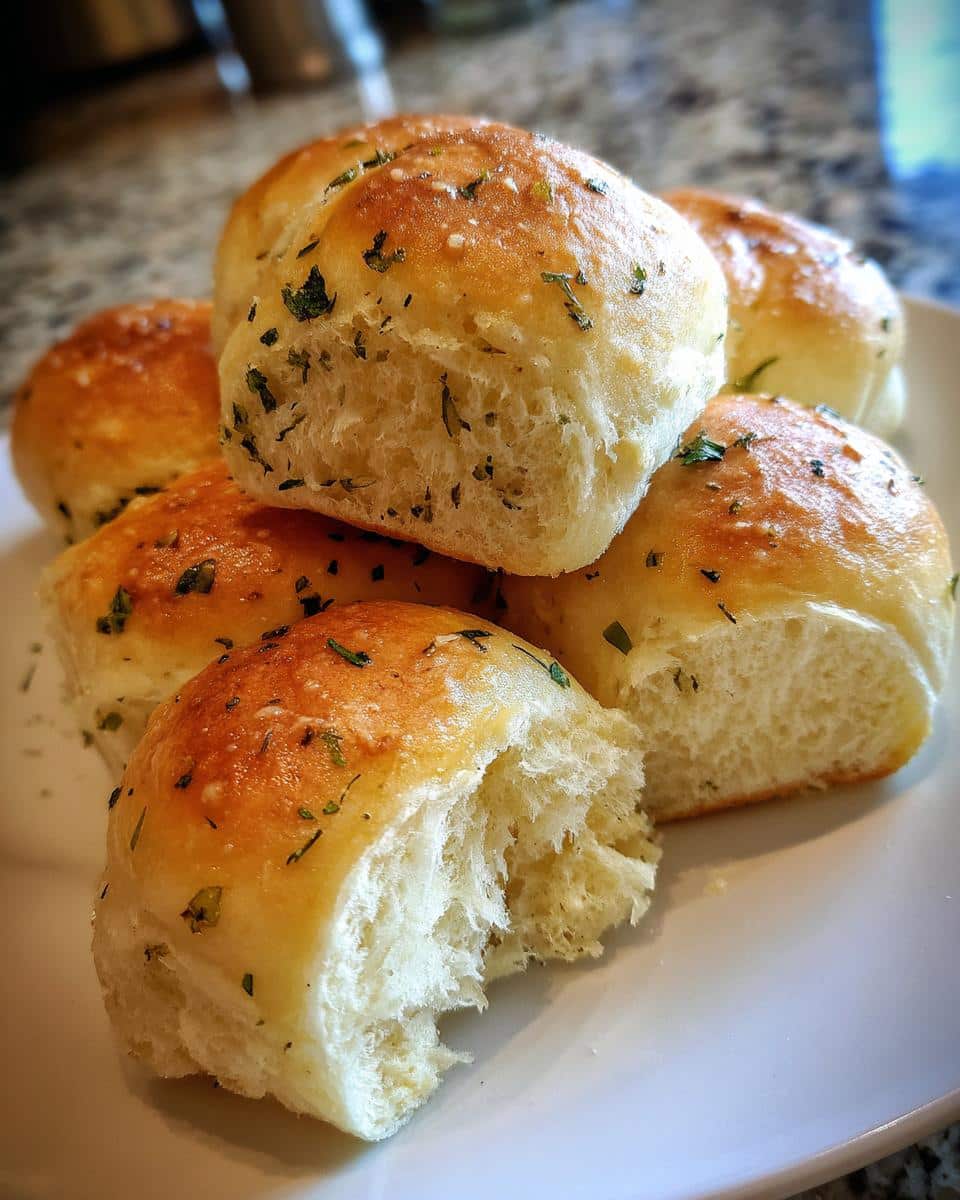
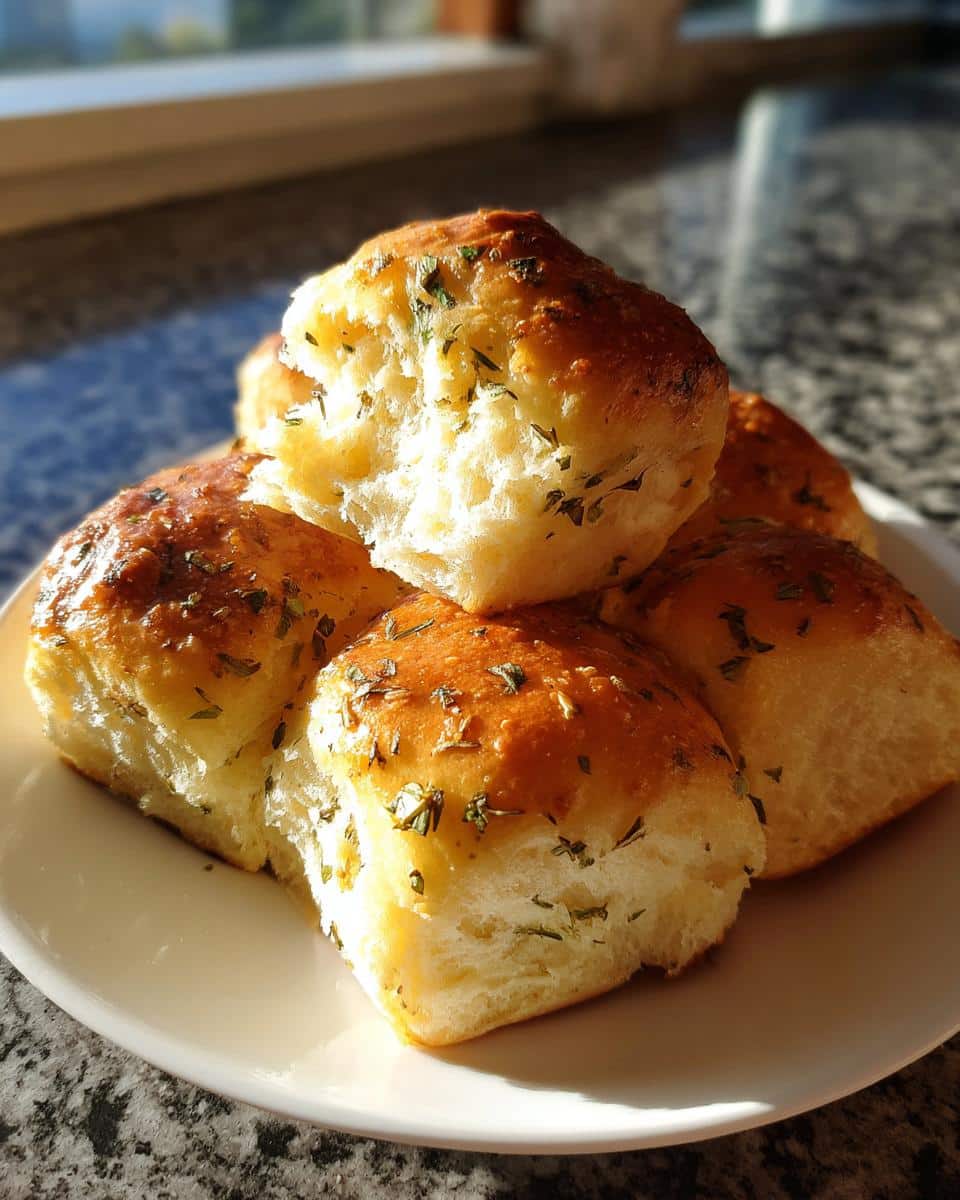
There’s nothing quite like pulling a tray of warm herbed dinner rolls from the oven—golden brown, fragrant with rosemary and thyme, and so soft they practically melt in your hands. I swear, half the time, half the batch disappears before they even hit the dinner table! My grandma used to make these rolls for Sunday suppers, and now they’re my go-to for everything from holiday feasts to lazy weeknight soups. The secret? Fresh herbs kneaded right into the dough (trust me, dried just won’t give you that same bright flavor). Plus, that fluffy, buttery texture? Absolute perfection—whether slathered with honey butter or used to soak up gravy. You’re going to love them.
Why You’ll Love These Herbed Dinner Rolls
Oh, where do I even start? These rolls are my pride and joy—here’s why they’ll become your new obsession too:
- Fluffy clouds of joy: That tender, pull-apart texture? It’s like biting into a buttery pillow (but better, because carbs).
- Herb-packed flavor bombs: Fresh rosemary and thyme make every bite sing—no sad, bland rolls here!
- Easy as pie (but simpler): Just mix, knead, rise, and bake. Even my yeast-phobic cousin nailed these on her first try.
- Dinner MVP: They steal the show at holiday tables but are equally happy next to Tuesday’s chili.
Seriously, once you catch whiff of that herby aroma filling your kitchen, you’ll understand the hype.
Ingredients for Herbed Dinner Rolls
Okay, let’s talk ingredients—because using the right stuff makes all the difference between “good” rolls and “oh-my-gosh-I-need-another-one” rolls. Here’s exactly what you’ll need (and why each one matters):
- 3 cups all-purpose flour: The backbone of our rolls. I like to spoon it into the measuring cup and level it off—no packing!
- 1 tbsp sugar: Just enough to feed the yeast and give a hint of sweetness. Grandma swore by cane sugar here.
- 1 tsp salt: Crucial for flavor balance. Skip it, and your rolls will taste flat (literally and figuratively).
- 1 packet active dry yeast (2 1/4 tsp): The magic maker! Check the expiration date—nothing sadder than dead yeast.
- 1 cup warm milk (110°F): Use a thermometer! Too hot kills yeast, too cold slows it down. Whole milk makes them extra rich.
- 2 tbsp unsalted butter, melted: Adds that irresistible tenderness. Salted butter works in a pinch, but adjust salt slightly.
- 2 tbsp fresh herbs, finely chopped: My holy trinity is parsley, thyme, and rosemary. No dusty jar herbs—fresh is non-negotiable here!
Pro tip: Set everything out before starting. Cold butter or milk straight from the fridge? Yeast hates surprises as much as I do when someone rearranges my spice drawer.
How to Make Herbed Dinner Rolls
Ready to get your hands doughy? Let’s walk through the steps to make these heavenly herbed dinner rolls. Trust me, it’s easier than you think—and so worth it. Just follow along, and you’ll have a tray of golden, fluffy rolls in no time.
Mixing the Dough
First things first: grab a big mixing bowl and whisk together the flour, sugar, salt, and yeast. This is your dry team—make sure they’re well-acquainted before the wet ingredients crash the party. Next, pour in the warm milk (remember, 110°F—no guessing here!) and the melted butter. Stir everything together until a shaggy dough forms. It’ll look messy at first, but that’s okay. Just keep mixing until there are no dry patches left. Pro tip: scrape the sides of the bowl to make sure everything gets incorporated.
Kneading and First Rise
Now comes the fun part—kneading! Dust your counter with a little flour (not too much, or your dough will get tough), and turn the dough out onto it. Knead for 5-7 minutes, pushing the dough away from you with the heel of your hand, then folding it back over itself. You’re looking for a smooth, elastic dough that springs back when you poke it. Once it’s ready, plop it into a greased bowl, cover it with a clean kitchen towel or plastic wrap, and let it rise in a warm spot for about 1 hour. You’ll know it’s ready when it’s doubled in size and looks all puffy and proud.
Shaping and Second Rise
Time to get creative! Punch down the dough to release any air bubbles, then sprinkle in those gorgeous fresh herbs. Fold the dough a few times to distribute the herbs evenly. Next, divide the dough into 12 equal pieces. I like to use a bench scraper for this—it’s a lifesaver. Roll each piece into a smooth ball and place them on a parchment-lined baking sheet, leaving a little space between each one. Cover them again and let them rise for another 30 minutes. They’ll puff up and get all cozy with each other, just like a little roll family.
Baking the Herbed Dinner Rolls
Finally, the moment of truth! Preheat your oven to 375°F (190°C) while the rolls are rising. Once they’re ready, pop them in the oven and bake for 15-20 minutes. You’ll know they’re done when they’re golden brown on top and sound hollow when you tap the bottom. If you’re unsure, use a thermometer—they should read 190°F (88°C) inside. Pull them out, let them cool just enough so you don’t burn your fingers, and then dive in. That first bite? Pure bliss.
Tips for Perfect Herbed Dinner Rolls
After making these rolls more times than I can count (and eating even more), I’ve picked up a few tricks that guarantee bakery-worthy results every single time. Here’s what you absolutely need to know:
- Fresh herbs or bust: That jar of dried rosemary in your spice rack? Leave it there. Fresh herbs give these rolls their vibrant flavor—chop them fine so they distribute evenly without tearing the dough.
- Milk thermometer magic: Yeast is picky about temperature. Too cold and it won’t wake up, too hot and you’ll kill it. I keep a cheap digital thermometer in my apron pocket—110°F is the sweet spot.
- Flour with a light hand: When kneading, resist the urge to keep adding flour. A slightly sticky dough makes for softer rolls. If it truly sticks, dust your hands—not the dough—with flour.
- The poke test never lies: After the first rise, your finger should leave an indent that slowly fills back halfway. If it springs back fast, give it more time. If it collapses, you’ve overproofed (but hey, they’ll still taste amazing).
- Brush with butter right after baking: This gives them that gorgeous shine and keeps the crust soft. I use the good butter here—none of that “I’ll save it for later” nonsense.
One last thing: don’t stress if your first batch isn’t picture-perfect. Even my “ugly” rolls get devoured before they cool!
Ingredient Substitutions for Herbed Dinner Rolls
Look, I get it—sometimes you’re halfway through a recipe and realize you’re out of rosemary or the milk went sour. Been there, burned that! Here are my tried-and-true swaps that’ll save your rolls without sacrificing flavor (because we don’t do sad, bland bread in this kitchen).
- Fresh herbs → Dried herbs: In a pinch, use 1 tsp dried herbs for every 1 tbsp fresh. But! Crush them between your fingers first to wake up the oils. And add them with the dry ingredients—they need extra time to hydrate.
- Whole milk → Plant-based milk: Almond or oat milk works beautifully. Just warm it gently—some brands separate when heated too fast. Skip the sweetened vanilla versions unless you want oddly dessert-like dinner rolls.
- Butter → Olive oil: Use 1.5 tbsp oil per 2 tbsp butter. The texture will be slightly denser but still delicious. Bonus: brush baked rolls with garlic-infused oil for an Italian twist.
- Active dry yeast → Instant yeast: Skip the proofing step and mix it right in with the dry ingredients. Use 25% less (about 1 3/4 tsp) since it’s more potent.
- All-purpose flour → Bread flour: Makes chewier rolls—great if you like a heartier bite. No need to adjust other ingredients, though you might need an extra tbsp of milk.
One substitution I don’t recommend? Leaving out the herbs entirely. At that point, just make regular rolls—these are called herbed dinner rolls for a reason! But hey, if you swap in some minced garlic and Parmesan, I won’t tell…
Serving Suggestions for Herbed Dinner Rolls
Oh, these rolls? They’re basically social butterflies—they get along with everything on your table. Here’s how I love to serve them (though let’s be real, they’re just as magical eaten straight off the baking sheet while standing in the kitchen):
- Soup’s best friend: Dunk them into creamy tomato bisque or butternut squash soup. The herbs play so nicely with those cozy flavors.
- Holiday showstoppers: Swap out boring dinner rolls at Thanksgiving—these babies hold their own against turkey and gravy. Bonus points for serving with honey butter.
- Salad sidekick: Pair with a big Caesar or Greek salad. The rolls soak up leftover dressing like little flavor sponges.
- Breakfast rebels: Split them open, toast lightly, and top with scrambled eggs and avocado. Yes, dinner rolls for breakfast—no rules here!
- Charcuterie upgrade: Serve warm alongside cheeses and cured meats. The rosemary makes them feel fancy without any extra work.
My personal favorite? Tearing one open while it’s still steaming, slathering it with salted butter, and watching it melt into all those herby nooks and crannies. Pure heaven.
Storing and Reheating Herbed Dinner Rolls
Let’s be honest—these rolls rarely last long enough to need storing in my house. But when they do (miraculously), here’s how to keep them tasting fresh-baked, whether it’s tomorrow’s lunch or next month’s emergency carb craving fix.
Room temp storage: Once completely cooled, tuck them into an airtight container or ziplock bag with all the air pressed out. They’ll stay soft for 2-3 days. Pro tip: add a slice of bread to the container—it absorbs excess moisture that would make them soggy.
Freezing for later: Wrap individual rolls tightly in plastic wrap, then aluminum foil (double protection against freezer burn!). They’ll keep beautifully for 3 months. I always stash a few in the freezer—my future self thanks me during hectic weeks.
Reheating magic: For room temp rolls, a quick 10-second zap in the microwave brings back that just-baked warmth. Frozen? Thaw overnight first, then:
- Oven method (best for crisp crusts): Wrap rolls in foil and warm at 300°F for 5-8 minutes. Uncover for the last 2 minutes if you like the crust crispy.
- Toaster oven hack: Split in half and toast cut-side up until lightly golden. Watch closely—they go from warm to charcoal fast!
One last trick? Brush reheated rolls with melted butter. It’s like hitting the “reset” button on freshness. Now if you’ll excuse me, I think I hear a leftover roll calling my name from the kitchen…
Herbed Dinner Rolls FAQs
Got questions? I’ve got answers! After years of making (and eating) these rolls, here are the most common head-scratchers—and my tried-and-true solutions.
Can I use instant yeast instead of active dry?
Absolutely! I do this all the time when I forget to plan ahead. Use 1 3/4 tsp instant yeast (25% less than active dry), and mix it right in with the dry ingredients—no need to proof it first. The rising times might be slightly shorter, so keep an eye on your dough. We’re going for puffy, not volcanic!
Why are my rolls dense?
Ah, the heartbreak of hockey-puck rolls. Usually it’s one of three culprits: over-flouring the dough (measure carefully!), killing the yeast with too-hot milk (thermometers are your BFF), or not letting the dough rise long enough (patience, grasshopper). If your kitchen’s chilly, let the dough rise near a warm oven—just don’t rush this step.
Can I make the dough ahead?
Yes! After the first rise, punch it down, cover tightly, and refrigerate overnight. The cold slows the yeast so you can bake fresh rolls tomorrow. Let the dough sit at room temp for 30 minutes before shaping. Bonus: chilled dough is easier to handle! Just don’t skip that second rise—it’s what gives them that airy texture.
My herbs keep turning black—help!
Ugh, the dreaded herb burn! Finely chop your herbs (big pieces = more surface area to scorch) and fold them in after the first rise. If they still darken, tent the rolls with foil during the last 5 minutes of baking. Or embrace it—I pretend those crispy rosemary bits are “artisanal.”
Can I freeze the baked rolls?
Please do! Freeze cooled rolls in a single layer first (so they don’t stick together), then transfer to a bag. They’ll keep for 3 months. To revive, thaw at room temp, then reheat wrapped in foil at 300°F for 10 minutes. Pro tip: freeze half the batch before your family discovers them—future you deserves warm rolls too.
Nutritional Information for Herbed Dinner Rolls
Okay, let’s talk numbers—because even though these rolls taste like pure indulgence, they’re actually pretty reasonable! Here’s the scoop per roll (based on my exact recipe, but remember, your mileage may vary depending on ingredients):
- Calories: About 150 per roll (perfect for that second—or third—helping guilt-free)
- Fat: 4g (mostly from that glorious butter, because flavor matters)
- Carbs: 25g (the good kind, aka “I deserve this” carbs)
- Protein: 4g (surprising for something so fluffy, right?)
- Sugar: Just 2g (the tiny bit of sugar mostly feeds the yeast, not your sweet tooth)
- Fiber: 1g (thank you, whole wheat flour’s distant cousin)
Important note: These values can shift based on your exact ingredients—like whether you use whole milk vs. skim, or an extra pat of butter for brushing (no judgment here). For precise counts, plug your specific brands into a nutrition calculator. But honestly? When that herby aroma hits your nose, I doubt you’ll be crunching numbers—you’ll be too busy reaching for roll number two.