Skip to content
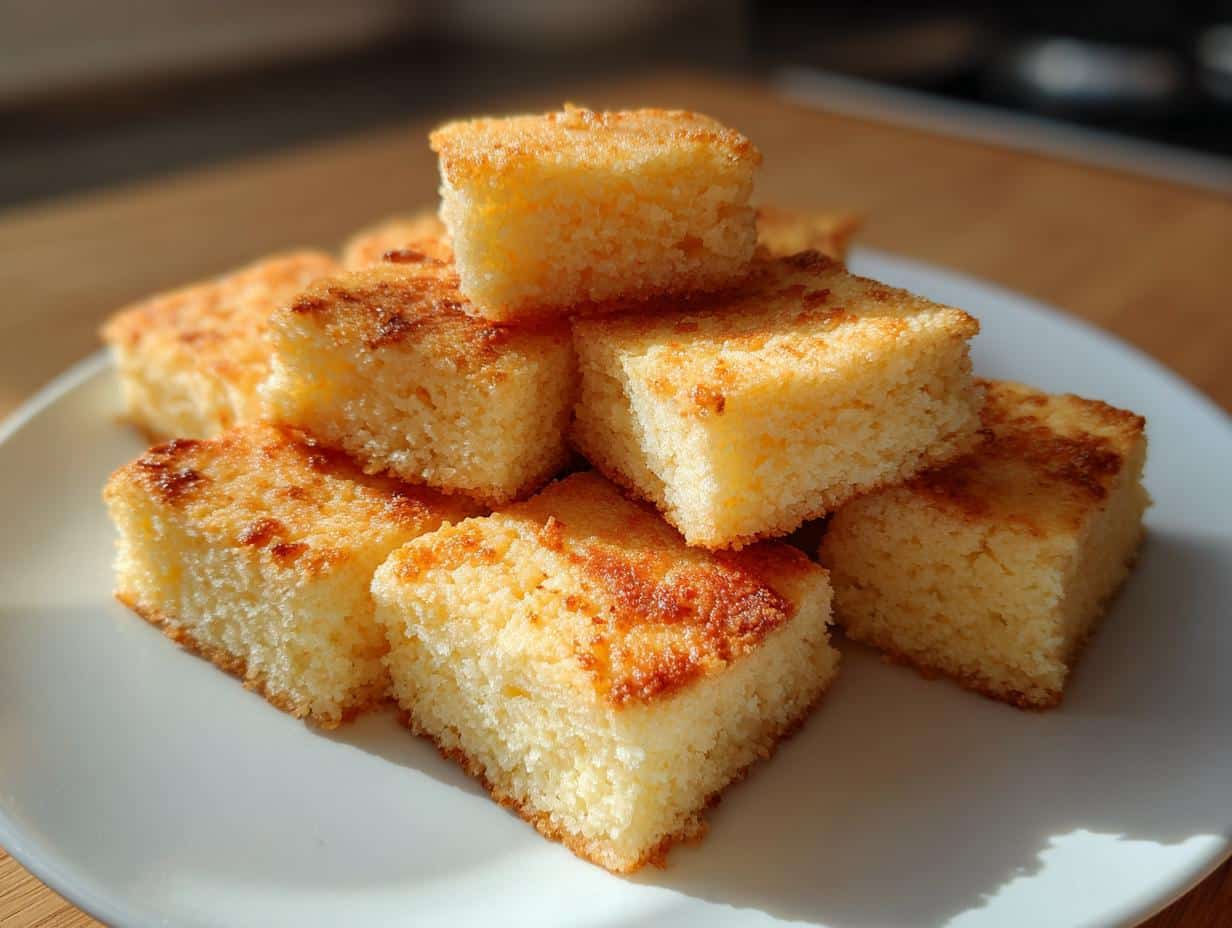
Oh, shortbread cookies – just saying those words makes me smile! There’s something magical about how three simple ingredients (butter, sugar, and flour) transform into these melt-in-your-mouth treats. My Scottish grandmother used to make them every Christmas, dusting them with sugar while still warm from the oven. The smell alone would bring everyone running to the kitchen!
These classic shortbread cookies have been loved for centuries, and once you try this recipe, you’ll understand why. They’re buttery without being too sweet, crumbly yet sturdy enough for tea-dunking (my favorite way to eat them). What I love most is how forgiving they are – no fancy techniques or special equipment needed. Just good ingredients and about 15 minutes of hands-on time. Whether you’re baking for a holiday cookie tray or just craving something simple and satisfying, these shortbread cookies never disappoint.
Fun fact: The original Scottish shortbread was baked in a round and cut into wedges called “petticoat tails” – isn’t that charming? My version uses a square pan because it’s what I always have on hand, but the spirit (and deliciousness) remains the same.
Why You’ll Love These Shortbread Cookies
Trust me, these shortbread cookies will become your new go-to recipe. Here’s why:
- Buttery perfection: Each bite melts in your mouth with rich, creamy flavor.
- Simple ingredients: Just butter, sugar, flour, and salt – no fancy stuff!
- No chilling required: Mix, press, bake – it’s that easy.
- Perfect for gifting: Package them in a cute tin or box for a thoughtful homemade treat.
Whether you’re a baking pro or a beginner, these cookies are foolproof and delicious every time.
Shortbread Cookies Ingredients
One of the best things about these cookies? You probably already have everything you need in your pantry right now. But let me walk you through each ingredient – because even with simple recipes, the little details make all the difference.
- 1 cup (2 sticks) unsalted butter, softened – And I mean really softened! Leave it out for about an hour until it gives easily when pressed. This makes creaming so much easier. Never microwave it – patience pays off here.
- 1/2 cup granulated sugar – I use regular white sugar, measured by gently spooning it into the cup (no packing!). Some folks swear by superfine sugar, but honestly? Plain sugar works beautifully.
- 2 cups all-purpose flour – If your flour’s been sitting awhile, give it a quick sift or whisk to break up any lumps. The spoon-and-level method gives me perfect measurements every time.
- 1/4 teaspoon salt – Just a pinch to balance the sweetness. If you only have salted butter, you can skip this – though I prefer controlling the salt myself.
See? Nothing weird or fancy – just good quality basics. I always use European-style butter when I can (that extra fat content makes them extra dreamy), but regular butter works great too. Now let’s turn these simple ingredients into magic!
How to Make Shortbread Cookies
Okay, let’s get baking! I promise this is one of the easiest cookie recipes you’ll ever make. Just follow these simple steps, and you’ll have perfect shortbread cookies before you know it. The key is not to rush – especially when creaming that butter and sugar. Slow and steady wins the race here!
Step 1: Cream Butter and Sugar
First things first – preheat your oven to 325°F (165°C). While that’s heating up, grab your softened butter (remember – finger-indent soft, not melted!) and sugar. I use my stand mixer with the paddle attachment, but a hand mixer works great too. Beat them together for a good 2-3 minutes until the mixture turns pale yellow and fluffy. You’ll know it’s ready when it looks almost like whipped cream. This step is crucial – it creates those tiny air pockets that give shortbread its signature delicate texture. For more on the science behind baking, check out The Science of Cooking.
Step 2: Mix Dry Ingredients
Now, add your flour and salt all at once. Here’s my big tip: mix on low speed just until the dough comes together. The moment you stop seeing flour streaks, STOP mixing! Overworking the dough makes tough cookies, and we want that melt-in-your-mouth texture. The dough will look crumbly at first, but it’ll come together as you press it into the pan. If it seems too dry, don’t panic – just use your hands to gently knead it a few times.
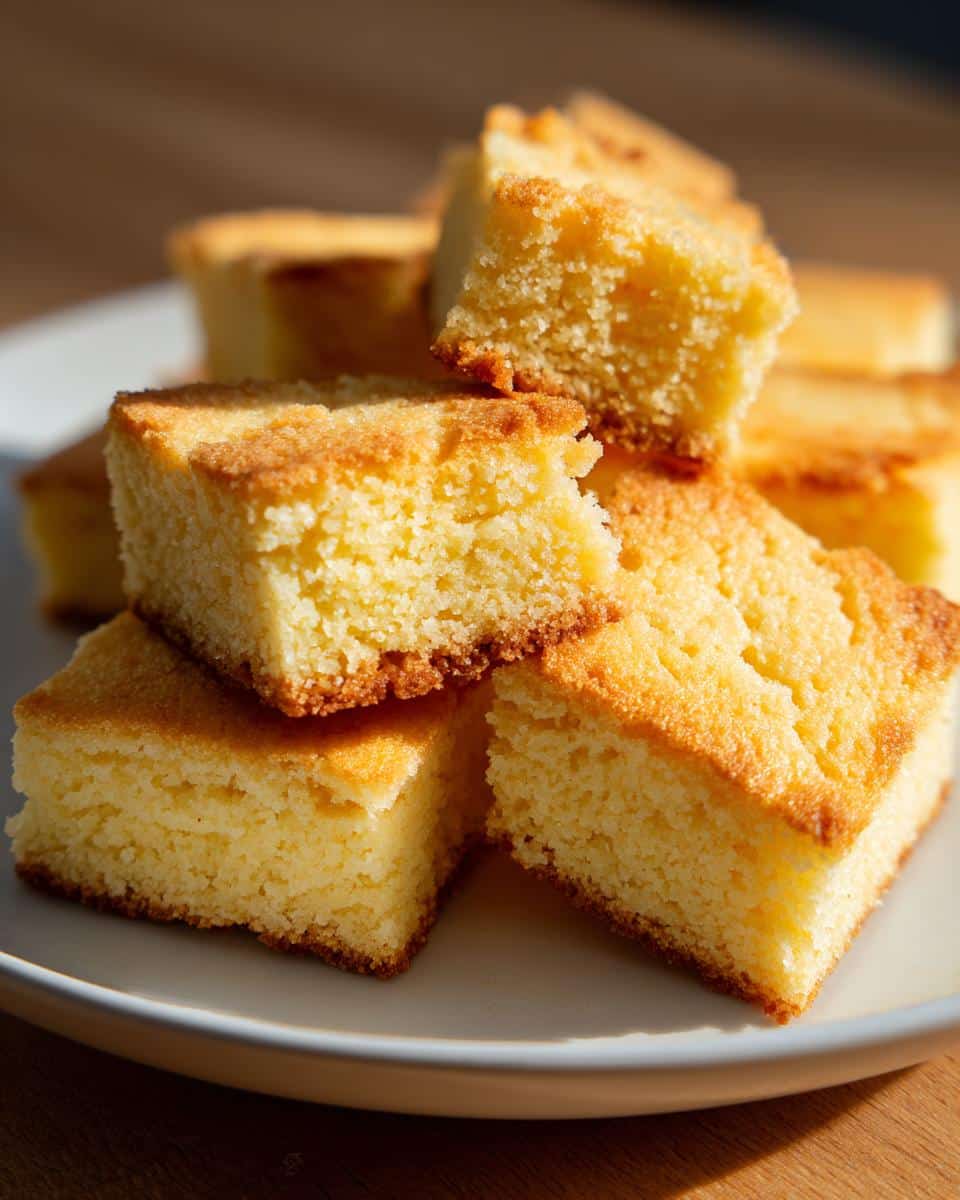
Step 3: Bake and Cut
Press the dough evenly into an ungreased 8-inch square pan (metal works best for even browning). I like to use the bottom of a measuring cup to really pack it in there – you want it nice and compact. Bake for 30-35 minutes until the edges turn that perfect golden color. The top should look lightly golden too, but not brown. Here’s the fun part – as soon as it comes out of the oven (careful, hot!), use a sharp knife to score it into squares while still warm. Then let it cool completely in the pan before removing. The waiting is the hardest part, I know!
See? Told you it was easy! Now all that’s left is to pour yourself a cup of tea and enjoy the fruits of your labor. These cookies are simple, but oh-so-satisfying.
Tips for Perfect Shortbread Cookies
After making hundreds of batches (okay, maybe thousands – I might have a problem), I’ve picked up some tricks that take these shortbread cookies from good to oh-my-goodness incredible. Here’s what I’ve learned:
- Metal is a must: Always use a metal baking pan – it conducts heat evenly so your cookies bake perfectly. Glass pans can lead to over-browned edges while the center stays underdone, and nobody wants that!
- Sharp knife = clean cuts: When scoring your cookies fresh from the oven, use the sharpest knife you have and press straight down – no sawing! I run my knife under hot water and dry it quickly for super-clean slices. The warmth helps it glide through the delicate shortbread.
- Patience with the pan: I know it’s tempting, but let those cookies cool completely in the pan before removing them. They firm up as they cool, and trying to move them too soon can cause breakage. Set a timer if you need to – I’ve burned my fingers too many times being impatient!
- Air is the enemy: Store these in an airtight container with parchment between layers. They’ll stay fresh and crisp for up to a week (if they last that long). A slice of bread in the container helps absorb any moisture – Grandma’s old trick that never fails.
Bonus tip: For extra fancy cookies, sprinkle them with coarse sugar right after cutting. The heat makes it stick beautifully, adding a lovely crunch and sparkle. Just don’t tell Grandma I gussied up her recipe!
Shortbread Cookies Variations
Now that you’ve mastered the classic version, let’s have some fun! Shortbread cookies are like a blank canvas just waiting for your creative touches. Here are my favorite ways to jazz them up – all while keeping that perfect buttery base:
- Citrus zest magic: Add 1 tablespoon of lemon or orange zest to the dough when creaming the butter. The bright citrus cuts through the richness beautifully. My neighbor swears by lime zest with a pinch of chili powder for a surprising kick!
- Chocolate lover’s dream: Drizzle melted chocolate over cooled cookies or dip one end for that classic bakery look. Dark chocolate pairs especially well. For extra indulgence, sandwich two cookies together with chocolate ganache – trust me, it’s worth the calories.
- Spice it up: Mix in 1/2 teaspoon cinnamon or cardamom with the flour for a warm, cozy flavor. Around the holidays, I love adding a pinch of nutmeg and cloves – smells like Christmas in every bite.
- Nutty goodness: Fold in 1/2 cup finely chopped toasted pecans or almonds for added crunch. My aunt always used hazelnuts and called them her “fancy pants” cookies.
The possibilities are endless! Just remember – shortbread dough is delicate, so any add-ins should be small and evenly distributed. Now go play with your food (I mean cookies) and make them your own!
Storing and Freezing Shortbread Cookies
Here’s the beautiful thing about these cookies – they actually get better after a day or two! The flavors mellow and the texture becomes even more perfect. Just follow these simple storage tips to keep your shortbread tasting freshly baked:
At room temperature, they’ll stay crisp and delicious for up to a week. I use an airtight container (my vintage cookie tin works perfectly) with sheets of parchment between layers to prevent sticking. If your kitchen tends to be humid, toss in a slice of bread – it absorbs any moisture like magic. My grandma swore by this trick, and I’ve never had soggy cookies since!
Want to freeze them? You’re in luck – shortbread freezes beautifully! Here’s how I do it:
- For baked cookies: Let them cool completely, then stack them in a freezer-safe container with parchment between layers. They’ll keep for up to 3 months. No need to thaw – I actually love eating them straight from the freezer!
- For unbaked dough: Press it into the pan as usual, then wrap the whole thing tightly in plastic wrap followed by foil. When you’re ready to bake, just unwrap and pop it straight into the oven (add a few extra minutes to the bake time).
One rainy-day tip: If your cookies lose their crispness, just pop them in a 300°F oven for 5 minutes to refresh them. They’ll come out tasting like they just came out of the oven! Now you’ve got no excuse not to always have shortbread on hand – not that we needed one, right?
Shortbread Cookies Nutritional Information
Okay, let’s talk numbers – but don’t let this scare you away from enjoying these buttery delights! Here’s the nutritional breakdown per cookie (based on cutting into 16 pieces):
- Calories: 120 (Worth every one, if you ask me!)
- Total Fat: 8g
- Saturated Fat: 5g
- Cholesterol: 20mg
- Sodium: 35mg
- Total Carbohydrates: 12g
- Sugar: 6g
- Protein: 1g
Now, here’s my little baker’s disclaimer: These values are estimates based on standard ingredients. Your exact numbers might dance around a bit depending on your butter’s fat content, how precisely you measure, and whether you sneak that extra chocolate drizzle (no judgment here!).
Fun fact: Compared to other cookies, shortbread is actually on the lighter side sugar-wise. It’s all about quality over quantity – one perfect bite satisfies better than three mediocre ones, right? That’s what I tell myself when I reach for a second… or third…
Frequently Asked Questions
Over the years, I’ve gotten so many questions about these shortbread cookies – and I love helping bakers troubleshoot! Here are the answers to the most common ones that pop up:
Can I use salted butter instead of unsalted?
Absolutely! Just skip the added salt in the recipe. I prefer unsalted because it lets me control the saltiness, but in a pinch, salted butter works fine. Your cookies might just taste a tiny bit different – but still delicious!
Can I roll out the dough and cut shapes?
You can, but fair warning – this dough is crumbly by nature! If you want to make shapes, add an extra tablespoon of butter to help it hold together better. Chill the dough for 30 minutes before rolling, and handle it gently. Hearts and circles work better than intricate designs that might break.
Why did my cookies spread or get too soft?
Oh honey, I’ve been there! Usually it means your butter was too soft when you started (should be cool to the touch, not greasy) or you might have overmixed the dough. Shortbread shouldn’t spread much at all – it’s meant to hold its shape. Next time, try chilling your dough for 20 minutes before baking if your kitchen is warm.
Can I make these gluten-free?
Yes! I’ve had great results using a 1:1 gluten-free flour blend. The texture is slightly more delicate, so handle with care. Some folks swear by adding 1/4 teaspoon xanthan gum for better structure, but it’s not strictly necessary. For more on gluten-free baking, you can explore resources like Celiac Disease Foundation.
Why are my cookies too hard?
This usually happens from overbaking or overmixing. Remember – they continue to firm up as they cool! Take them out when the edges are just golden (not brown) and let them do their thing in the pan. Also, measure your flour carefully – too much makes them dry.
There you have it – everything you need to make perfect shortbread cookies that would make my Scottish grandma proud! Whether you stick to the classic recipe or get creative with your own twists, I’d love to hear how they turn out. Snap a photo of your baking masterpiece and tag me – nothing makes me happier than seeing these buttery treats brightening someone’s day.
Now go forth and bake up some happiness! And don’t forget to rate this recipe below if you loved it as much as I do. Your feedback helps other bakers know which recipes are truly worth making. Happy baking, my friend!