Skip to content
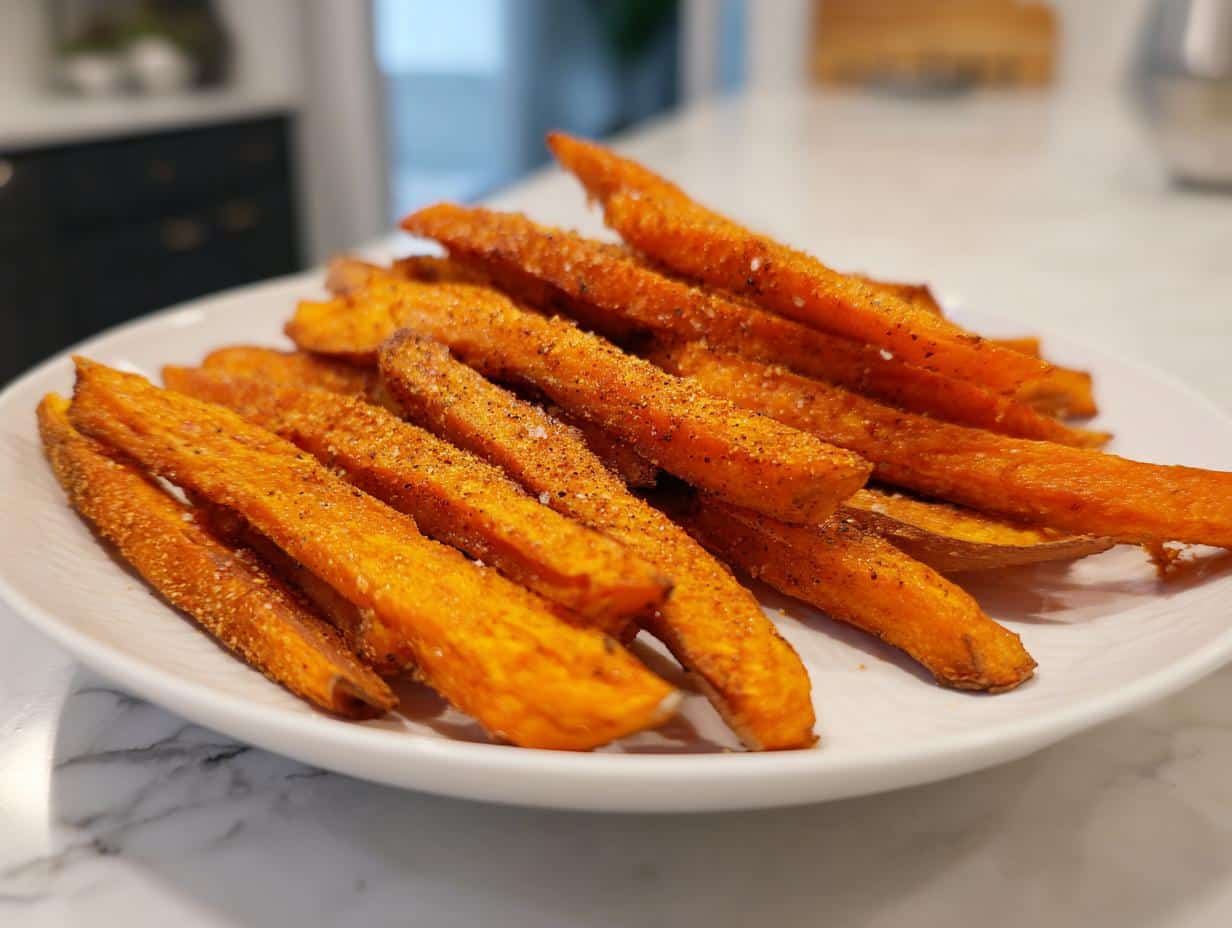
Oh my gosh, you’re going to love these sweet potato fries—crispy on the outside, tender on the inside, and packed with flavor. I swear, once you make them at home, you’ll never go back to the soggy takeout version. The secret? A hot oven, a little patience, and the perfect spice blend (trust me, that sprinkle of paprika and garlic powder? Life-changing). My kids beg for these weekly, and I love that they’re actually healthy—no deep fryer needed. Whether you’re pairing them with burgers or just snacking straight off the tray, these fries are a game-changer.
Why You’ll Love These Sweet Potato Fries
These fries aren’t just delicious—they’re basically magic. Here’s why they’ve become my go-to side dish:
- Crazy easy: Just chop, toss, and bake—no fancy techniques needed
- Healthier than regular fries: Baked, not fried, and packed with vitamin A
- Perfect crispiness: That golden exterior gives way to tender centers
- Totally customizable: Switch up the spices to match your mood
- Kid-approved: My picky eaters gobble these up every time
Seriously, they’re so good you’ll want to make a double batch. I learned that the hard way when my husband ate an entire tray by himself!
Ingredients for Sweet Potato Fries
Here’s the short-but-mighty ingredient list for fries that’ll knock your socks off. Exact measurements matter here—I learned that after a sad batch where I eyeballed the oil (big mistake!). Everything you need is probably already in your pantry:
- 2 large sweet potatoes (about 1.5 lbs total—peeled and cut into ¼-inch fries)
- 2 tablespoons olive oil (the good stuff—it makes a difference!)
- 1 teaspoon paprika (smoked or regular, your call)
- ½ teaspoon garlic powder (not garlic salt—we’ll add salt separately)
- ½ teaspoon kosher salt (plus extra for sprinkling after baking)
- ¼ teaspoon black pepper (freshly ground if you’re feeling fancy)
Pro tip: If your sweet potatoes are skinny, grab 3 medium ones instead. Uniform thickness = evenly crispy fries!
How to Make Sweet Potato Fries
Ready to make the crispiest, most addictive sweet potato fries of your life? Let’s do this! Follow these steps, and I promise you’ll be a fry-making pro in no time.
Step 1: Prep the Sweet Potatoes
First things first—wash and peel those sweet potatoes. I like to use a sturdy veggie peeler to make quick work of it. Then, grab a sharp knife and slice them into ¼-inch thick fries. Try to keep them uniform so they bake evenly. (Wonky fries = some burnt, some soggy—no thanks!) If you’re feeling extra, soak the cut fries in cold water for 30 minutes. It helps remove excess starch and makes them even crispier. Just pat them dry with a kitchen towel before seasoning.
Step 2: Season the Fries
Now, the fun part! Toss your fries in a big bowl with olive oil, paprika, garlic powder, salt, and black pepper. Use your hands to make sure every single fry is coated evenly. This step is crucial—don’t skimp on the spices or oil, or you’ll end up with bland, dry fries. Trust me, I’ve been there, and it’s not pretty.
Step 3: Bake to Perfection
Preheat your oven to 425°F (220°C) while you’re prepping—this is non-negotiable for crispy fries. Line a baking sheet with parchment paper (no sticking, easy cleanup—win-win!) and spread the fries in a single layer. Crowding the pan is a no-go; they need space to crisp up. Bake for 20-25 minutes, flipping halfway through. Keep an eye on them toward the end—they go from golden to burnt real quick. When they’re crispy and slightly caramelized, pull them out and let them cool for a minute. Then, dig in!

Tips for the Best Sweet Potato Fries
Want to take your fries from good to *great*? Here are my tried-and-true tips for crispy perfection every time:
- Soak for crispiness: Soaking the cut fries in cold water for 30 minutes removes excess starch, helping them crisp up beautifully.
- Space them out: Spread the fries in a single layer on the baking sheet—no overlapping! Crowding = soggy fries.
- Flip halfway: Don’t skip flipping them halfway through baking. It ensures even browning on all sides.
- Watch closely: Sweet potatoes caramelize quickly, so keep an eye on them during the last 5 minutes to avoid burning.
Follow these, and you’ll have fries that are golden, crispy, and downright irresistible!
Sweet Potato Fries Variations
Once you’ve mastered the basic recipe, try these fun twists to keep things interesting! My personal favorite? Tossing them with a pinch of cayenne and brown sugar for sweet-heat magic. Fresh rosemary and grated parmesan make them fancy enough for dinner parties, while a sprinkle of cinnamon turns them into an oddly delicious dessert-like treat. The options are endless—play around and find your perfect combo!
Serving Suggestions for Sweet Potato Fries
These fries are crazy versatile—I love them with everything! Dunk them in garlic aioli or spicy ketchup for dipping, or pile them next to a juicy burger or grilled chicken. My kids even eat them for breakfast with scrambled eggs (don’t judge—try it!). They’re the perfect sidekick to almost any meal.
Storing and Reheating Sweet Potato Fries
Okay, let’s be real—leftover fries rarely happen in my house. But if you miraculously have some, here’s how to keep them tasting fresh! Store cooled fries in an airtight container in the fridge for up to 3 days. When reheating, skip the microwave (soggy city!) and pop them back in a 400°F oven or air fryer for 5 minutes. They’ll crisp right back up—almost like new!
Sweet Potato Fries FAQs
I get asked about these fries ALL the time—here are the answers to the questions that pop up most often in my kitchen (and my DMs!).
Q1. Can I make these in an air fryer instead?
Absolutely! Air fryers work wonders for sweet potato fries. Just cook at 400°F for about 12-15 minutes, shaking the basket every 5 minutes. They’ll get extra crispy—sometimes I prefer them this way!
Q2. Why won’t my fries get crispy?
Oh honey, I’ve been there! Usually it’s one of three things: 1) Your oven wasn’t hot enough (preheat properly!), 2) You overcrowded the pan (give them space to breathe), or 3) You didn’t pat the potatoes dry enough after soaking (moisture is the enemy of crispiness).
Q3. Do I really need to peel the sweet potatoes?
Nope! The skins are totally edible and packed with nutrients. I peel mine because I prefer the texture, but leave them on if you like—just scrub them really well first.
Q4. Can I prep these ahead of time?
You sure can! Cut the fries and keep them in cold water in the fridge for up to 24 hours before baking. Just drain and pat them dry when you’re ready to season and cook.
Q5. What’s the best dipping sauce for these?
My family argues about this constantly! My vote goes to garlic aioli, while my kids swear by honey mustard. Ranch, chipotle mayo, or even plain Greek yogurt with lemon zest all work beautifully—get creative!
Nutritional Information
Now, I’m no nutritionist, but I can tell you these sweet potato fries are way better for you than regular fries—and tastier too! Since we’re baking them instead of deep frying, they’ve got way less fat. And sweet potatoes? Packed with vitamin A, fiber, and all sorts of good stuff. For more information on the nutritional benefits of sweet potatoes, check out this USDA FoodData Central entry.
That said, exact nutrition numbers can vary depending on your potato size, how much oil you use, and which brands you buy. My advice? Enjoy them guilt-free as part of a balanced meal—they’re vegetables after all! (Okay, fine, they’re vegetables covered in delicious spices… but still!)
Try this recipe and share your results! Tag me on Instagram—I love seeing your crispy fry creations and hearing about your favorite spice combos.