Skip to content
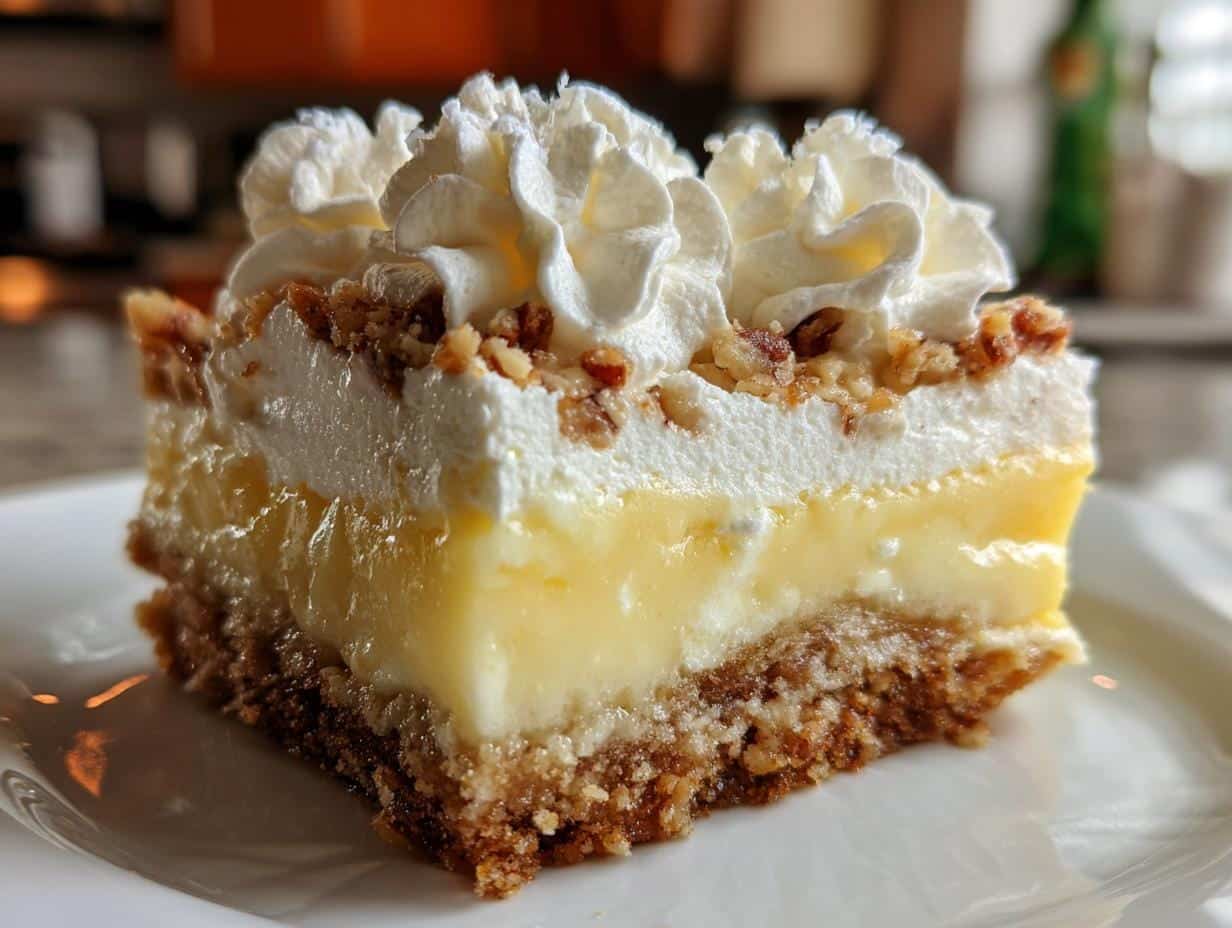
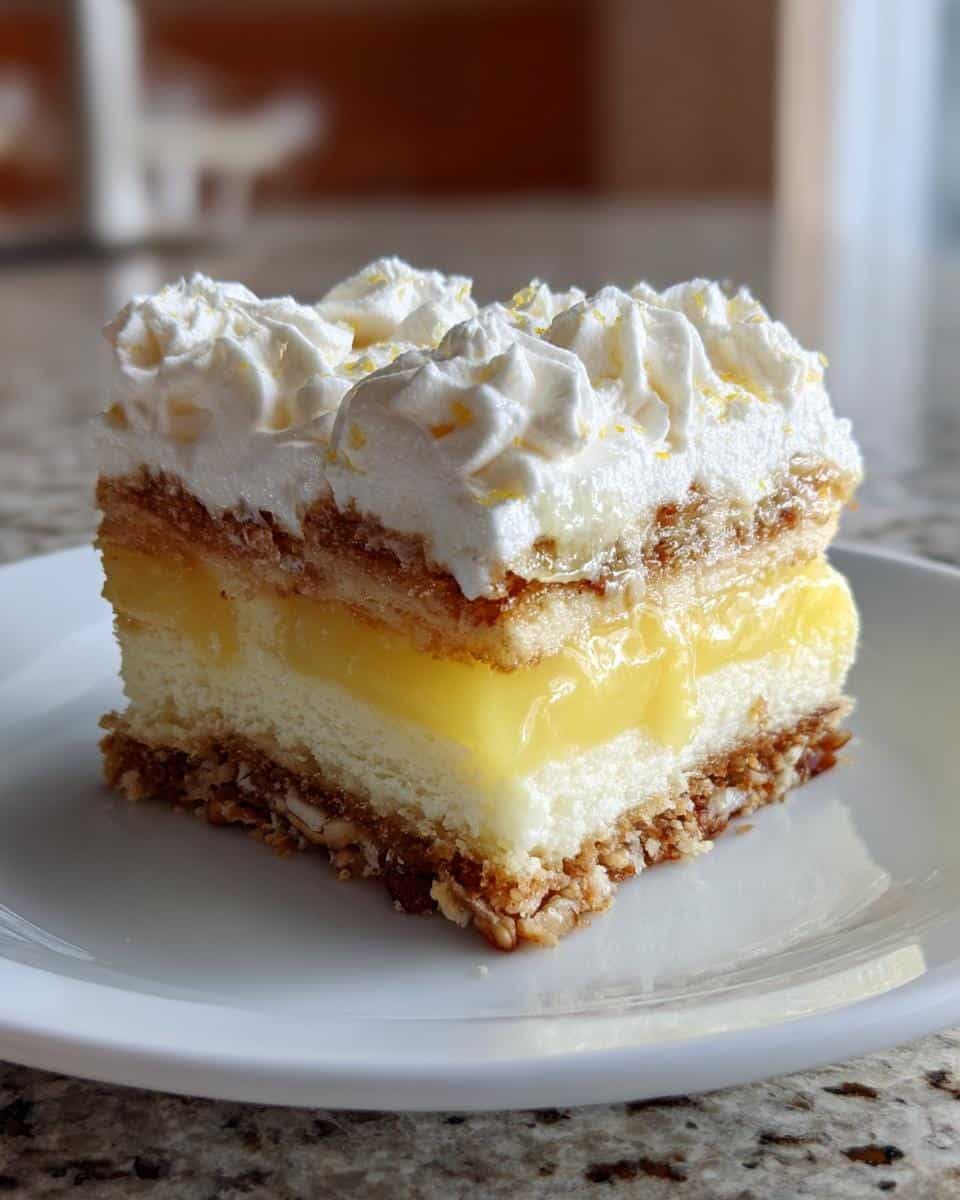
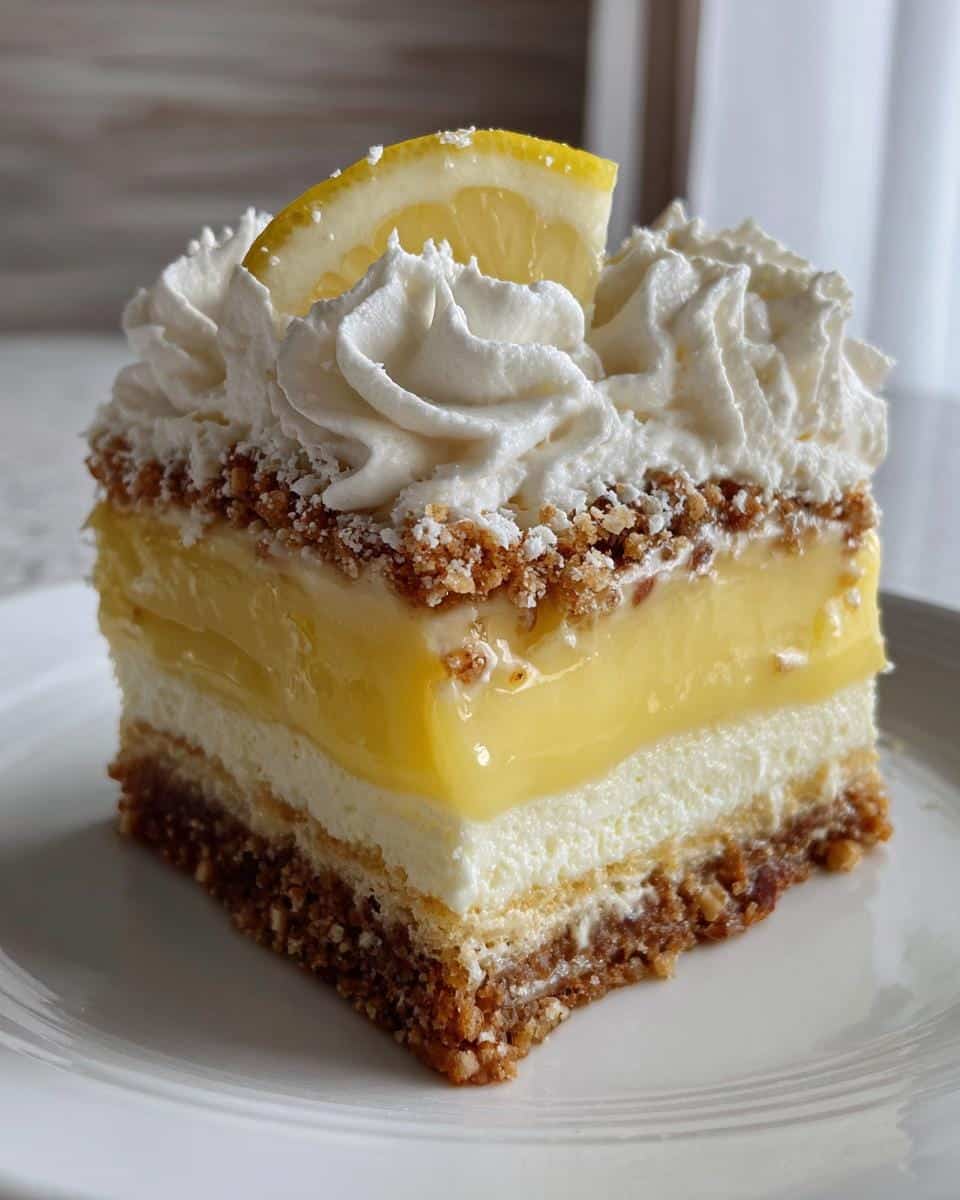
Oh my gosh, you HAVE to try this Lemon Lush Dessert Recipe! It’s been my go-to potluck dish ever since my aunt Betty brought it to a family reunion years ago. I still remember sneaking an extra slice when no one was looking – that perfect combo of buttery crust, creamy cheesecake layer, and tangy lemon pudding was just irresistible. The best part? It looks fancy but comes together so easily. Each spoonful gives you this dreamy mix of textures – crisp pecans, fluffy whipped topping, and velvety pudding all dancing together. Trust me, once you try it, you’ll be hooked just like I was!
Ingredients for Lemon Lush Dessert Recipe
Gathering all your ingredients before starting is key to making this dreamy dessert come together smoothly. Here’s exactly what you’ll need, separated by layer – because organization is half the battle when creating something this delicious!
Crust Layer Ingredients
- 1 cup all-purpose flour – Spoon and level for accuracy
- 1/2 cup unsalted butter, softened – Let it sit out for about 30 minutes
- 1/2 cup finely chopped pecans – Toast them first for extra flavor if you’re feeling fancy
Cream Cheese Layer Ingredients
- 8 oz cream cheese, softened – Full-fat works best here
- 1 cup powdered sugar – Sift it to avoid lumps
- 1 cup whipped topping – Thaw frozen topping completely
Lemon Pudding Layer Ingredients
- 2 (3.4 oz) packages instant lemon pudding mix – The instant kind works best
- 3 cups very cold milk – Whole milk creates the creamiest texture
Topping Ingredients
- Additional whipped topping – About 1-2 cups for garnish
- Optional: lemon zest – For a pretty finishing touch
Pro tip: Measure everything out before you start mixing – it makes the process so much smoother. And don’t skip softening that cream cheese and butter properly – lumpy batter is no one’s friend!
How to Make Lemon Lush Dessert Recipe
Alright, let’s dive into making this heavenly layered dessert! I promise it’s easier than it looks – just follow these steps carefully, and you’ll have the perfect Lemon Lush every time. The secret is taking your time with each layer and not rushing the chilling process (I know it’s hard to wait!).
Step 1: Prepare the Crust
First things first – preheat that oven to 350°F (175°C). While it’s heating up, grab your flour, softened butter, and pecans. Mix them together until they form a crumbly dough – I like using my hands for this part to really feel when it’s perfectly combined.
Now, press this mixture FIRMLY into your 9×13-inch baking dish. Seriously, pack it down tight – this prevents crumbs everywhere when you slice it later. Pop it in the oven for exactly 15 minutes until it’s lightly golden. Then comes the hardest part – walk away and let it cool completely! No cheating here – a warm crust will melt your cream cheese layer.
Step 2: Make the Cream Cheese Layer
While the crust cools, let’s make that dreamy cream cheese filling. Beat your softened cream cheese and powdered sugar together until it’s completely smooth – no lumps allowed! I usually let my mixer run for a good 2-3 minutes here.
Now, gently fold in that whipped topping. Don’t stir too vigorously – we want to keep it light and fluffy. Spread this cloud-like mixture evenly over your cooled crust. Pro tip: Use an offset spatula for super smooth edges!
Step 3: Assemble the Lemon Pudding Layer
Here’s where the magic happens! Grab your pudding mixes and cold milk. Whisk them together for a full 2 minutes – set a timer! This ensures the perfect thick-but-smooth consistency. Let it stand for 5 minutes to set slightly before carefully spreading it over the cream cheese layer.
Be extra gentle here – you don’t want to mix the layers. I like to dollop spoonfuls across the surface first, then connect them with light strokes.
Step 4: Chill and Serve
Almost there! Top with that final layer of whipped topping, smoothing it just like you did with the cream cheese. Now comes the ultimate test of patience – refrigerate for at least 4 hours (overnight is even better).
This chilling time is CRUCIAL – it lets all the flavors meld and gives you those perfect clean slices. When you’re ready to serve, sprinkle with lemon zest if you’re feeling fancy. Then watch it disappear faster than you can say “lemon lush”!
Why You’ll Love This Lemon Lush Dessert Recipe
Okay, let me tell you why this dessert has become my absolute obsession – and why you’re going to adore it too! Every time I make it, people go nuts (pun totally intended with those pecans). Here’s what makes it so special:
- That dreamy texture contrast – Crispy crust meets fluffy cream cheese meets silky pudding in every bite. It’s like a party in your mouth!
- The perfect balance of flavors – Sweet cream cheese plays so nicely with the tangy lemon. Not too cloying, not too tart – just right.
- Looks fancy but couldn’t be easier – No fancy techniques needed. If you can stir and spread, you’ve got this!
- Total crowd-pleaser – I’ve never brought this to a gathering without someone asking for the recipe. Works for everything from backyard BBQs to fancy dinner parties.
- Make-ahead magic – Actually tastes better after chilling, so it’s perfect when you need to prep something ahead. No last-minute stress!
Seriously, this recipe checks all the boxes. It’s the kind of dessert that makes people think you spent hours in the kitchen when really, you just layered a few simple things together with love (and maybe licked the spoon a few times).
Tips for the Perfect Lemon Lush Dessert Recipe
After making this lemon lush more times than I can count (and eating way too many “test” slices), I’ve picked up some game-changing tricks that’ll take your dessert from good to “Oh-my-gosh-can-I-have-the-recipe?” amazing. These little details make all the difference!
Temperature is everything
Here’s where most folks go wrong – they don’t let ingredients come to the right temp. That cream cheese? Needs to be SOFT soft – leave it out until your finger leaves a dent without resistance. Cold milk for the pudding? Non-negotiable! Warm milk makes runny pudding, and nobody wants a soupy layer.
The crust cooling conundrum
I know it’s tempting to rush ahead, but please, PLEASE let that crust cool completely before adding the cream cheese layer. I set mine on a wire rack and walk away for at least 30 minutes. If you don’t, you’ll end up with melty, messy layers – and we’re going for pretty, defined stripes here!
Full-fat all the way
This isn’t the time for diet versions. Splurge on full-fat cream cheese and whole milk – they create that luxuriously rich texture that makes spoonfuls disappear. My aunt Betty always said, “If you’re gonna make dessert, MAKE dessert.” Words to live by!
The garnishing game
Presentation matters! Right before serving, I zest a lemon over the top – the bright yellow flecks make it look bakery-worthy. For special occasions, I’ll arrange thin lemon slices around the edges. Pro tip: Add the zest garnish last minute – it loses its vibrant color if it sits too long.
Slice like a pro
Want those clean, perfect squares? Run your knife under hot water between cuts. The warmth helps glide through all those luscious layers without dragging. Also, wipe the blade clean each time – it makes a world of difference in presentation.
Ingredient Substitutions for Lemon Lush Dessert Recipe
Listen, I’m all for sticking to the original recipe (it’s perfect as is!), but sometimes you gotta improvise when the pantry’s looking bare. Here’s how to tweak this lemon lush when you’re in a pinch – with all the adjustments you’ll need to keep that signature creamy-crunchy goodness!
Nut alternatives for the crust
Out of pecans? No sweat! Walnuts make an easy 1:1 swap – just chop ’em the same size. If allergies are a concern, try:
- Oatmeal – Use 1/2 cup quick oats instead (adds nice chew)
- Graham cracker crumbs – Mix 3/4 cup with the flour for a sweeter twist
- Shredded coconut – Toast 1/3 cup flakes for tropical vibes
Whipped topping swaps
Forgot to thaw your Cool Whip? Been there! Try these:
- Homemade whipped cream – Whip 1 cup heavy cream with 2 tbsp sugar until stiff peaks form
- Greek yogurt – Use 3/4 cup plain Greek yogurt + 2 tbsp honey (drain excess liquid first)
- Coconut cream – Chill a can overnight, scoop out the thick part, and whip it
Pudding mix adjustments
If you’re out of instant lemon pudding, here’s how to adapt:
- Cook-and-serve pudding – Cook according to package, then chill completely before layering
- Homemade version – Mix 1/2 cup sugar, 1/3 cup cornstarch, pinch of salt with 3 cups milk. Cook until thick, then whisk in 1/4 cup lemon juice + 1 tbsp zest
- Flavor twists – Lime or orange pudding work great too for a citrusy change
One golden rule – keep the ratios similar to the original. Too much liquid in substitutions can make layers soggy. And honestly? The first time you make it, stick to the classic version. Then get creative with these swaps once you’ve tasted perfection!
Serving and Storing Lemon Lush Dessert Recipe
Oh, the grand finale – slicing into that beautiful chilled lemon lush! Here’s how to serve it up like a pro and keep any leftovers (if there are any!) tasting fresh. I’ve learned these tricks through trial and error – mostly from trying to make it last more than one day (good luck with that in my house!).
Perfect portions and presentation
This recipe makes about 12 generous squares – perfect for sharing at gatherings. I like to cut them smaller for parties (about 24 pieces) since it’s so rich. For extra pizzazz:
- Top each slice with a dollop of whipped cream and lemon curl
- Dust lightly with powdered sugar right before serving
- Add fresh raspberries or blueberries for a pop of color
- Sprinkle with crushed pecans for crunch contrast
Keeping it fresh
The good news? This dessert actually gets better after chilling overnight as the flavors meld. To store:
- Always cover tightly with plastic wrap or aluminum foil
- Press the wrap directly onto the surface to prevent drying
- Refrigerate for up to 3 days (though it rarely lasts that long!)
- For individual portions, transfer slices to airtight containers
Warning: The pudding layer will soften slightly after day two – still delicious, just not quite as firm-textured. And whatever you do, don’t freeze it! The dairy separates and gets grainy when thawed. Trust me, I learned that lesson the hard way.
Serving temperature matters
Take it out of the fridge about 10 minutes before serving – just enough to take the chill off but not enough to make the layers unstable. Room temperature lets all those amazing flavors shine while keeping that perfect layered structure intact.
Pro tip: Keep extra garnishes on the side so guests can customize their slices. A little bowl of lemon zest, extra nuts, or berries makes it feel extra special!
Nutritional Information for Lemon Lush Dessert Recipe
Okay, let’s be real – we’re not eating this heavenly dessert for its health benefits! But I know some folks like to keep track (or maybe just want to plan their workout accordingly after indulging). Here’s the nutritional lowdown per serving, based on my calculations – just remember these are estimates that can change depending on your exact ingredients.
- Serving Size: 1 slice (about 1/12 of the pan)
- Calories: Around 320
- Total Fat: 18g (9g saturated)
- Cholesterol: 40mg
- Sodium: 380mg
- Total Carbohydrates: 35g
- Sugars: 24g
- Protein: 5g
A few things to note: Using low-fat cream cheese or milk will change these numbers slightly. And if you go heavier on the whipped topping (no judgment here!), those calories and sugars will creep up. The pecans add healthy fats but also bump up the calorie count – totally worth it in my book!
My philosophy? Enjoy every creamy, tangy bite without guilt – life’s too short not to savor desserts like this. Just maybe don’t eat half the pan in one sitting (though I won’t tell if you do!).
FAQs About Lemon Lush Dessert Recipe
I get so many questions about this recipe from friends and family – seems like everyone wants to make their lemon lush just right! Here are the answers to the most common ones I hear, based on all my years of making (and eating) this dessert.
Can I use lime pudding instead of lemon?
Absolutely! Lime pudding makes a fantastic twist – it gives that same bright, tangy flavor with a slightly different zing. I’ve even used a mix of lemon and lime for a “citrus medley” version that’s always a hit at summer picnics.
How do I prevent a soggy crust?
The key is in the cooling – let that baked crust cool completely before adding any other layers. I mean totally, completely cool. Also, make sure your cream cheese mixture isn’t too runny (beat it until thick) and your pudding has fully set before spreading.
Can this dessert be frozen?
Honestly? I don’t recommend it. The dairy-based layers tend to separate and get grainy when thawed. If you must freeze, skip the whipped topping garnish and add it fresh after thawing. But it’s really best eaten within 3 days from the fridge.
Why is my cream cheese layer lumpy?
Two culprits – either your cream cheese wasn’t soft enough (leave it out longer!), or you didn’t beat it thoroughly with the sugar first. Always start with room temp cream cheese and mix for a good 2-3 minutes before adding anything else.
Can I make this in individual cups?
Yes! Layer the ingredients in clear glasses or jars for a cute, portable version. Just press the crust into the bottoms, then alternate cream cheese and pudding layers. This actually makes portion control easier (but who are we kidding – we’ll still eat two!).
Still have questions? Drop me a note – I could talk about this dessert all day! Just don’t blame me if you become as obsessed as I am.
Print
Best Lemon Lush Dessert Recipe with 4 Layers of Bliss
- Total Time: 4 hours 35 minutes
- Yield: 12 servings
- Diet: Vegetarian
Description
A creamy, layered dessert with a buttery crust, sweet cream cheese filling, and tangy lemon topping.
Ingredients
- 1 cup all-purpose flour
- 1/2 cup butter, softened
- 1/2 cup chopped pecans
- 8 oz cream cheese, softened
- 1 cup powdered sugar
- 1 cup whipped topping
- 2 (3.4 oz) packages instant lemon pudding mix
- 3 cups cold milk
- Additional whipped topping for garnish
Instructions
- Preheat oven to 350°F.
- Mix flour, butter, and pecans. Press into a 9×13-inch baking dish.
- Bake for 15 minutes. Let cool.
- Beat cream cheese and powdered sugar until smooth. Fold in 1 cup whipped topping.
- Spread over cooled crust.
- Whisk pudding mixes with milk for 2 minutes. Let stand 5 minutes.
- Spread pudding over cream cheese layer.
- Top with remaining whipped topping. Refrigerate 4 hours before serving.
Notes
- Store covered in refrigerator for up to 3 days.
- Substitute walnuts for pecans if preferred.
- For a stronger lemon flavor, add 1 tsp lemon zest to pudding.
- Prep Time: 20 minutes
- Cook Time: 15 minutes
- Category: Dessert
- Method: Baked
- Cuisine: American