Skip to content
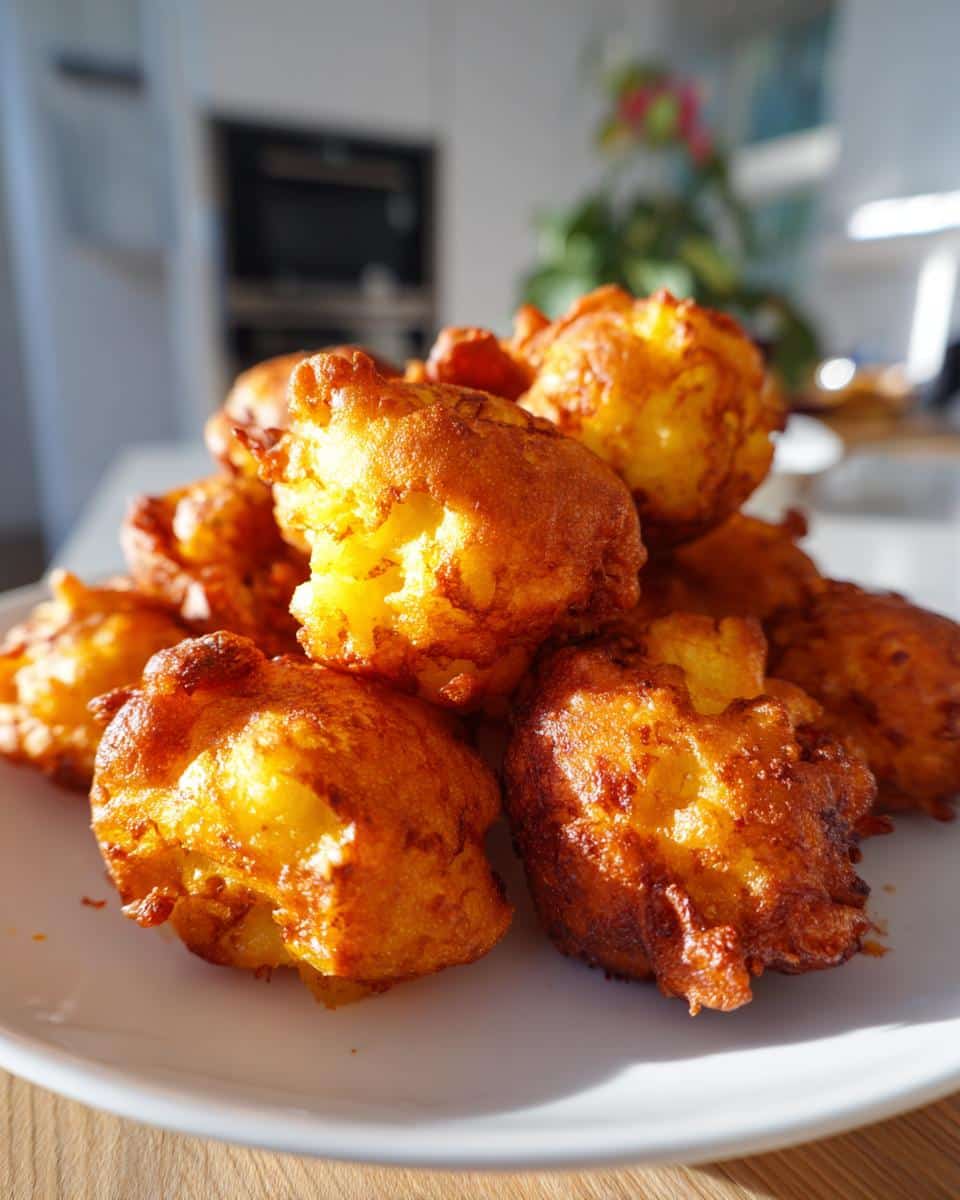
Oh my gosh, let me tell you about my absolute favorite way to enjoy apples – these baked apple fritters! They give you all that cozy, cinnamon-spiced goodness of traditional fritters without the messy frying. I grew up watching my grandma fry hers in bubbling oil, but when I discovered this baked version? Game changer. The smell alone – warm apples and nutmeg wafting through the kitchen – takes me right back to her cozy farmhouse kitchen. As a baker who’s tested dozens of apple recipes (and eaten way too many failed attempts), I promise these baked apple fritters deliver that perfect crispy-on-the-outside, tender-on-the-inside texture we all crave.
Why You’ll Love These Baked Apple Fritters
Let me count the ways these baked apple fritters will become your new obsession:
- So much easier than frying – No hot oil splatters or greasy mess! Just mix, drop, and bake.
- Healthier but just as delicious – All the warm cinnamon-apple flavor without all that oil absorption.
- Perfect texture every time – Crispy golden edges with tender, apple-packed centers (my secret is in the batter mixing).
- Warm spices that hug your soul – That cinnamon-nutmeg combo? Absolute magic with baked apple fritters.
- Totally customizable – Add nuts, swap apple varieties, or drizzle with glaze (or don’t – they’re amazing plain!).
Honestly? I’ve converted so many fried fritter fans with this baked version. The proof is in the disappearing fritters!
Ingredients for Baked Apple Fritters
Here’s everything you’ll need to make these irresistible baked apple fritters. Trust me, it’s all pantry staples you probably already have on hand!
- Dry Ingredients:
- 2 cups all-purpose flour (spooned and leveled)
- 1/4 cup granulated sugar
- 1 tbsp baking powder
- 1 tsp ground cinnamon
- 1/2 tsp ground nutmeg
- 1/2 tsp salt
- Wet Ingredients:
- 1 cup milk (any kind works!)
- 2 large eggs
- 2 tbsp unsalted butter, melted
- 1 tsp vanilla extract
- Add-Ins:
- 1 1/2 cups diced apples (peeled, 1/4-inch pieces)
Ingredient Notes & Substitutions
Here’s the scoop on making these baked apple fritters work for you:
- Apples: Firm apples like Granny Smith or Honeycrisp work best. They hold their shape and give that perfect sweet-tart balance.
- Milk: Swap in almond, oat, or soy milk if you’re dairy-free. The recipe stays just as delicious!
- Sugar: Feel free to use coconut sugar or a sugar substitute like monk fruit if you prefer. Just keep the measurement the same.
- Butter: Unsalted is key here—it lets you control the saltiness of the fritters. If you only have salted butter, just reduce the added salt to 1/4 tsp.
How to Make Baked Apple Fritters
Making these baked apple fritters is seriously foolproof – just follow these simple steps and you’ll be biting into warm, spiced perfection in no time! The secret is in treating the batter gently and knowing exactly when they’re done baking.
Mixing the Batter
First things first – preheat that oven to 375°F (190°C) and line your baking sheet with parchment paper. Now let’s talk batter! The key here is restraint – yes, restraint! Overmixing is the enemy of tender baked apple fritters.
Whisk your dry ingredients together in one bowl until they’re perfectly blended. In another bowl, beat the wet ingredients just until smooth. Now here’s my trick: pour the wet into the dry and stir with a wooden spoon until just combined. A few lumps? Perfect! That’s exactly what you want.
Gently fold in those beautiful diced apples – I like to use a folding motion with a rubber spatula to keep them intact. The batter will be thick and spoonable, almost like muffin batter. This is exactly right!
Baking and Cooling
Time to bake! Drop heaping spoonfuls of batter onto your prepared sheet – I use my trusty cookie scoop for perfect portions. Leave about 2 inches between each fritter because they’ll puff up beautifully.
The magic happens fast – bake for 15-18 minutes until those edges turn a gorgeous golden brown. Here’s how I test doneness: the edges should look crispy, and if you gently press the top, it should spring back slightly. A toothpick inserted should come out with moist crumbs (not wet batter).
Now comes the hardest part – wait 5 minutes before eating! This cooling time lets the fritters set properly so they don’t fall apart when you pick them up. But hey, if you can’t resist sneaking one piping hot… I won’t tell.
Tips for Perfect Baked Apple Fritters
After making dozens (okay, maybe hundreds) of batches, I’ve learned all the tricks for baked apple fritters that turn out perfect every single time. Here are my can’t-live-without tips:
- Keep apple pieces uniform – Dice them into consistent 1/4-inch chunks so they bake evenly. Too big and they’ll stay crunchy; too small and they’ll disappear into the batter.
- Check your oven temp – An oven thermometer is your best friend! These baked apple fritters need that exact 375°F (190°C) to get golden without drying out.
- Give them breathing room – Crowding the pan leads to steamed, not crispy fritters. Trust me, bake in batches if needed – it’s worth the wait!
- Rotate your pan halfway – Ovens have hot spots. A quick turn at the 8-minute mark ensures even browning all around.
- Don’t skip the parchment – It prevents sticking better than grease alone and makes cleanup a breeze. (Ask me how I learned this the hard way!)
Follow these simple tips, and you’ll be the baked apple fritter hero of your kitchen in no time!
Serving and Storing Baked Apple Fritters
Oh, the possibilities with these baked apple fritters! My absolute favorite way to serve them? Still warm from the oven with a steaming cup of coffee – the cinnamon and apple flavors just sing together. But let me share all my best serving tricks and storage secrets so you can enjoy them anytime.
Glaze or No Glaze?
These fritters are delicious plain, but sometimes I can’t resist dressing them up. For a simple powdered sugar glaze, mix 1 cup powdered sugar with 2 tablespoons milk and 1/2 teaspoon vanilla. Drizzle it over while the fritters are still slightly warm – the glaze will soak in just enough. Feeling fancy? Add a pinch of cinnamon or a teaspoon of apple cider to the glaze for extra flavor!
Perfect Pairings
Morning, noon, or night – these baked apple fritters fit right in! They’re heavenly with:
- A hot mug of coffee or chai tea
- A scoop of vanilla ice cream for dessert
- Whipped cream and caramel drizzle (my kids’ favorite)
- Plain Greek yogurt for a breakfast treat
Storing Like a Pro
If by some miracle you have leftovers (it happens!), here’s how to keep them fresh:
- Room temperature: Store in an airtight container for up to 2 days. Place a paper towel underneath to absorb any moisture.
- Reheating: Pop them in a 300°F (150°C) oven for 5 minutes to crisp them back up. The microwave works in a pinch, but they’ll lose some crispness.
- Freezing: Freeze unglazed fritters in a single layer, then transfer to a freezer bag. They’ll keep for 2 months! Thaw at room temperature and warm before serving.
Pro tip: The glaze always tastes best fresh, so I recommend adding it right before serving if you’re planning to store them. Now go enjoy your baked apple fritters – I promise they won’t last long!
Baked Apple Fritters Nutritional Info
Now, I’m no nutritionist, but I do believe in knowing what’s going into my treats! These baked apple fritters are definitely a lighter option than their fried cousins, but let’s break down what you’re getting in each delicious bite. Remember – these numbers can vary based on your specific ingredients (especially if you add that irresistible glaze I mentioned earlier!).
Per fritter (based on 12 fritters per batch):
- Calories: 120kcal
- Carbohydrates: 20g
- Protein: 3g
- Fat: 3g
- Sugar: 8g
- Fiber: 1g
What I love about these numbers? That fiber and protein help balance the natural sugars, making these baked apple fritters more satisfying than you’d expect. The apples contribute vitamins and the cinnamon adds antioxidants – at least that’s what I tell myself when I sneak a second one with my afternoon tea!
Of course, if you’re watching specific macros or have dietary needs, always adjust ingredients to fit your requirements. The beauty of homemade baked apple fritters is you control exactly what goes in them – unlike the mystery ingredients in store-bought treats!
FAQs About Baked Apple Fritters
I get asked these questions all the time about my baked apple fritters, so let me share everything I’ve learned from my (many) batches. These are the real-deal answers to the questions that pop up most often in my kitchen and DMs!
Can I freeze baked apple fritters?
Absolutely! Just skip the glaze before freezing (add it fresh when serving). Let them cool completely, then arrange in a single layer on a baking sheet to freeze solid before transferring to a freezer bag. They’ll keep beautifully for 2 months. To serve, just thaw at room temperature and warm in a 300°F (150°C) oven for 5 minutes to bring back that fresh-baked crispness.
What are the best apples to use?
Firm, slightly tart apples are my go-to for baked apple fritters because they hold their shape and balance the sweetness perfectly. Granny Smith is my #1 pick, but Honeycrisp, Braeburn, or Pink Lady work great too. Avoid super soft apples like Red Delicious – they’ll turn mushy faster than you can say “fritter”!
Can I make gluten-free baked apple fritters?
You bet! Just swap the all-purpose flour for a 1:1 gluten-free baking blend (I love Bob’s Red Mill). The texture comes out nearly identical – maybe just a tad more tender. Pro tip: Let the batter sit for 5 minutes after mixing to let the GF flour hydrate properly. And don’t be shy with those apples – they help keep everything moist!
Why did my fritters come out dense?
Oh honey, I’ve been there! Usually it means the batter got overmixed. Remember – lumps are your friends! Stir just until the flour disappears, then walk away. Also, check your baking powder isn’t expired (test it with hot water – if it doesn’t bubble, toss it). And never, ever pack your flour – spoon it lightly into the measuring cup.
Can I make these dairy-free?
Easy-peasy! Just use your favorite non-dairy milk (almond and oat work beautifully) and swap the butter for coconut oil or vegan butter. I’ve even used applesauce instead of butter when I was in a pinch – they were still delicious, just a bit cakier. The apples keep everything plenty moist regardless!
Ready to Bake?
Now that you’ve got all my best tips and tricks, I can’t wait for you to try these baked apple fritters yourself! There’s nothing quite like pulling that golden batch out of the oven and watching everyone’s eyes light up when they take that first bite. Trust me, your kitchen is about to smell absolutely incredible.
When you make them (because I know you will!), snap a photo and tag me on Instagram – I love seeing your creations! There’s nothing that makes me happier than spotting your beautiful baked apple fritters in my feed. Maybe yours will inspire someone else to bake up some cozy apple goodness too!
Now go preheat that oven and get ready for the easiest, most delicious baked apple fritters of your life. Happy baking, friend!