Skip to content
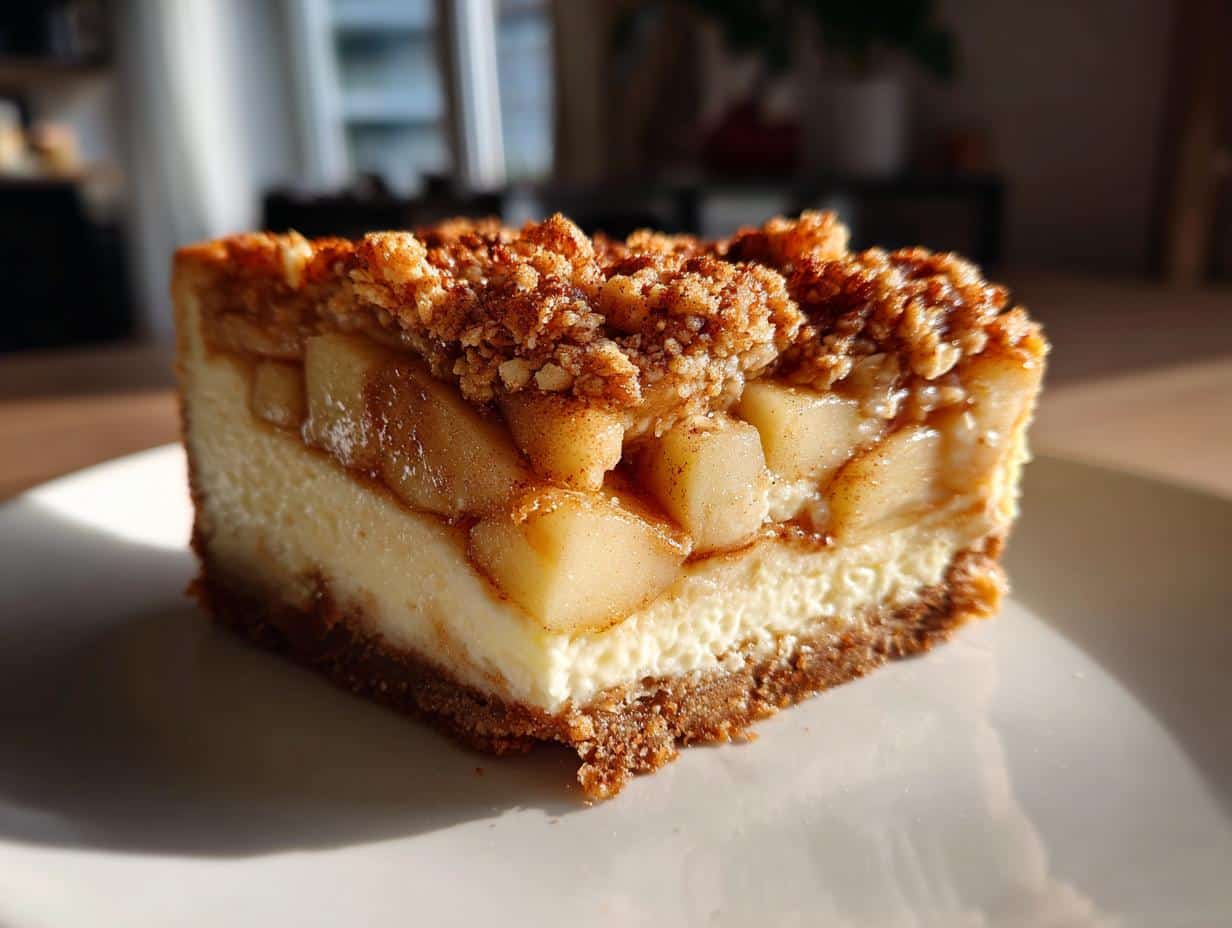
I’ll never forget the first time I tried apple crumble cheesecake at my aunt’s holiday party. There it sat on the dessert table – this glorious golden-topped creation that looked like two of my favorite desserts had a beautiful baby. One bite and I was hooked – the smooth, tangy cheesecake layer, those sweet-spiced apples, and that irresistible crunchy topping that somehow stayed perfectly crisp. It was love at first taste!
Now my kitchen smells like cinnamon and butter every autumn as I bake this apple crumble cheesecake for friends and family. What makes it so special? That magical contrast – the cool creaminess against the warm apple pie-like flavors, all wrapped up in one spectacular dessert. It’s the perfect marriage of two classics, and honestly? Once you try this combo, you’ll never want to eat plain cheesecake again.
The best part? It’s way easier to make than it looks. With a few simple steps, you can create this showstopper that’ll have everyone begging for the recipe. Trust me, this dessert disappears faster than you can say “second slice!”
Table of contents:
Why You’ll Love This Apple Crumble Cheesecake
This apple crumble cheesecake isn’t just delicious – it’s downright addictive! Here’s why it’s become my go-to dessert:
- The perfect texture combo – velvety cheesecake meets crunchy, buttery crumble
- So much easier than making separate cheesecake and apple crumble
- That wow factor when you bring it to the table (everyone thinks you slaved for hours!)
- The aroma – your kitchen will smell like a cozy bakery
- It’s a total crowd-pleaser that appeals to both cheesecake and pie lovers
Honestly? Once you try this mashup, regular cheesecake seems… incomplete.
Ingredients for Apple Crumble Cheesecake
Here’s everything you’ll need to create this heavenly dessert – I’ve grouped them by layer so you can prep like a pro. Trust me, using quality ingredients makes all the difference here!
For the crust:
- 200g digestive biscuits (about 14 biscuits), finely crushed – Graham crackers work too
- 100g unsalted butter, melted (that’s about 7 tablespoons)
For the cheesecake layer:
- 500g full-fat cream cheese, softened to room temperature (this is KEY for smooth filling)
- 150g caster sugar (superfine sugar works best)
- 2 large eggs, room temperature (cold eggs can make the batter lumpy)
- 1 tsp pure vanilla extract (none of that artificial stuff!)
For the apple layer:
- 2 medium apples (I swear by Granny Smith), peeled and diced into 1cm pieces
- 50g light brown sugar (pack it in!)
- 1 tsp ground cinnamon (freshly ground if you’re fancy)
For the crumble topping:
- 50g plain flour (all-purpose works fine)
- 50g rolled oats (not instant – we want texture!)
- 30g cold unsalted butter, cubed (straight from the fridge)
Pro tip: Measure everything before you start – it makes the process so much smoother. And don’t skip the room temp ingredients – I learned that the hard way when my first attempt had lumpy filling!
Equipment You’ll Need
Now, I know what you’re thinking – “Do I need fancy equipment for this?” Nope! Just a few basics that you probably already have in your kitchen. Here’s the short and sweet list:
- 8-inch springform pan – The hero of this recipe! The removable sides make serving so easy.
- Mixing bowls – One for the crust, one for filling, one for crumble (three total – medium size works great).
- Hand mixer or stand mixer – For that perfectly smooth cheesecake filling.
- Box grater or food processor – For crushing the biscuits (though a ziplock bag and rolling pin works in a pinch!).
- Apple peeler and sharp knife – For prepping those apples just right.
- Silicone spatula – My MVP for scraping every last bit of that delicious batter.
That’s it! No special tools required – just good old-fashioned kitchen basics. See? I told you this was easier than it looks!
How to Make Apple Crumble Cheesecake
Okay, let’s get baking! This apple crumble cheesecake comes together in four simple phases. Follow these steps carefully, and you’ll have dessert perfection. Pro tip: Set a timer for each stage – it helps keep me on track when I’m chatting away in the kitchen!
Preparing the Crust
First things first – preheat that oven to 160°C (140°C fan). While it’s warming up, let’s make our buttery biscuit base:
Take your finely crushed digestive biscuits and mix them thoroughly with the melted butter in a medium bowl. You want every crumb coated – it should look like wet sand. Pour this mixture into your lined springform pan and press it down firmly with the back of a spoon or your fingers.
Here’s my trick: use a flat-bottomed glass to really compact it evenly across the bottom and slightly up the sides. Pop this in the fridge to set while you make the filling – about 10 minutes does the trick!
Making the Cheesecake Filling
Now for the creamy star of our show! Make sure your cream cheese is properly softened – I leave mine out for at least 2 hours beforehand. Nothing worse than lumpy filling!
In a large bowl, beat the cream cheese with a hand mixer until smooth and creamy – about 1 minute. Gradually add the caster sugar while mixing, then the eggs one at a time. Finally, mix in that glorious vanilla extract.
Key tip: Don’t overmix! Just blend until everything is incorporated and silky. Overbeating can introduce too much air and cause cracks later. Pour this luscious filling over your chilled crust.
Layering the Apples and Crumble
Time for the fun part! In a small bowl, toss your diced apples with brown sugar and cinnamon until they’re nicely coated. Spread these evenly over the cheesecake layer – try to distribute them well so every slice gets apple goodness.
For the crumble topping, combine flour and oats in a bowl. Add your cold butter cubes and rub them in with your fingertips until the mixture resembles coarse breadcrumbs. Sprinkle this generously over the apples – I like to get clumpy bits for extra texture!
Baking and Cooling
Carefully transfer your masterpiece to the preheated oven. Bake for about 45 minutes – you’ll know it’s done when the edges are set but the center still has a slight jiggle.
This next part is crucial: let it cool COMPLETELY in the pan on a wire rack. I know it’s tempting, but don’t rush this! Then refrigerate for at least 4 hours (overnight is even better) before slicing.
Trust me, the wait is worth it – chilling sets the texture perfectly and makes slicing cleaner. Plus, the flavors develop beautifully!
Tips for the Perfect Apple Crumble Cheesecake
After making this apple crumble cheesecake more times than I can count, I’ve learned a few secrets for absolute perfection:
- Use tart apples – Granny Smiths hold their shape and balance the sweetness
- Room temp ingredients are non-negotiable – cold cream cheese = lumpy filling
- Mix filling just until smooth – overbeating causes cracks
- Chill overnight if possible – the flavors deepen beautifully
- Run a knife around the edge before removing the springform for clean slices
Follow these simple tricks, and you’ll get rave reviews every time!
Apple Crumble Cheesecake Variations
One of the best things about this recipe? It’s like a blank canvas for your dessert dreams! Here are some of my favorite ways to mix it up when I’m feeling creative (or just using what’s in my pantry):
Nutty Delight
Add 50g chopped pecans or walnuts to your crumble topping for extra crunch. The toasty flavor pairs perfectly with the apples – just toss them in with the flour and oats. My cousin swears by adding a handful of toasted almonds too!
Fruit Swaps
Ran out of apples? No problem! Pears make a lovely substitute – just use firm ones like Bosc so they don’t turn mushy. In summer, I’ve used peaches (peeled and diced) with a dash of nutmeg instead of cinnamon. So good!
Caramel Drizzle
For special occasions, I’ll warm up some caramel sauce and drizzle it over each slice right before serving. The sweet-salty combo takes this dessert to another level. Pro tip: Add a pinch of sea salt to your caramel for that fancy salted caramel effect.
Spice It Up
Feeling adventurous? Try adding 1/4 tsp of cardamom or allspice to your apple mixture. Or for a cozy twist, mix 1/2 tsp of pumpkin pie spice into your crumble topping. My aunt adds a pinch of ginger for extra warmth – it’s heavenly!
The possibilities are endless! Just remember – whatever variations you try, keep the basic ratios the same and you can’t go wrong. Happy experimenting!
Storing and Serving Suggestions
Okay, let’s talk about the best ways to store and serve this apple crumble cheesecake – because trust me, you’ll want to do both properly to keep it tasting amazing!
First, storage: This beauty will keep perfectly in the fridge for 3 days if you cover it well with plastic wrap or store it in an airtight container. I like to press the wrap directly onto the surface to prevent any drying out. Pro tip: If you’re making it ahead for a party, I actually think it tastes even better on day two when the flavors have really settled in together!
Now, serving – here’s where the magic happens! Take it out of the fridge about 15 minutes before serving to take the chill off – that way you get the full creamy texture of the cheesecake. Use a sharp knife dipped in hot water (and dried!) for clean slices. And please, whatever you do, don’t skip the vanilla ice cream on the side! That warm-cold contrast with the creamy cheesecake and crunchy topping? Absolute perfection.
For extra fancy presentation, I sometimes sprinkle a little cinnamon over the top or add a few thin apple slices fanned out on each plate. But honestly? This dessert is so gorgeous on its own, it hardly needs any dressing up. Just bring it to the table and watch the oohs and aahs begin!
Apple Crumble Cheesecake FAQs
I get asked these questions ALL the time when I serve this dessert – so let me save you the trouble of wondering (or making the same mistakes I did when I first started baking it)!
Can I freeze apple crumble cheesecake?
Oh honey, I wish! But no – freezing really messes with the texture. The cheesecake layer gets grainy and the crumble topping loses its wonderful crunch. Trust me, I learned this the hard way when I tried freezing leftovers “for later.” It’s best enjoyed fresh or kept in the fridge for up to 3 days.
Can I use frozen apples instead of fresh?
You can, but there’s a trick! Thaw them completely first, then drain off any excess liquid (I squeeze them gently in a clean kitchen towel). Frozen apples tend to be mushier though, so for the best texture, fresh is definitely the way to go. My grandma would roll in her grave if I suggested anything less than crisp Granny Smiths!
Why did my cheesecake crack?
Don’t panic – it still tastes amazing! Cracks usually happen from overmixing (too much air in the batter) or cooling too quickly. Next time, try these fixes: mix just until smooth, don’t open the oven door during baking, and let it cool gradually in the turned-off oven with the door slightly ajar for about an hour. But hey – that’s what the crumble topping is for… to hide any imperfections!
Can I make this gluten-free?
Absolutely! Just swap the digestive biscuits for gluten-free ones (I like the Schär brand), and use gluten-free flour in the crumble topping. Everything else is naturally gluten-free. My gluten-intolerant friend says this version tastes just as good as the original – maybe even better because she can actually eat it!
How do I know when it’s done baking?
The edges should be set but the center should still have a slight jiggle (like Jell-O) when you gently shake the pan. It’ll firm up as it cools. If you wait until it’s completely firm in the oven, you’ve overbaked it. And remember – no toothpick test here! That beautiful crumble topping will fool you every time.
Nutritional Information
Now, I’m no nutritionist, but I know many of us like to keep an eye on what we’re enjoying – especially when it’s as irresistible as this apple crumble cheesecake! Here’s the breakdown per serving (and remember, these are estimates – your results might vary slightly depending on exact ingredients used).
Each generous slice (that’s 1/8th of this beauty) contains about:
- 420 calories – A completely worthwhile indulgence if you ask me!
- 28g sugar – Mostly from the apples and that delicious brown sugar
- 28g fat (16g saturated) – Thank the cream cheese and butter for that rich texture
- 38g carbs – With 2g fiber from the apples and oats
- 6g protein – A little bonus from the eggs and cream cheese
Again, these numbers are approximate – I’ve calculated them based on my standard recipe using a nutrition calculator. If you’re watching specific dietary needs, you might want to adjust ingredients accordingly. My diabetic sister makes a version with sugar substitutes that works beautifully!
But let’s be real – when you’re serving up something this delicious, sometimes the best nutrition is for the soul. Everything in moderation, right? Now who’s ready for second helpings?
Print
Irresistible Apple Crumble Cheesecake in 4 Easy Steps
- Total Time: 1 hour 5 minutes
- Yield: 8 servings
- Diet: Vegetarian
Description
A delicious dessert combining the flavors of apple crumble and creamy cheesecake.
Ingredients
- 200g digestive biscuits
- 100g unsalted butter, melted
- 500g cream cheese
- 150g caster sugar
- 2 large eggs
- 1 tsp vanilla extract
- 2 apples, peeled and diced
- 50g brown sugar
- 1 tsp cinnamon
- 50g plain flour
- 50g rolled oats
- 30g cold butter, cubed
Instructions
- Preheat oven to 160°C (140°C fan).
- Crush biscuits and mix with melted butter. Press into a lined tin.
- Beat cream cheese, caster sugar, eggs, and vanilla until smooth. Pour over the base.
- Toss apples with brown sugar and cinnamon. Spread over the cheesecake mix.
- Rub flour, oats, and cold butter into crumbs. Sprinkle over apples.
- Bake for 45 minutes until set. Cool completely before slicing.
Notes
- Chill for 4 hours for best texture.
- Use tart apples like Granny Smith.
- Store leftovers in the fridge.
- Prep Time: 20 minutes
- Cook Time: 45 minutes
- Category: Dessert
- Method: Baking
- Cuisine: American