Skip to content
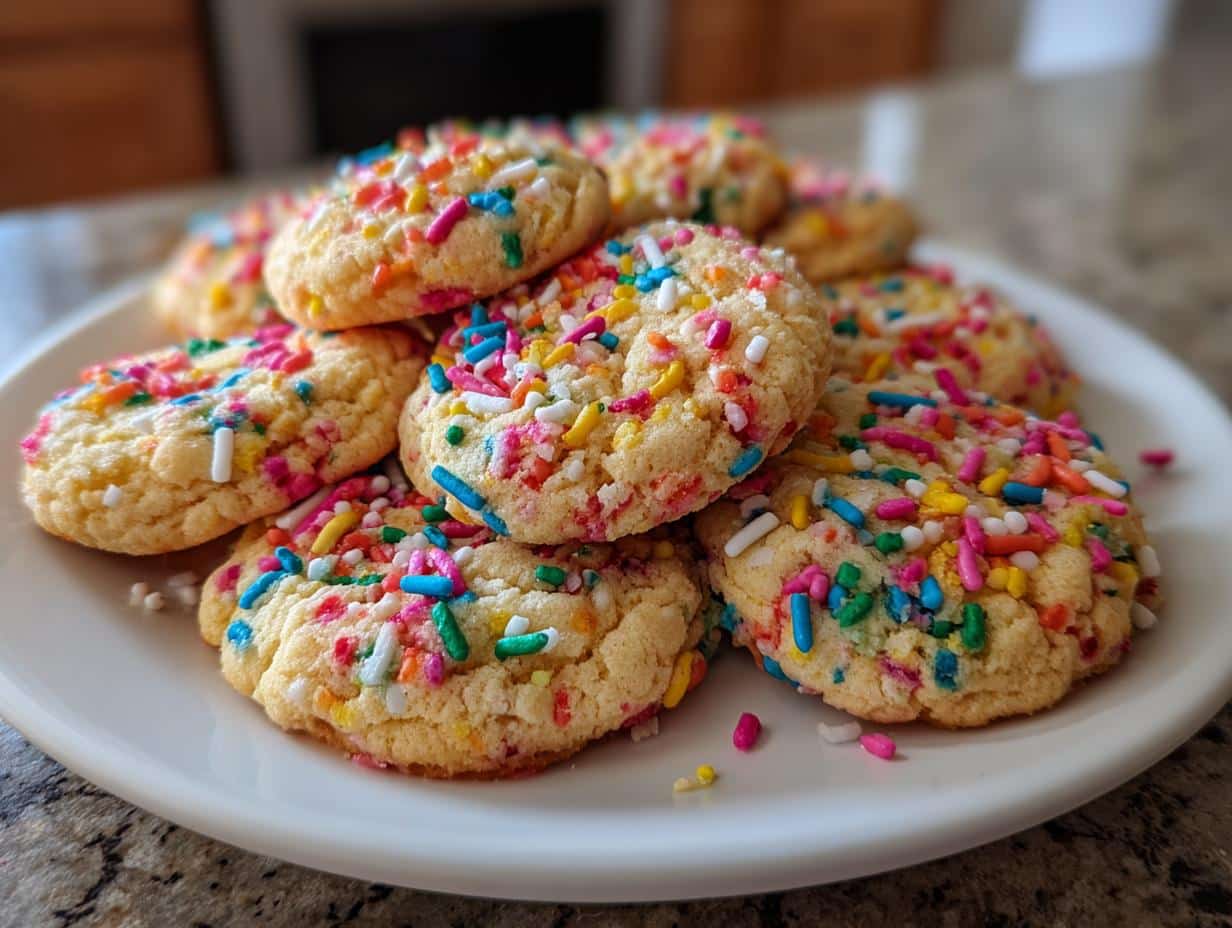
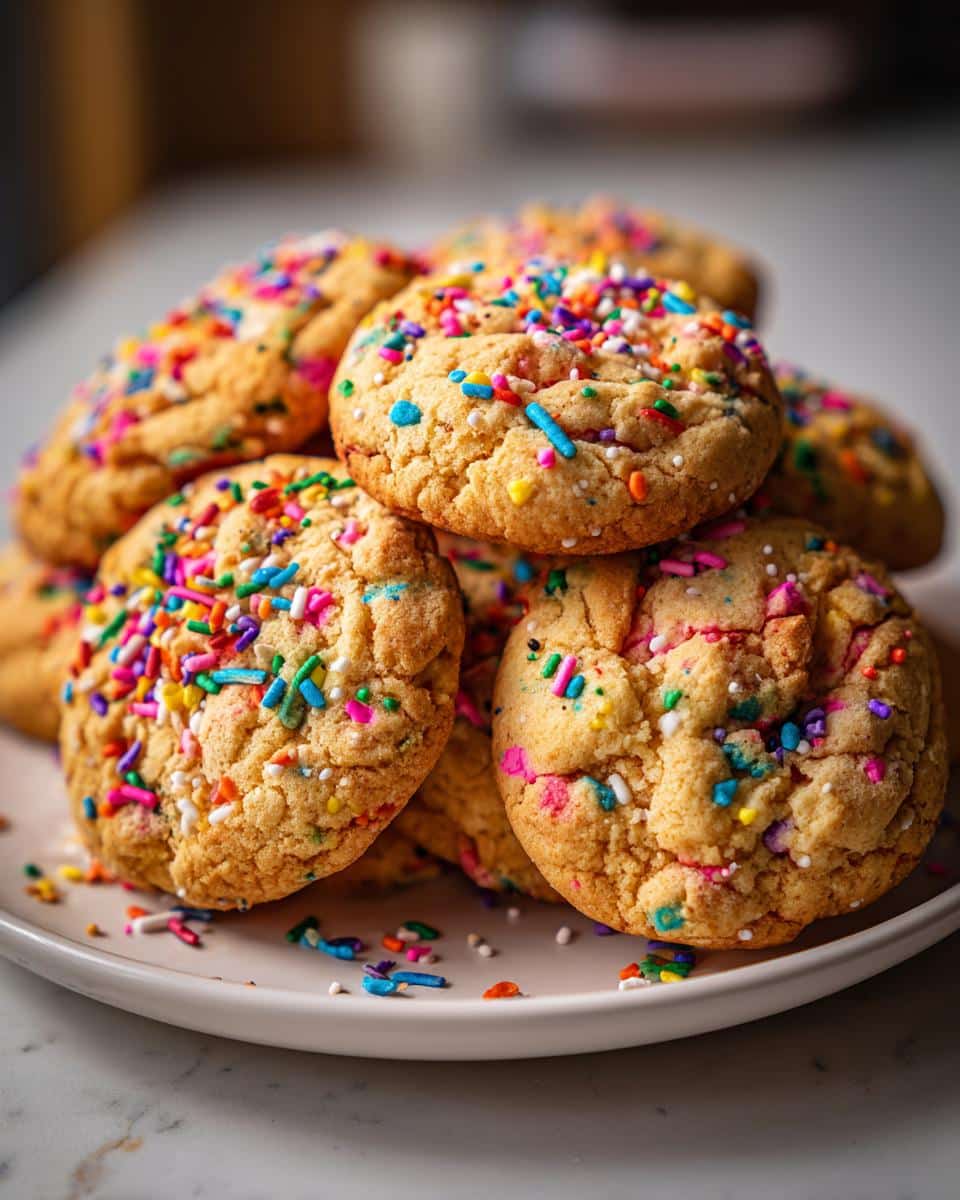
Picture this: It’s 4pm on a Tuesday, your kids just announced they need cookies for school tomorrow, and you’ve got exactly zero patience for complicated recipes. Enter my lifesaver – No Chill Sprinkle Cookies! These vibrant little gems skip the annoying refrigeration step most sugar cookies demand, meaning you’re just 22 minutes away from chewy, colorful happiness. I perfected this recipe during one particularly chaotic birthday party prep when three separate moms texted me for emergency cookies. Now it’s my go-to whenever spontaneity strikes (or when I just really need something sweet fast). The best part? Goal: Preheat oven. Mission: Cookies.
Why You’ll Love These No Chill Sprinkle Cookies
Let me count the ways these cookies will become your new baking bestie:
- Zero chill time: No waiting around for dough to firm up – mix, scoop, bake, done!
- Pantry staples: You probably have everything in your kitchen right this minute
- Kid magnet: The rainbow sprinkles make little faces light up (and tiny hands eager to help stir)
- Instant happiness: That first whiff of vanilla-scented cookies baking? Pure joy in 12 minutes flat
- Forgiving dough: Even if you overmix slightly, these still come out chewy-perfect
I’ve made these when surprise guests arrive, when my niece demands “something pretty,” and yes, that one time I needed emergency cookies at midnight. They never let me down.
Ingredients for No Chill Sprinkle Cookies
Here’s everything you’ll need to whip up these cheerful cookies in a flash. The beauty is in the simplicity – I bet you’ve got most of these in your pantry right now! Just make sure your butter’s properly softened (more on that below). This exact combo gives you cookies that are soft in the center with just the right crisp edges.
- 1 cup all-purpose flour: Spoon and level it – don’t scoop directly from the bag or you’ll pack too much
- 1/2 cup granulated sugar: Plain white sugar gives the perfect sweetness without overpowering
- 1/4 cup unsalted butter, softened: This is KEY! Leave it out for 30-45 minutes – it should dent easily when poked but not be greasy
- 1 large egg: Room temperature blends smoother (I just pop mine in warm water for 5 minutes if I forget to take it out)
- 1 tsp vanilla extract: The good stuff makes all the difference – none of that artificial flavoring!
- 1/2 tsp baking powder: Fresh is best – test yours by mixing with hot water to see if it bubbles
- 1/4 tsp salt: Just enough to balance the sweetness
- 1/4 cup rainbow jimmies sprinkles: Trust me, jimmies hold color better than nonpareils during baking
A quick note on the butter: I learned the hard way that microwave-softened butter never works as well as properly room-temp butter. If you’re in a real hurry, cut it into tablespoon-sized pieces – they’ll soften faster. Now let’s get mixing!
How to Make No Chill Sprinkle Cookies
Okay, let’s dive right in! The beauty of these cookies is how ridiculously simple they are to make. Just follow these steps and you’ll have perfect sprinkle cookies without any fuss. First rule of cookie club: always preheat your oven first – I set mine to 350°F (175°C) before I even grab a mixing bowl. Trust me, nothing’s worse than dough-ready\
Step 1: Mix Dry Ingredients
Grab your favorite mixing bowl – I always use my grandma’s speckled blue one for luck! Whisk together the flour, sugar, baking powder and salt until they’re completely combined. You’ll know it’s ready when you can’t see any streaks of baking powder. This step distributes the leavening evenly so your cookies rise perfectly. Fun fact: I once forgot the baking powder entirely (mom brain!) and ended up with hockey puck cookies. Learn from my mistake!
Step 2: Combine Wet Ingredients
Now for the magic! In a separate bowl, cream your softened butter until it’s smooth and creamy. When it looks like pale yellow silk, add the egg and vanilla. Beat just until incorporated – you’ll see the mixture get slightly fluffy. Here’s my secret: scrape down the sides halfway through to make sure everything mixes evenly. The dough will look a bit like cake batter at this point – that’s perfect!
Step 3: Add Sprinkles
Time for the fun part! Gently fold in your rainbow jimmies sprinkles. Go slow here – overmixing can make your dough turn tie-dye (been there, done that). Just stir until the sprinkles are evenly distributed. The dough will be slightly sticky – that’s exactly what you want! If it seems too wet, resist the urge to add more flour. The stickiness helps create those perfectly chewy centers we love.
Step 4: Bake and Cool
Drop tablespoon-sized dough balls onto a lined baking sheet (I swear by parchment paper – no sticking!). Space them about 2 inches apart – these babies spread just enough to become cookie perfection. Bake on the middle oven rack for 10-12 minutes. They’re done when the edges just start turning golden but the centers still look soft. Pro tip: They’ll continue cooking slightly on the hot pan, so pull them when they seem almost-but-not-quite done.
Let them cool on the pan for 5 minutes – I know it’s hard to wait! Then transfer to a wire rack. They firm up as they cool, turning into the perfect combo of crispy edges and chewy centers. Just try not to eat them all straight off the rack (no judgment if you do!).
Pro Tips for Perfect No Chill Sprinkle Cookies
After making probably hundreds of batches of these cookies (okay, maybe thousands – don’t judge my sweet tooth!), I’ve learned all the little tricks to absolute perfection:
- Jimmies over nonpareils: Those tiny round sprinkles bleed color like crazy – long jimmies hold their rainbow magic better
- Parchment is your BFF: No sticking, easy cleanup, and perfectly golden bottoms every time
- Set that timer for 10 minutes: Ovens lie! Peek early to prevent overbaking – edges should just barely tan
- Cooling rack patience: Letting them sit 5 minutes on the pan prevents crumbling (the hardest 5 minutes of your life)
- Sprinkle tax: Always mix in extra sprinkles – some inevitably disappear into the dough fairy’s pockets
My biggest unsettled cookie debate? Whether to leave them chewy or bake an extra minute for crisp edges. I’ll let you decide – just don’t tell my husband I eat the “ugly” test cookies first!
Storing and Freezing No Chill Sprinkle Cookies
Here’s the beautiful thing about these cookies – they stay just as cheerful days later as they were fresh from the oven! Though let’s be honest, they rarely last that long in my house. When I actually manage to save some (usually by hiding them in the vegetable drawer – shhh!), here’s how to keep them perfect:
Room temperature storage: Pop them in an airtight container with a piece of bread – the bread keeps them soft by absorbing any humidity. They’ll stay fresh for 5 days this way. No bread? A paper towel works too. Just don’t store them with anything absorbent (like those silica packets) or they’ll turn into hockey pucks.
Freezing baked cookies: These freeze like a dream! Cool completely, then layer between parchment paper in a freezer bag. They’ll keep for 3 months – though I’ve never made it past 2 weeks without raiding the stash. Thaw at room temperature for an hour or zap them for 15 seconds in the microwave if you need instant cookie therapy.
Freezing the dough: This is my secret weapon for last-minute cookie emergencies! Scoop the dough into balls first, then freeze on a baking sheet before transferring to a bag. When cravings strike, bake straight from frozen – just add 2 extra minutes to the baking time. The sprinkles stay vibrant and the centers stay perfectly chewy.
Pro tip: Label your freezer bags with the date! I once baked 6-month-old dough wondering why the cookies tasted “different” (turns out freezer burn isn’t a flavor enhancer). Now I use a Sharpie like a responsible adult… sometimes.
No Chill Sprinkle Cookies Variations
One of my favorite things about this recipe is how easily you can dress it up for any occasion! Once you’ve mastered the basic version (which is perfect as-is), try these fun twists that keep the no-chill magic alive:
Seasonal Sprinkle Swaps
I keep a whole drawer of sprinkles just for these cookies – it’s ridiculous but brings me joy! For Valentine’s Day, swap in all red and pink jimmies. Around Christmas, green and red sprinkles make them instantly festive. Pastel mixes in spring? Absolutely yes. Just keep using jimmies rather than nonpareils to prevent color bleed.
Citrus Zest Upgrade
When I want something brighter, I add 1 teaspoon of lemon or orange zest to the dough. The citrus plays beautifully with the vanilla – it’s like sunshine in cookie form! Just make sure to zest the fruit before juicing (another lesson learned the messy way).
Chocolate Chip Surprise
Sometimes I’ll replace half the sprinkles with mini chocolate chips for a “confetti cookie” effect. The kids go wild when they bite into a cookie and get both rainbow colors AND chocolate. Semi-sweet works best since the sprinkles already add plenty of sweetness.
Almond Extract Option
For grown-up gatherings, I swap 1/2 teaspoon of the vanilla for almond extract. It gives this subtle sophistication that pairs beautifully with coffee. Just don’t go overboard – almond extract is powerful stuff!
The possibilities are endless – I’ve even done matcha powder for green tea cookies (reduce flour by 1 tbsp) and cinnamon sugar sprinkles for fall. Whatever variation you try, remember the golden rule: keep that dough unchilled and your oven preheated! Happy baking, friends.
Nutritional Information
Okay, let’s talk numbers – but first, my standard baking blogger disclaimer: these are estimates! Your exact cookie’s nutrition will vary based on how big you make them, your specific ingredients, and whether you sneak extra sprinkles (no judgment here). I calculated these based on getting exactly 24 cookies from the batch, which is about a tablespoon of dough each. Here’s the breakdown per cookie:
- Calories: 80
- Sugar: 5g
- Sodium: 35mg
- Fat: 3g (1.5g saturated, 1g unsaturated)
- Carbohydrates: 12g
- Protein: 1g
- Cholesterol: 15mg
A few notes from my kitchen experiments: Using salted butter instead of unsalted adds about 20mg more sodium per cookie. If you use margarine, the saturated fat drops but you’ll get more trans fats (which is why I stick with real butter). And yes, I did once weigh every single ingredient and calculate precisely – turns out my “tablespoon” dough balls were actually more like tablespoon-and-a-half when I got excited, which explains why some batches had juicier numbers!
The sprinkles contribute minimal calories (about 5 per cookie) but maximum joy – totally worth it in my book. These aren’t health food, but they’re portion-controlled happiness! Now if you’ll excuse me, I need to go “quality test” another cookie… for science.
Common Questions About No Chill Sprinkle Cookies
After sharing this recipe with countless friends (and their friends’ friends!), I’ve heard all the burning questions about these magical no-chill cookies. Here are the answers to what everyone wants to know:
Can I use margarine instead of butter?
Technically yes, but I don’t recommend it. Margarine has more water content, which can make your cookies spread too thin or turn out greasy. That said, when my neighbor ran out of butter last minute, we used margarine in a pinch and the cookies were still decent – just flatter and slightly less flavorful. If you must substitute, look for a margarine with at least 80% fat content.
Why don’t these need chilling like other sugar cookies?
The magic is in the ratios! Most sugar cookie doughs need chilling to firm up because they’re high in butter. Our recipe uses less butter and includes an egg for structure, plus the flour-to-fat ratio is spot-on for immediate baking. I once tested chilling this dough just to see – the cookies came out dense and didn’t spread properly. Trust me, no chill means happier cookies!
How do I prevent flat cookies?
Flat cookie tragedy! Three likely culprits: 1) Your butter was too soft/melted (it should dent when poked but hold its shape), 2) You overmixed after adding flour (develops too much gluten), or 3) Your baking powder is old (test it by mixing with hot water – if it doesn’t bubble, replace it). Also, always bake on the middle rack – bottom racks make cookies spread faster.
Can I make these without sprinkles?
Absolutely! The base dough is delicious plain – like a soft sugar cookie. Sometimes I’ll roll the dough balls in cinnamon sugar before baking for a different twist. But fair warning: Without sprinkles, they might disappear even faster. My kids call the sprinkle-free version “naked cookies” and inhale them immediately.
Why do some sprinkles bleed color?
Ah, the great sprinkle debate! Nonpareils (those tiny round ones) are notorious for bleeding because their dye isn’t heat-stable. Jimmies (long cylinder sprinkles) hold up better, but even they can transfer some color if you overmix the dough. For the brightest cookies, add sprinkles at the very end and fold gently. And definitely avoid liquid food coloring in the dough – learned that messy lesson during a red velvet cookie experiment gone wrong!
Print
22-Minute No Chill Sprinkle Cookies – Easy & Chewy Bliss
- Total Time: 22 mins
- Yield: 24 cookies
- Diet: Vegetarian
Description
Easy-to-make sprinkle cookies that require no chilling time.
Ingredients
- 1 cup flour
- 1/2 cup sugar
- 1/4 cup butter
- 1 egg
- 1 tsp vanilla extract
- 1/2 tsp baking powder
- 1/4 tsp salt
- 1/4 cup sprinkles
Instructions
- Preheat oven to 350°F (175°C)
- Mix flour, sugar, baking powder, and salt
- Add butter, egg, and vanilla extract
- Stir in sprinkles
- Drop spoonfuls onto baking sheet
- Bake for 10-12 minutes
Notes
- Store in airtight container for up to 5 days
- Dough can be frozen for later use
- Prep Time: 10 mins
- Cook Time: 12 mins
- Category: Dessert
- Method: Baking
- Cuisine: American